
Transform Your Fireplace: A Step-by-Step Guide to Building a Rustic Wood Beam Mantel
We are absolutely thrilled to share our latest DIY project, a journey we’ve wanted to embark on for quite some time: crafting a stunning **DIY wood beam mantel** for our fireplace. The original mantel never quite captured the essence we envisioned for our home, prompting us to design and build a rustic wood beam that perfectly complements the fireplace’s style. The transformation is remarkable, and we couldn’t be happier with the new focal point it creates in our living space.
The Inspiration Behind Our Rustic Fireplace Mantel Makeover
Our fireplace, initially, lacked a mantel entirely. From the moment we moved in, I knew this needed to change. A fireplace without a mantel feels incomplete; it’s the heart of the room and an essential canvas for seasonal and personal decor. Without it, the fireplace simply blended into the wall, missing its potential as a cozy, inviting centerpiece. We soon installed a mantel, but it never truly felt right.
The first mantel we built had a reddish-brown finish on the shelf and side molding. To try and integrate it better with our existing decor, I applied a thin wash of white paint, hoping to create a more cohesive look with the fireplace tiles. While it was an improvement, I still wasn’t completely satisfied. It lacked the character, warmth, and substantial feel I had always envisioned. The design felt too generic, failing to capture the unique, rustic charm we desired for our home.
After countless hours spent browsing online and observing various fireplace designs on TV, a clear vision emerged: a chunky, wooden beam mantel. I imagined something akin to a reclaimed barn wood beam – robust, authentic, and full of natural texture. This style, I believed, would perfectly align with the cozy and slightly rustic aesthetic we cultivate throughout our house, especially complementing the Spanish-style architectural elements. My husband quickly got on board with the idea, and together, we planned our **fireplace renovation**.
Gathering Your Materials for a DIY Wood Beam Mantel
Our first step was a trip to the lumber section of Home Depot. We were on the hunt for the perfect piece of wood to serve as our **DIY wood beam mantel** shelf. After sifting through several options, we settled on a sturdy 4×6 wood post. This dimension offered the substantial, chunky look we desired, providing ample depth for decorating without overwhelming the fireplace itself. Pine, with its natural knots and grain patterns, was the ideal choice for achieving that authentic rustic aesthetic we were after.
Essential Materials and Tools:
- A 4×6 wood post (or similar dimension for your desired look)
- Wood saw (for cutting to size)
- Sander (orbital or belt sander) and various grits of sandpaper
- Wood stain (we used Minwax Dark Walnut)
- Clean rags or brushes for stain application
- Safety gloves and eye protection
- Drop cloths or tarps
- Wood filler and paint (for patching old molding areas)
- Chisel or router (if carving for brackets)
- Existing steel brackets (or new mounting hardware)
The Installation Process: Building Your Rustic Mantel
With our chosen wood beam in hand, the real work began. The initial phase involved carefully preparing the fireplace area for its new centerpiece. My husband meticulously cut the 4×6 wood post to the precise length required to fit snugly above our fireplace. This accuracy is crucial for a professional and finished look.
Preparing the Fireplace and Beam:
- Removing Old Elements: We carefully removed the existing side molding that flanked the fireplace. This step was essential to create a clean slate for our new beam.
- Patching and Painting: After the molding was gone, we patched any holes or imperfections in the wall around the fireplace tiles. A fresh coat of paint ensured a seamless, tidy background for the upcoming **rustic fireplace mantel**.
A key challenge arose with the existing steel brackets that previously supported the old, thinner mantel shelf. Our new 4×6 wood beam was significantly thicker, meaning it wouldn’t sit flush against the wall if placed directly on the brackets. To address this, my husband skillfully carved out specific spaces on the back of the wood beam, allowing it to fit perfectly over the protruding steel brackets. This custom notching ensured the beam would rest securely and flush against the wall, creating a robust and integrated look that is crucial for any **DIY wood beam mantel** installation.
Sanding and Staining for the Perfect Finish:
Once the beam was cut and notched, the next crucial step in our **woodworking for beginners** friendly project was sanding. My husband meticulously sanded the entire beam with his handy dandy sander, ensuring all surfaces were perfectly smooth to the touch. This not only prepares the wood for a flawless stain application but also removes any rough edges, making it safe and pleasant to interact with.
For the finish, I knew I wanted a deep, rich color that would highlight the wood’s natural grain and complement our home’s palette. We initially experimented with a lighter pine shade, but it didn’t quite hit the mark, perhaps emphasizing the wood’s red undertones more than desired. We quickly pivoted to Minwax stain in **Dark Walnut**, and the results were exactly what we had envisioned. This choice imparted a beautiful, profound color, giving the beam an aged, substantial feel.
The staining process itself, while straightforward, involved careful application and sufficient drying time. We applied several coats, allowing each to penetrate and dry thoroughly. A word of caution: wood stain can have a strong odor. To mitigate this, we let the mantel sit outside for a day or two until the smell completely dissipated, ensuring our indoor air quality remained pleasant.
Final Installation and Enjoyment:
Once the stain was dry and the fumes were gone, we carefully brought the finished **mantel shelf** inside. The beam perfectly slipped into place, resting securely on the prepared steel brackets. The fit was snug and stable, confirming the precision of the earlier carving. Seeing it installed, we realized this was one of the most impactful yet surprisingly easy **DIY projects** we’ve ever undertaken. The longest part of the entire process was patiently waiting for the stain to dry and cure!
Decorating Your New Rustic Mantel: Simple Touches, Big Impact
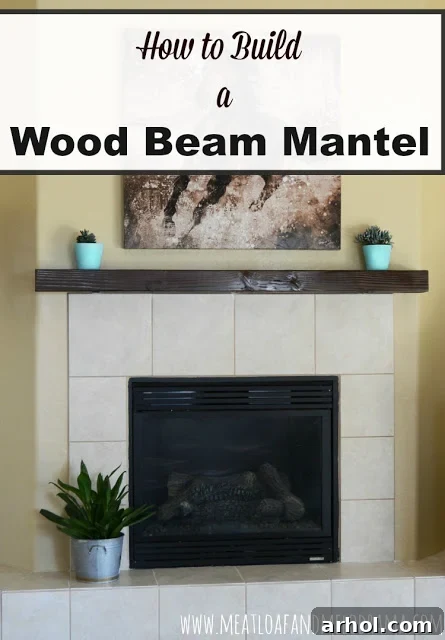
With our gorgeous new **DIY wood beam mantel** in place, it was time for the fun part: decorating! For now, I wanted to keep the decorations simple, allowing the beauty of the dark walnut beam and the fireplace itself to shine. I chose two charming potted succulents, which add a touch of greenery and life to the rustic setting. I found the pots at the Dollar Store and gave them a quick makeover by painting them a cheerful, summery turquoise shade, adding a pop of color against the rich wood.
The beauty of pine wood, with its natural knots and grooves, truly shines through the dark stain. These imperfections are precisely what give the mantel its authentic, rustic character – a feature I absolutely adore. It tells a story and adds a unique charm that manufactured pieces simply can’t replicate.
The chosen **Dark Walnut stain** harmonizes perfectly with the warm brown tones present in the horse picture hanging above the mantel. In fact, that very picture served as a subtle inspiration for the entire mantel project. Given that we often see horses in our area, the rustic, earthy aesthetic of the new mantel and the artwork together create a cohesive and deeply personal narrative for our home. To further enhance the rustic feel, I picked up an old galvanized bucket from a thrift store this past weekend. It makes a wonderful, charming planter, and I’m already on the hunt for more!
The End Result: A Fireplace Transformed
We absolutely adore this **DIY wood beam mantel**; it surpasses our original one in every way. Its rustic charm and substantial presence fit the Spanish style of our house to perfection, adding an authentic, warm element that was previously missing. It has truly become the statement piece we always wanted for our living room, drawing the eye and inviting warmth. My husband is equally thrilled, not only with the stunning outcome but also with the satisfaction of crossing another significant **DIY home improvement** project off our list!
This project proves that with a clear vision, a few basic tools, and a weekend of effort, you can achieve a truly custom and beautiful result. If you’re looking to upgrade your fireplace, consider embracing the timeless appeal of a rustic wood beam mantel. It’s an investment in your home’s character that pays dividends in style and coziness.
Thank you for joining us on this exciting **fireplace design ideas** journey and taking the time to read about our **DIY wood beam mantel** transformation. We hope it inspires you to tackle your own home projects!
You May Also Like These DIY Home Projects