
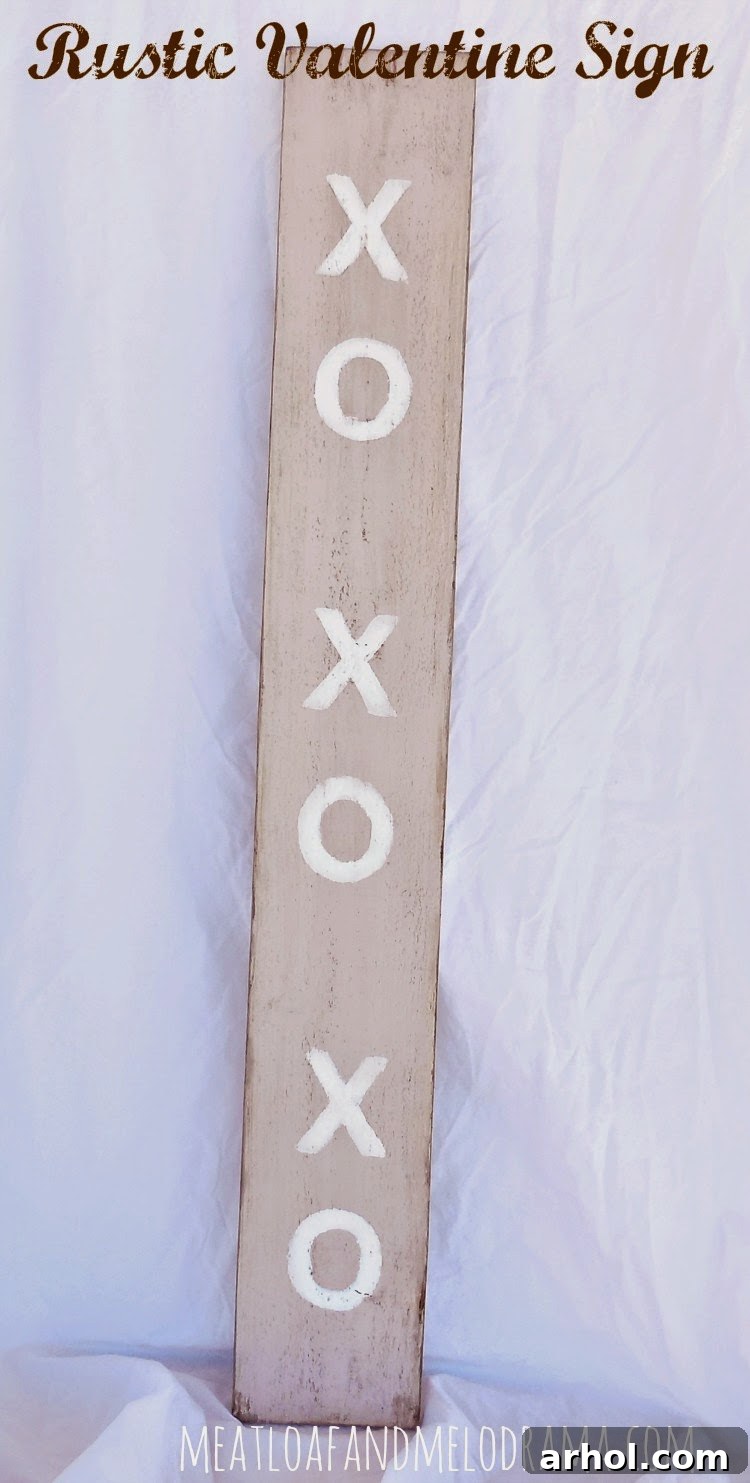
DIY Rustic Valentine’s Day Sign: Crafting Charming XO XO Decor for Your Home
Hello, creative friends! I hope your recent weekend was as productive and inspiring as mine. We certainly had a bustling couple of days, but I’m absolutely thrilled to report that I managed to check off some exciting items from my never-ending to-do list. Not only did we make significant strides on our kitchen island renovation, but I also completed a delightful new piece of decor: a charming rustic Valentine’s Day sign specifically designed for our family room!
While I typically don’t go all out with extensive Valentine’s Day decorations, I really wanted a special, heartfelt piece to replace the “Believe” sign that had beautifully adorned our home during the Christmas season. The outcome of this new project has me utterly smitten, and I simply couldn’t wait to share the entire step-by-step process with you. If you’re searching for an accessible, rewarding, and charming DIY project to infuse a touch of love into your living space, then you’ve certainly come to the right place. Let’s get crafting!
Embracing Rustic Charm with a Shabby Chic Twist for Valentine’s Day
When my thoughts turn to Valentine’s Day, my imagination often conjures images of soft, delicate pastels rather than the bold, traditional deep reds. There’s an inherent romance and gentle allure in muted hues that perfectly resonates with the tender sentiment of love. This vision strongly influenced my choice to use a very delicate, soft pink shade as the foundational color for my sign.
I’ve always been profoundly drawn to the elegant, artfully worn aesthetic of shabby chic decor. However, with a vibrant, bustling household filled with energetic kids, maintaining that pristine, delicate look can often prove to be quite a formidable challenge! Consequently, I frequently find myself gravitating towards a more resilient and forgiving rustic vibe. For this particular project, my intention was to harmoniously blend both styles, thereby creating a piece that feels both charmingly aged and robust enough to withstand the rigors of everyday family life. This sign, I truly believe, beautifully marries the timeless warmth of rustic character with the understated elegance of shabby chic, resulting in a unique and captivating decor item.
Essential Materials for Your DIY Rustic Valentine Sign
One of the most appealing aspects of embarking on this DIY project is the surprisingly few materials you’ll require, many of which you might already have tucked away in your crafting stash or garage. It’s a fantastic opportunity to engage in sustainable crafting by upcycling and transforming forgotten items into something truly beautiful and meaningful.
- An old wood board: I personally utilized a 1×6 inch board that I salvaged from my scrap wood collection. Any piece of reclaimed wood will work wonderfully, as its natural imperfections and history will only contribute to the authentic rustic character of your finished sign.
- Sandpaper: Essential for a quick initial preparation of the wood surface and, later, for achieving that desirable distressed effect. A fine-grit sandpaper (around 120-220 grit) is typically sufficient.
- Annie Sloan Chalk Paint (Antoinette): This exquisite soft pink hue is absolutely ideal for imparting a subtle yet elegant Valentine’s touch. Of course, you are welcome to choose any pastel chalk paint color that aligns with your personal aesthetic and existing home decor.
- White Craft Paint: This will be used for meticulously painting the iconic “XO XO XO” lettering onto your sign, providing a lovely contrast to the base color.
- Cardboard letters (XO XO XO): These are incredibly useful as temporary stencils or reliable tracing guides, making the lettering process much simpler and more accurate.
- Pencil: An indispensable tool for lightly tracing the outlines of your letters onto the painted board.
- Small Paint Brushes: You’ll need a couple of these – one for smoothly applying the chalk paint and another, smaller brush for the detailed work of filling in the letters.
- Dry Brush (optional but highly recommended): A slightly stiffer, older brush is perfect for this specialized technique, used for both distressing and adding definition with a darker contrasting color.
- Burnt Umber Craft Paint (optional): This rich, dark brown shade is fantastic for adding depth, dimension, and an authentic aged look to the edges and crevices of your sign.
- Picture Wire and Hardware (optional): If your intention is to hang your beautifully crafted sign on a wall, you’ll need this hardware to ensure secure and easy display.
- Clean Cloths/Rags: Always handy for wiping away excess paint, cleaning brushes, or for general tidy-up during your project.
Step-by-Step Guide: Crafting Your Rustic XO XO Valentine Sign
Step 1: Prepare Your Wood Board for Its Transformation
Every truly remarkable DIY project begins with a well-prepared foundation. For this rustic Valentine’s sign, I started by carefully selecting an old 1×6 inch wood board from my cherished collection of reclaimed materials. The inherent beauty of using salvaged wood lies in its unique history and character, which immediately lends an authentic, lived-in feel to any rustic aesthetic. Before any paint could even be considered, I subjected the board to a very quick, light sanding. The primary objective here wasn’t to achieve a flawlessly smooth, furniture-grade finish; rather, the goal was simply to eliminate any potential stray splinters or particularly rough edges that might impede the painting process or make handling the board uncomfortable or unsafe. Just a few swift, deliberate passes with sandpaper were all it took to perfectly prime the wood for its exciting transformation.
Step 2: Apply the Base Coat with Annie Sloan Chalk Paint
With the wood board now impeccably prepped, it was time to introduce the foundational layer of color. For this specific project, I made the conscious choice to use Annie Sloan Chalk Paint in the wonderfully soft shade “Antoinette.” I had acquired a small jar of this particular paint a couple of months prior, brimming with anticipation to finally experiment with its unique qualities, and crafting this Valentine’s sign presented itself as the absolutely perfect opportunity. Chalk paint is highly celebrated for its impressively quick drying time and its remarkable ability to adhere flawlessly to almost any surface without the need for extensive or tedious preparation. I applied a rough, intentionally somewhat uneven coat of the “Antoinette” pink. The aim was explicitly not perfection, but rather to establish a textured base that would gracefully contribute to the charmingly distressed, aged look we would achieve later in the process. Incidentally, I’m also planning to incorporate this very same lovely color into a table I’m currently in the process of redoing, so this sign project served as an excellent and practical test run!
Step 3: Precisely Trace Your “XO XO XO” Design
This is the stage where the magic of personalization truly begins to unfold! My delightful little “Diva” (my ever-creative daughter) enthusiastically suggested incorporating the classic “XO XO XO” motif, and I immediately knew it was absolutely perfect for a heartwarming Valentine’s sign. To ensure the letters were rendered just right—neatly proportioned and aesthetically pleasing—I employed an incredibly simple yet highly effective tracing technique: utilizing cardboard letters as reliable guides. I carefully positioned each cardboard letter onto the freshly painted board and, with a light touch, traced around their perimeters using a pencil. This method is extraordinarily easy to execute and guarantees that your lettering will be consistently well-proportioned and perfectly centered, effectively eliminating the guesswork often associated with freehand drawing. Even if your tracing isn’t absolutely flawless, rest assured that those slight, charming imperfections will only enhance the authentic rustic character of your finished sign!
Step 4: Fill in the Letters with Crisp White Paint
Once the “XO XO XO” outlines were clearly and precisely visible on the board, it was time to infuse them with life and vibrancy using crisp white paint. This particular step proved to be a wonderfully joyous and collaborative one, as my enthusiastic kids eagerly volunteered their help, eager to contribute to the creative process. I was, naturally, more than happy to let them participate! One of the truly fantastic advantages of working within a distressed or rustic style is that any minor “mistakes” or unintentional smudges are incredibly forgiving and can often be easily incorporated into the overall aesthetic. I reasoned that any stray marks or slightly uneven lines from their painting efforts could simply be lightly sanded away during the subsequent distressing phase, thereby making this a wonderfully stress-free, fun, and genuinely inclusive activity for everyone involved. It truly encapsulates the heartwarming spirit of homemade charm and collaborative creation.
Step 5: Clean Up and Refine the Lettering
To my genuine and delightful surprise (though, perhaps, not entirely unexpected given their enthusiasm!), the kids did an absolutely marvelous job meticulously filling in the letters. Their spirited participation truly translated into remarkably neat work, leaving me with hardly any significant touch-ups to perform. My primary task after allowing the white paint to thoroughly dry was simply to carefully erase any residual pencil marks that might have subtly peeked out from underneath the freshly applied white paint. This crucial final step ensures a clean, impressively crisp finish for the lettering, while still beautifully preserving that undeniably charming, handmade, and slightly imperfect feel that is so characteristic of rustic decor.
Step 6: Skillfully Distress for an Authentic Aged Look
Now, we arrive at the truly enjoyable part of the process—the step that genuinely extracts and emphasizes the “rustic” essence in our rustic Valentine sign! Once the paint was entirely dry and fully cured, I took a piece of sandpaper and began the artful process of lightly distressing the entire surface of the sign. My focus was primarily directed towards the edges, the corners, and other areas where natural wear and tear would organically manifest over time. The ultimate objective here was to subtly reveal tantalizing hints of the natural wood grain peeking through the paint layers, thereby creating that exquisitely weathered, delightfully vintage appeal. This purposeful distressing technique instantly infuses the sign with an undeniable sense of character and profound depth, making it appear as though it has been a treasured heirloom for generations.
Step 7: Enhance Definition with the Dry Brushing Technique
Even after the thorough distressing, I intuitively felt that the sign could benefit from just a little more visual punch, particularly to make the bright white “XO XO XO” letters truly stand out and command attention. This is precisely where the nuanced dry brushing technique comes into its own. I carefully selected a small, relatively stiff brush, dipped its bristles into some burnt umber craft paint, and then meticulously blotted almost all of the paint off onto a clean paper towel. It’s crucial that the brush is nearly dry, leaving behind just the barest hint of pigment. With this “dry” brush, I then very lightly and carefully brushed around the perimeter of the sign’s edges and gently worked the almost-dry paint into some of the natural crevices and minor imperfections present in the wood. This subtle, strategic application of a darker contrasting color adds an incredible level of definition, profoundly enhances the already distressed areas, and imparts to the sign a rich, antique-like patina, unequivocally making the white letters truly “pop” against the soft pink background.
The Final Touch: A Unique Hue and Versatile Display Options
And just like that, with the final artistic flourishes applied, the rustic Valentine sign was triumphantly complete! It’s always a fascinating phenomenon how colors can subtly transform and reveal different nuances depending on their surrounding environment and ambient lighting conditions. While technically the base shade I used is a soft, delicate pink, in the warm, natural light of our home, it magically takes on more of a lovely, inviting peachy-tan hue. This charming and somewhat unexpected warmth blends absolutely perfectly with our existing tan walls, creating an incredibly harmonious, cohesive, and inviting atmosphere. It serves as a beautiful reminder that sometimes, the true, profound beauty and versatility of a color only fully reveal themselves when placed within their intended context.
To ensure the sign was perfectly display-ready, I securely attached some durable picture wire to its back. This ingenious addition allows for effortless hanging on any wall, instantly transforming a blank space. However, I encourage you not to limit its potential solely to wall display! This incredibly versatile piece would also look absolutely enchanting propped up casually on a mantelpiece, gracefully nestled amongst books on a bookshelf, or even adorning a welcoming front porch, greeting guests with a touch of handmade warmth. Its inherent rustic appeal makes it wonderfully suitable for a myriad of settings and styles, consistently adding a heartwarming and personal touch wherever it finds its place.
Why Choose DIY for Your Valentine’s Day Decor?
Embarking on the journey of creating your own Valentine’s Day decor offers a multitude of benefits that extend far beyond simply possessing a beautiful finished product:
- Personalization: DIY allows you the freedom to meticulously choose colors, heartwarming phrases, and distinct styles that perfectly align with your home’s aesthetic and your personal taste, ensuring your decor is truly one-of-a-kind.
- Cost-Effectiveness: By cleverly utilizing scrap wood and readily available, affordable craft paints, DIY projects often prove to be significantly more economical than purchasing mass-produced, store-bought decorations.
- Creative Outlet: Crafting offers a fantastic opportunity to de-stress, express your inherent creativity, and immerse yourself in a genuinely rewarding hands-on activity that fosters mindfulness.
- Family Fun: Engaging children (just like my own!) in the crafting process can transform a simple project into a cherished family memory, actively fostering their creativity, improving fine motor skills, and imbuing them with a valuable sense of accomplishment.
- Sustainable Practice: Thoughtfully upcycling old materials gives them a vibrant new lease on life, effectively reducing waste and promoting eco-friendly habits in your home.
Additional Tips for Your Own Rustic Sign Project Success
If you’re feeling inspired and eager to create your very own rustic Valentine sign, here are a few extra tips and considerations to ensure your project is not only successful but also deeply enjoyable:
- Experiment with Colors: While I opted for a soft pink, feel absolutely free to explore and choose any color palette that truly speaks to your heart and complements your home. Muted blues, creamy off-whites, subtle grays, or even light greens can yield equally stunning and uniquely rustic Valentine signs.
- Vary Your Distressing: Don’t be timid about experimenting with the degree of distressing you apply. For a more pronounced, heavily aged look, sand with a bit more vigor and focus. Conversely, for a more delicate, subtle touch of wear, keep your sanding light and gentle.
- Consider Pre-made Stencils: If the idea of tracing by hand isn’t your preference, don’t worry! Widely available pre-made stencils for letters and phrases can provide an exceptionally clean, crisp, and professional finish to your lettering.
- Sealing Your Sign: For enhanced durability and longevity, especially if your sign is destined for outdoor display or high-traffic areas, seriously consider applying a clear protective wax (such as Annie Sloan’s Clear Wax) or a matte polycrylic sealer after all paint layers and distressing are completely finished and dry.
- Other Phrase Ideas: Beyond “XO XO XO,” consider alternative heartwarming phrases such as “Love,” “Be Mine,” “Sweetheart,” “Our Love Story,” or even a significant date that holds special meaning for you.
Share Your Love and Creativity!
I’m currently channeling all my creative energy into meticulously decorating our mantelpiece, and I’m incredibly excited about the prospect of unveiling the finished look to you all very soon! In the meantime, I would absolutely love to hear from you. Do you revel in the joy of decorating for Valentine’s Day, infusing your home with themed touches? Or do you perhaps prefer to celebrate the occasion with the timeless classics of rich chocolates and a beautiful, fragrant bouquet of flowers? Or perhaps, like many, you enjoy a delightful blend of both?
Whatever your preferred way to celebrate this season of love, I sincerely hope that this DIY project inspires you to add a little handmade warmth and heartfelt love to your home. Thank you so immensely for stopping by and sharing a moment of creative joy with me. Enjoy the remainder of your day, filled with warmth, happiness, and good cheer!
Discover More Rustic & DIY Sign Ideas!
If you thoroughly enjoyed crafting this charming rustic Valentine’s sign and are eager for more hands-on creativity, you might also find immense pleasure in these other inspiring DIY projects that bring a unique handmade charm to your home throughout the year:
Rustic Christmas Porch Sign
DIY Wood and Burlap Believe Sign