
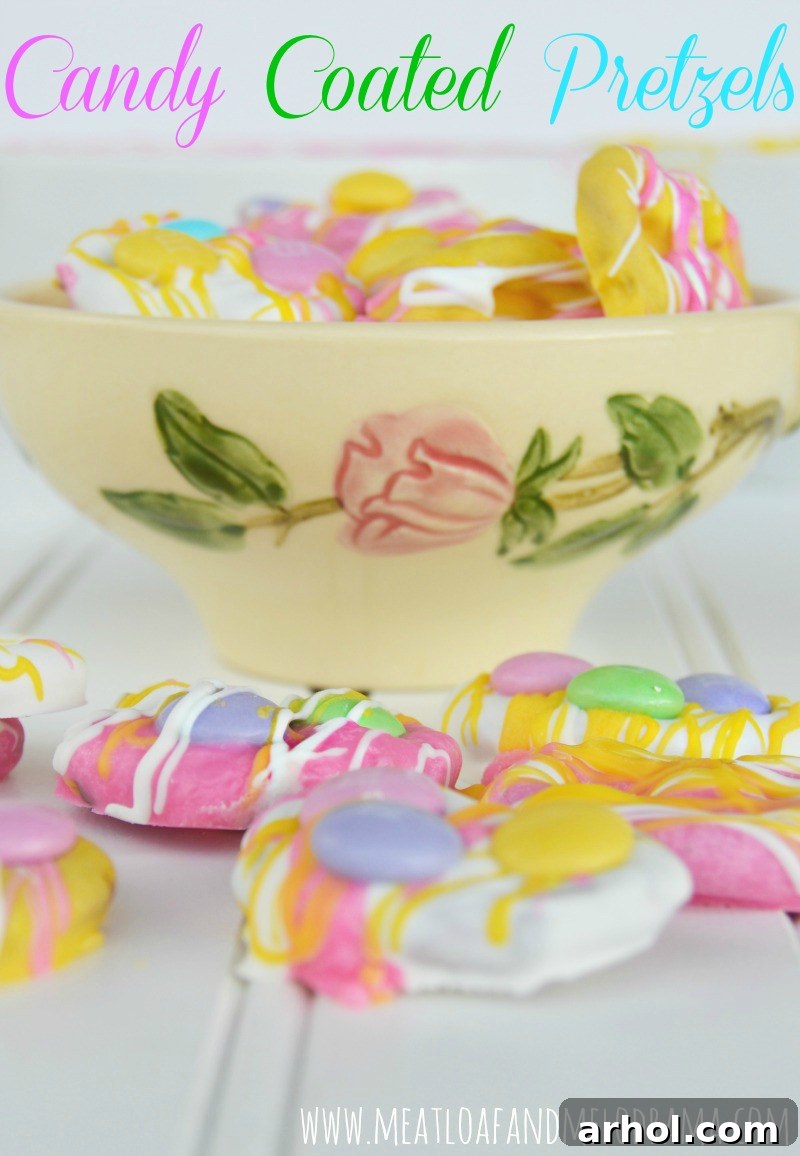
Spring has officially sprung, bringing with it a vibrant palette of pastel colors, longer days, and a renewed sense of joy! And what better way to celebrate the season than with a batch of homemade treats? Recently, during a trip to the craft store with my kids, we stumbled upon an irresistible display of Wilton Candy Melts. The array of cheerful hues—from sunny yellows to soft pinks and crisp whites—practically leaped into our shopping cart. Having enjoyed success with these melts for Valentine’s Day goodies, we knew exactly what our next project would be: crafting some beautiful and utterly addictive Candy Coated Pretzels for Spring.
Delightful Spring Candy Coated Pretzels: Your Ultimate Guide to Easy Homemade Treats
While I might not always gravitate towards pastels in everyday life, there’s something truly enchanting about the soft, muted tones that emerge with Easter and the spring season. They evoke feelings of sunshine, happiness, and fresh beginnings. For this particular culinary adventure, we initially considered making candy-coated cookie dough. However, the thought of an overly sweet treat quickly led us to embrace the timeless appeal of pretzels instead. The harmonious marriage of salty and sweet in these delightful morsels is nothing short of magical, making them dangerously addicting!
Why Candy Coated Pretzels are the Perfect Spring Treat
There’s an undeniable charm to candy-coated pretzels that makes them a go-to for any occasion, but especially for spring. Their simplicity belies a sophisticated flavor profile where the crisp, salty crunch of the pretzel perfectly balances the smooth, sweet coating of the candy melts. This delightful contrast isn’t just a treat for your taste buds; it’s a feast for the eyes too, especially when dressed in spring’s signature pastel hues.
These treats are incredibly versatile, making them ideal for everything from Easter brunch and garden parties to casual afternoon snacks or thoughtful homemade gifts. Plus, they’re a fantastic activity for kids, encouraging creativity and providing a delicious reward at the end. The hands-on process of melting, dipping, and decorating is not only fun but also yields a personalized touch that store-bought treats simply can’t match.
Gather Your Ingredients and Tools
Making these charming spring pretzels requires just a few simple ingredients and basic kitchen tools. The beauty lies in their accessibility and ease of preparation, ensuring that anyone can whip up a batch of these delightful snacks.
Essential Supplies:
- Wilton Candy Melts: We chose yellow, pink, and white to capture the quintessential spring aesthetic. Wilton Candy Melts are fantastic because they melt smoothly and come in a vast array of vibrant colors, making them perfect for festive treats. You can also explore other pastel shades like lavender or light blue to broaden your spring palette.
- Mini Pretzels: The classic mini pretzel twists are ideal for dipping as their size allows for easy handling and a good candy-to-pretzel ratio. Pretzel rods are another excellent option, offering a larger canvas for decoration and a satisfying crunch.
- Pastel M&M’s: These add a delightful pop of color, an extra layer of sweetness, and a satisfying little crunch. Look for the spring-themed M&M’s bags that feature softer pastel shades. Alternatively, sprinkles, chopped nuts, or even a contrasting drizzle of another candy melt color can make fantastic toppings.
Additional Equipment You’ll Need:
- Microwave-safe Bowls: Essential for melting the candy melts efficiently. Having separate bowls for each color prevents mixing and ensures clear, distinct hues.
- Spoons or Dipping Tools: Forks or specialized candy dipping tools are incredibly helpful for submerging pretzels and gently tapping off excess candy coating.
- Parchment Paper or Wax Paper: Crucial for lining your drying surface. This prevents the coated pretzels from sticking and makes for easy cleanup.
- Baking Sheet or Flat Surface: To hold the parchment paper and dipped pretzels while they set.
Step-by-Step Directions to Create Your Spring Pretzels
The process of making candy coated pretzels is straightforward and enjoyable. Follow these steps for perfectly coated and beautifully decorated treats.
1. Melting the Candy Melts: Precision is Key
Start by placing your Wilton Candy Melts into separate microwave-safe bowls, one color per bowl. The key to perfectly melted candy is low and slow heating. Begin by microwaving each bowl for 30 seconds. After the initial heating, stir the melts thoroughly. Even if they don’t look melted, stirring helps distribute the heat. Continue microwaving in 15-second increments, stirring well after each interval, until the candy is fully melted and smooth. Be careful not to overheat, as this can cause the candy to seize or burn, making it thick and difficult to work with. If your candy melts seem too thick, you can add a tiny amount (1/2 teaspoon) of vegetable shortening or coconut oil to thin them out slightly, stirring until smooth.
2. Dipping and Coating Your Pretzels
Once your candy melts are perfectly smooth and fluid, it’s time to dip the pretzels! Hold a mini pretzel by one end and carefully submerge it into the melted candy, coating about two-thirds or three-quarters of the pretzel. Gently lift the pretzel out of the candy and lightly tap it against the side of the bowl to allow any excess coating to drip off. This helps create a smooth, even layer without too much bulk. You want enough candy to coat, but not so much that it pools excessively.
3. Decorating with Flair
Immediately after dipping each pretzel, place it onto a sheet of parchment or wax paper. This is the perfect moment to add your decorations! While the candy is still wet, sprinkle liberally with pastel M&M’s. You can also get creative by drizzling a different color of melted candy over the dipped pretzels using a spoon or a piping bag with a tiny hole. For example, drizzle white candy over pink-dipped pretzels, or vice versa. The vibrant combinations make each pretzel a miniature work of art.
4. Allowing Them to Set
Once decorated, allow the candy coated pretzels to set completely. This can take anywhere from 30 minutes to an hour at room temperature, depending on the humidity and temperature of your kitchen. For faster setting, especially if you’re in a hurry or your kitchen is warm, you can carefully transfer the baking sheet to the refrigerator for about 10-15 minutes. Once the candy is firm to the touch, they are ready to enjoy!
Creative Variations and Customization
One of the best aspects of this recipe is how easily it can be customized to suit different tastes and occasions. While we adore the pastel M&M’s, there are endless possibilities for personalization.
We encountered a playful debate in our household: the chocolate lovers versus the non-chocolate lovers. Some requested we leave off the chocolate M&M’s on a few pretzels, and of course, we obliged! However, for those who appreciate the full spectrum of flavor, the combination of crunchy pretzel, sweet candy coating, and a hint of chocolate from the M&M’s is truly exceptional. Seriously, the non-chocolate lovers are missing out on a delightful layer of complexity!
Beyond M&M’s, consider these delightful variations:
- Sprinkle Extravaganza: Use various shapes and colors of sprinkles—nonpareils, jimmies, sugar pearls—to create different textures and visual appeals.
- Nutty Crunch: Finely chop pecans, almonds, or peanuts and sprinkle them over the wet candy for an added layer of flavor and crunch.
- Coconut Delight: Toasted shredded coconut can add a tropical twist and beautiful texture.
- Cookie Crumbles: Crush some OREO cookies or graham crackers for a unique flavor combination.
- Color Themes: Adapt the candy melt colors and toppings for any holiday or party theme! Think bold reds and greens for Christmas, oranges and blacks for Halloween, or school colors for graduation parties.
Serving Your Beautiful Creations: A Touch of Nostalgia
Once your candy coated pretzels are set, it’s time to display and share them! To truly embrace the spirit of spring and add a personal touch, I brought out my grandma’s vintage Desert Rose Franciscan Ware. This exquisite dinnerware, with its delicate floral patterns, perfectly complements the soft pastel colors of the pretzels.
This particular little bowl is one of the cherished few pieces from her extensive collection that remains completely free of chips or cracks, making it a true treasure. Using it for these homemade spring treats not only elevates the presentation but also fills me with wonderful memories of my grandmother. There’s something truly special about combining new traditions with family heirlooms, creating a beautiful bridge between generations.
Perhaps, eating candy coated pretzels out of a treasured family heirloom makes them taste even better, infused with love and memories!
These delightful treats are not just for eating; they also make wonderful gifts. Package them in clear cellophane bags tied with a pretty ribbon, or arrange them in decorative boxes for a charming hostess gift or party favor. They are perfect for Easter baskets, bridal showers, baby showers, or simply as a thoughtful gesture to brighten someone’s day.
Final Thoughts and Your Turn to Create!
We hope this guide inspires you to create your own batch of delightful spring candy coated pretzels. They are incredibly easy to make, wonderfully customizable, and guaranteed to bring smiles to faces. The combination of salty and sweet, crunchy and smooth, all dressed in beautiful spring pastels, makes them an irresistible treat for any occasion.
Whether you’re celebrating Easter, hosting a spring gathering, or simply looking for a fun kitchen project with the kids, these pretzels are a perfect choice. So grab your Wilton Candy Melts, your favorite mini pretzels, and let your creativity shine!
Thanks so very much for visiting our kitchen today. We hope you have a wonderfully sweet and joyful spring season!
You May Also Enjoy These Sweet Treats: