
Hello crafty friends and fellow creators!
Craft Your Own Whimsical Style: Easy DIY LEGO Earrings for All Ages
The holiday season is officially upon us, and the crisp, cool weather certainly sets the perfect festive mood here at my home. It’s a time for cozy evenings, warm drinks, and, of course, plenty of crafting! However, with all the joy and preparations, it seems we’ve also welcomed the season’s first round of sniffles and coughs. It’s almost a yearly tradition, isn’t it? My poor little one is battling a bug, and the way these things tend to spread from one child to the next is, well, just part of the holiday fun, I suppose!
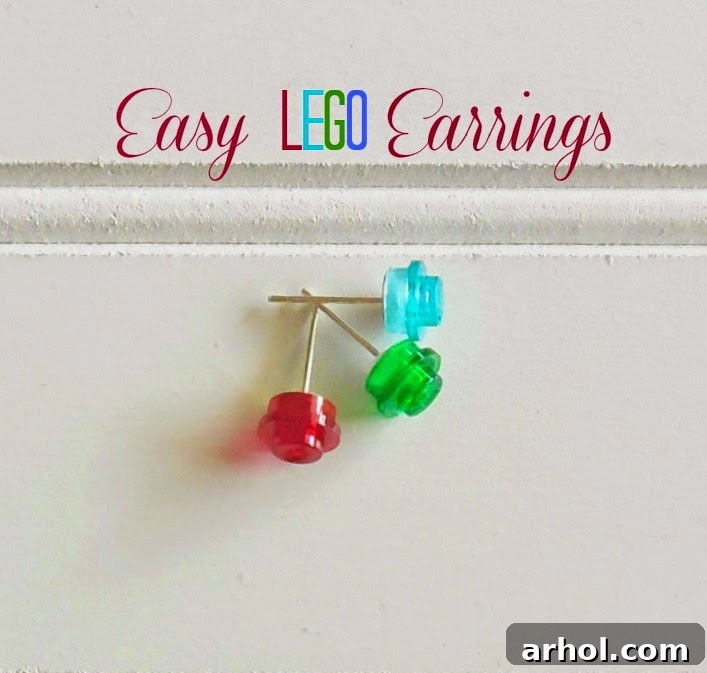
Despite the minor medical detours, our home remains a hub of creativity. LEGOs, in particular, hold a special place in our hearts. While not every child in our house is a master builder, everyone appreciates the versatility and fun that LEGO bricks bring. Just this past weekend, my older daughter embarked on a truly brilliant project: crafting her own adorable LEGO earrings. And let me tell you, even for those who aren’t die-hard LEGO enthusiasts, these earrings are an absolute game-changer. They’re unique, undeniably cool, and a fantastic way to express personality.
Beyond their charm, these DIY LEGO earrings offer an incredible advantage: affordability. If you already have a stash of LEGO bricks at home (and who doesn’t?), you can transform them into charming, personalized jewelry pieces for next to nothing. This makes them ideal for thoughtful, handmade gifts that won’t break the bank. I still cherish the pair my daughter made for me last time; I even tried to convince the kids to part with some of their tiny lightsabers for a more adventurous design, but alas, those were non-negotiable! So, we stuck with these delightful little button earrings, and they are simply super cute!
The beauty of this project lies in its simplicity and speed. You can whip up a pair of these eye-catching LEGO earrings in a matter of minutes, making it one of the easiest and most rewarding crafts you’ll ever undertake. Whether you’re looking for a quick personal accessory, a unique gift, or a fun activity to do with children, this project ticks all the boxes. Let’s dive into the minimal supplies you’ll need to get started on your own collection of whimsical LEGO jewelry.
What You’ll Need: Gathering Your LEGO Earring Essentials
One of the best aspects of this DIY craft is how few materials are required, and chances are, you might already have most of them lying around. This project is not only creatively satisfying but also incredibly budget-friendly, especially if you’re repurposing existing LEGO pieces. Here’s your straightforward shopping list:
- Round LEGO Buttons: These are the classic, small, circular LEGO pieces with a single stud on top. They come in an incredible array of colors, offering endless possibilities for customization. You can also experiment with other small, flat LEGO pieces for different looks.
- Earring Posts/Studs: These are the metal bases that will attach to your LEGO pieces and go through your earlobe. Look for flat-pad earring posts, as these provide a solid surface for gluing. They come in various sizes; ensure the pad is small enough to be discreetly hidden by your chosen LEGO piece.
- Earring Backs/Clutches: These secure the earring posts in place. You’ll commonly find silicone (for comfort) or metal (for durability) options. Make sure they fit snugly onto your chosen earring posts.
- Strong Adhesive Glue: This is arguably the most crucial component for durable earrings. We’ll discuss glue options in more detail below, but the key is to choose one that creates a strong, lasting bond between metal and plastic.
In our home, a veritable treasure trove of LEGOs awaits any creative whim. For this particular batch of earrings, my daughter thoughtfully selected vibrant red, classic green, and serene light blue round LEGO buttons. These colors are fantastic for creating eye-catching pairs or even mismatched, playful sets. You can easily find earring posts and backs at most local craft stores, often in multi-packs, making it easy to stock up for many future projects. Consider looking for hypoallergenic options if you or your gift recipient have sensitive ears.
Choosing Your Adhesive: The Key to Lasting LEGO Earrings
The type of glue you choose is paramount to the longevity and durability of your LEGO earrings. Over the years, we’ve experimented with various adhesives, each with its own set of pros and cons. Our goal is always to find a strong, reliable bond that can withstand daily wear and tear. Here’s a breakdown of our experiences and recommendations:
- Hot Glue: We tried using hot glue in the past, primarily for its quick drying time. While it certainly does the job instantly, we often found that the LEGO pieces eventually separated from the posts over time. Hot glue can be too flexible and doesn’t create a truly rigid bond for small, high-wear items like earrings. It’s great for temporary crafts, but not ideal for long-term jewelry.
- E6000 Adhesive: This is a popular choice among crafters for its industrial-strength bond and versatility. E6000 would undoubtedly work wonders for these earrings, creating a very durable connection. However, I must confess, I personally can’t stand the strong, distinctive odor it emits during application and curing. If you have a well-ventilated space and are not sensitive to strong fumes, it’s an excellent option.
- Tacky Glue: This time around, we opted for a good quality Tacky Glue. So far, we’ve had no problems, and the bond seems robust. Tacky Glue offers a good balance of strength and user-friendliness, typically being less odorous and easier to work with than stronger industrial glues. The drying time is longer, but the results are worth the wait.
- Super Glue (Cyanoacrylate Adhesive): While super glue offers a fast bond, it can sometimes be brittle and prone to cracking under stress, which might not be ideal for earrings that experience some movement. It also bonds skin instantly, so extreme caution is necessary, especially when crafting with children.
- 2-Part Epoxy Resin: For the most durable and professional-grade finish, a 2-part epoxy adhesive is an excellent choice. It creates an incredibly strong, waterproof bond. However, it requires precise mixing and has a longer cure time, making it a bit more involved for a quick craft project.
Ultimately, if you have a favorite glue that you trust for crafting small objects, by all means, use it! The most important thing is to ensure it creates a strong, lasting bond suitable for jewelry.
Step-by-Step: Crafting Your Own LEGO Earrings
Now that you have all your materials ready and your preferred adhesive selected, it’s time for the fun part: assembling your unique LEGO earrings! This process is so straightforward, you’ll be amazed at how quickly you can create several pairs.
Step 1: Prepare Your Workspace and Materials
Find a clean, well-lit surface. Lay down some wax paper or a silicone mat to protect your table from any errant glue. Have your chosen LEGO buttons, earring posts, earring backs, and glue readily accessible. If using a liquid glue, a toothpick or a small applicator stick will be invaluable for precise application.
Step 2: Apply the Adhesive
Take one earring post (the part with the flat pad). Using your chosen glue, apply a very small dab directly onto the flat pad of the earring post. A toothpick works perfectly for this, allowing you to control the amount of glue and prevent any excess from spreading. You only need a tiny amount – too much glue can squeeze out and create a messy finish. Ensure the glue covers the entire surface of the flat pad for maximum adhesion.
Step 3: Attach the LEGO Piece
Carefully pick up your desired LEGO button. Gently press the flat underside of the LEGO piece onto the glue-covered earring post. Center the LEGO piece as much as possible to ensure it sits evenly on the post. Apply gentle, even pressure for a few seconds to allow the glue to begin bonding. Avoid twisting or rotating the LEGO piece once it’s in place, as this can weaken the bond or spread glue where it shouldn’t be.
Step 4: Allow to Dry Completely
This step is crucial for the durability of your new earrings. Place the newly assembled earring on your protected surface and allow the glue to dry and cure fully according to the manufacturer’s instructions. Drying times can vary significantly depending on the type of glue you use. For Tacky Glue, this might take several hours, or even overnight, to achieve a strong, lasting bond. Resist the urge to handle or test the earrings before they are completely dry!
Once the glue has completely dried and cured, your brand-new LEGO earrings are ready to be worn! How incredibly easy is that? These charming little gems are absolutely perfect for adding a delightful dash of colorful whimsy and playful personality to any wardrobe. They’re a subtle nod to creativity and childhood joy that can brighten up even the simplest outfit.
Beyond the Buttons: Creative Variations and Personalization
While these simple round LEGO buttons are my personal favorite for their classic appeal and ease of use, don’t limit your imagination! In the past, we’ve experimented with larger LEGO bricks and different shapes, and the possibilities are truly endless. Consider these ideas to take your LEGO earring creations to the next level:
- Different LEGO Shapes: Instead of just buttons, try flat tiles (1×1, 1×2), tiny slopes, or even minifigure heads for a more quirky look. Just ensure the piece has a flat enough surface for the earring post.
- Dangle Earrings: For a more elaborate design, use a small drill bit (specifically for plastic) to carefully make a hole in your LEGO piece, then attach it to a dangle earring hook using a jump ring. This opens up even more creative avenues!
- Color Combinations: Go beyond single colors. Create striped patterns, mix and match contrasting colors, or even use pieces from specific LEGO themes for a themed pair of earrings.
- Themed Collections: Imagine a pair of tiny LEGO flowers for spring, ghost-shaped bricks for Halloween, or even miniature LEGO food pieces for a fun, foodie-inspired accessory.
- Miniature Scenes: With very small, flat LEGO pieces, you could even try to create a tiny, flat mosaic or scene before gluing it to a larger earring base.
My daughter is currently on a mission, enthusiastically making a whole bunch of these for her friends, planning to distribute them as unique, handmade gifts. And, perhaps, just maybe, she’ll remember her dear old mom in the process too! Hint, hint!
Share Your Creative Journey!
This simple DIY project offers a fantastic way to unleash your creativity, repurpose beloved toys, and create truly one-of-a-kind accessories or gifts. The joy of wearing something you’ve made yourself, or seeing the delight on someone’s face when they receive a handmade item, is truly unparalleled.
We’d absolutely love to hear from you and see your creations! Would you be adventurous enough to wear LEGO earrings, embracing a touch of playful nostalgia in your daily style? Do you often delve into the world of making your own jewelry, finding satisfaction in crafting unique pieces? If so, please share all about it in the comments below!
What are your favorite DIY jewelry techniques or materials? Do you have any secret tips for getting glue to hold on tricky surfaces? Are there other LEGO craft ideas you’ve tried or would like to see? Your stories and insights are always a wonderful source of inspiration for us and the entire crafting community. We believe that sharing ideas makes everyone’s creative journey richer and more exciting.
Thanks so much for stopping by and taking the time to read about our latest crafting adventure! I truly love having visitors join me in my little corner of the internet. Your presence and engagement make every post so much more enjoyable to create and share. Don’t be a stranger, and feel free to explore other creative projects and family fun ideas on our site.
Sharing this crafty post at: