
Easy DIY Personalized Christmas Ornaments: A Fun & Memorable Craft for Kids
The holiday season is a magical time, filled with cherished traditions, heartwarming joy, and the warmth of family togetherness. One of the most beloved customs in many homes is decorating the Christmas tree. While store-bought ornaments are undeniably beautiful, there’s an unparalleled charm and sentimental value in hanging handmade decorations, especially those crafted by little hands. Today, we’re absolutely thrilled to share an incredibly easy, super quick, and wonderfully personal ornament craft that your kids will adore – and you will too!
This project takes mere minutes from start to finish, making it perfect for even the shortest attention spans. It’s a craft that seamlessly blends creativity with sentimental value, allowing children to express themselves while creating a unique keepsake that can be treasured for years to come. For generations, personalized ornaments have been a cornerstone of our family’s holiday decor, with each passing year adding a new story and a fresh memory to our tree. About two years ago, our kids truly embraced this tradition, taking it to a new level by designing their own distinct ornaments using clear plastic balls and filling them with their most beloved small treasures.
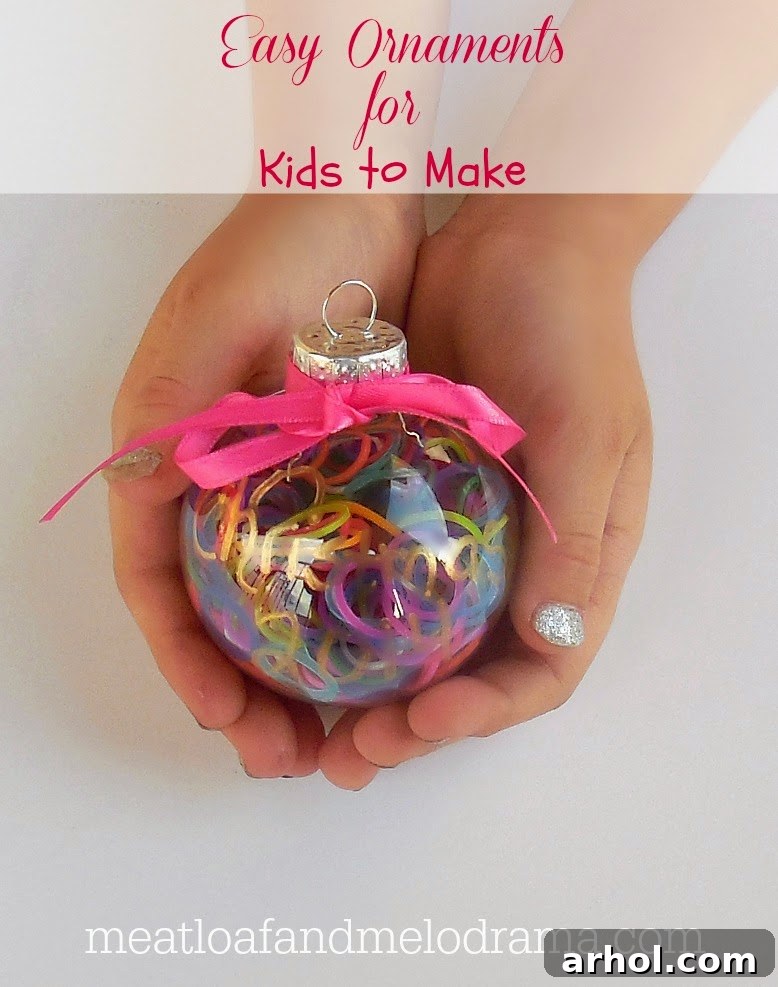
In Christmases past, we’ve witnessed a delightful array of items find their way into these clear baubles: everything from tiny action figures and charming trinkets to mini erasers and classic building blocks. This year brought fresh inspiration and individual flair: our youngest decided to use festive, Christmas-colored Legos, while our little diva, true to her vibrant personality, opted for a dazzling assortment of colorful loom bands. The true beauty of this craft lies in its delightful simplicity and the boundless possibilities it offers for genuine personalization, making each ornament a tiny reflection of its creator.
Why Personalized Ornaments are a Must-Have Holiday Tradition
Creating personalized Christmas ornaments isn’t just about making a pretty decoration; it’s about weaving memories, fostering creativity, and building traditions that families will cherish for a lifetime. Each year, as you carefully unpack these handmade treasures, you’re not merely hanging an ornament on the tree; you’re reliving a precious moment, recalling a joyful story, and appreciating the growth and evolving interests of your children. These unique pieces become tangible reminders of past Christmases, evolving right along with your family’s journey.
- Unmatched Sentimental Value: Unlike mass-produced decorations, a personalized ornament holds a piece of your child’s personality, effort, and imagination. It’s a delightful snapshot of their interests and developmental stage at that particular age, making it uniquely theirs.
- Fosters Creativity and Choice: Kids thrive on making choices. This craft provides a wonderful opportunity for them to select their own fillings, colors, and even the message they want to convey on their ornament, thereby encouraging imaginative thinking and independent decision-making.
- Easy & Accessible for All Ages: With minimal supplies and a straightforward process, this project is a low-stress activity for both parents and children, consistently yielding charming and beautiful results every single time.
- Unique & Cherished Keepsakes: Every single ornament will be one-of-a-kind, reflecting the individual who lovingly crafted it. Over time, these handmade ornaments accumulate into a beautiful collection that tells your family’s unique holiday story, year after year.
- Builds Lasting Family Traditions: Making ornaments together can easily become a cherished annual ritual, something everyone eagerly anticipates as the holiday season joyfully approaches.
Gather Your Simple Supplies for This Kid-Friendly Ornament Craft
One of the most appealing aspects of this DIY ornament project is how few supplies you actually need. Chances are, many of these items you might already have tucked away in your craft bin or around the house, making it an incredibly budget-friendly and spontaneous holiday activity. Here’s a comprehensive list of what you’ll want to gather to get started on your festive creations:
- Clear Plastic Ball Ornaments: These versatile spheres form the foundational base of your creation. You can readily find them in various sizes and styles at craft stores, discount retailers, or through online marketplaces. Some designs come in two halves that conveniently snap together, while others feature a removable metal cap at the top. For the sake of ease and little hands, we recommend the latter style, as it creates a wider opening that simplifies the filling process, preventing any frustration.
- Small Items for Filling: This is truly where the magic happens and your child’s personality gets to shine! The possibilities for fillers are genuinely endless, limited only by imagination. Our kids particularly loved using:
- Loom Bands: Especially popular for their vibrant, cheerful colors and soft, pliable texture.
- Legos or Other Small Building Blocks: Perfect for children who have a passion for construction and building. Consider using festive red, green, or white blocks for a holiday theme!
- Glitter: A timeless classic for adding instant sparkle and shimmer (a small funnel can be handy to minimize any potential mess!).
- Small Beads or Sequins: These provide a delicate, shimmering effect, catching the light beautifully.
- Miniature Toys or Charms: Think tiny action figures, miniature animal figurines, symbolic charms, or even small plastic army men.
- Ribbon Scraps or Fabric Pieces: Cut into small strips, squares, or shapes to add texture and color.
- Confetti: For an instant burst of festive cheer and playful color.
- Cotton Balls or Fake Snow: Ideal for creating a soft, wintry wonderland scene inside the ornament.
- Tiny Pinecones or Dried Berries: For a more natural, rustic, and earthy touch.
- Small Photos: Rolled up or carefully cut into small shapes to add a deeply personal and photographic element to the ornament.
Always encourage your child to choose items that are meaningful to them, or that perfectly reflect their current interests and passions.
- Ribbon or Twine: Absolutely essential for creating a sturdy hanger for your finished ornament and for adding a beautiful decorative flourish. Choose colors that wonderfully complement the chosen filling or the overall Christmas theme you’re aiming for.
- Paint Pen or Permanent Marker (e.g., Sharpie): For adding that truly personal touch – writing the year, your child’s name, or a special holiday message directly onto the outside of the ornament. White or metallic pens tend to work exceptionally well on clear surfaces, ensuring excellent visibility and a striking effect.
Step-by-Step Guide to Crafting Your Personalized Ornaments
This craft is remarkably simple, making it accessible for even toddlers to participate with a little assistance and supervision! Here’s a detailed guide on how we brought our personalized ornaments to life, creating cherished holiday memories:
- Prepare the Ornaments: If your clear plastic balls feature removable tops, gently and carefully take them off. This crucial step creates a wide, unobstructed opening for easily adding the fillings, preventing any potential frustration for smaller children trying to squeeze items through a narrow hole. If your ornaments are the snap-open variety, guide your child on how to gently open them.
- Choose and Add Your Fillings: Lay out a captivating variety of small items, perhaps in separate bowls or containers, to inspire your child. Then, empower your child to freely select what they want to put inside their ornament. My son, for instance, meticulously picked out just a few of his most treasured Legos in festive red and green hues – he wasn’t quite ready to part with too many of his precious blocks! My daughter, on the other hand, was incredibly eager to stuff her ornament full of as many loom bands as possible. Interestingly, she opted for a beautiful and unexpected mix of pastel shades, much to my son’s surprise, who had anticipated traditional reds and greens. This freedom of choice makes the craft truly unique.
Watch their little faces light up with concentration and joy as they carefully drop their chosen treasures into the clear balls. It’s a wonderful exercise in developing fine motor skills, encouraging decision-making, and fostering a sense of ownership over their creation!
- Secure the Top: Once the ornament is filled to your child’s creative satisfaction, carefully replace the metal cap or snap the two halves firmly back together. Double-check that it’s securely fastened so none of their precious, chosen items can accidentally escape!
- Add the Ribbon Hanger: Cut a suitable length of ribbon or decorative twine (approximately 8-10 inches works well for most ornaments) and thread it through the small loop on the ornament’s top. Tie it into a sturdy knot or an elegant, festive bow, creating a reliable hanger for your beautiful decoration. We opted for a classic, cheerful red ribbon for my son’s Lego ornament and a lovely, delicate pink one for my daughter’s vibrant loom band creation.
- Personalize with Writing: This step is truly what makes the ornament uniquely special and a wonderful memento. Using a good quality paint pen or permanent marker, allow your child (or you, if they’re too young for precise writing) to proudly inscribe the current year, their name, or a short, sweet holiday message on the outside of the ornament. For example, “Christmas 2024,” “[Child’s Name] Christmas,” or even a tiny drawing. While the writing can sometimes be tricky to capture perfectly in photographs, it adds immense personal charm and creates a lasting memory that will be cherished over the years. This particular year, my kids proudly wrote “Christmas 2014” on theirs, vividly marking that specific holiday memory.
- Display with Pride: Finally, hang your beautiful, handmade, and personalized ornaments on the Christmas tree! They will undoubtedly be a vibrant, meaningful, and utterly charming addition to your holiday decor. Despite the slight challenge of convincing my energetic little guy to stay perfectly still for a clear photo, the final results truly shine brightly on the tree, wonderfully reflecting all the joy, effort, and creativity poured into them.
Tips for a Smooth & Enjoyable Crafting Experience
To ensure your ornament-making session is filled predominantly with smiles, laughter, and lasting memories rather than any potential stress or frustration, here are a few incredibly helpful tips and tricks:
- Prepare Your Workspace Thoroughly: Before beginning, lay down a protective tablecloth, old newspaper sheets, or a dedicated craft mat. This simple step will effectively shield your surfaces from any glitter spills, marker smudges, or other minor crafting mishaps.
- Pre-Sort Fillings for Easy Access: If you’re offering a diverse selection of small items, consider sorting them into individual bowls, small containers, or muffin tins. This organization makes it much easier for kids to visually assess their options and make their choices without unnecessary rummaging or mess.
- Consider Age Appropriateness and Supervision: For very young children or toddlers, close supervision is absolutely essential, especially when dealing with small items that could potentially pose choking hazards. You might consider pre-opening the ornaments or pre-cutting ribbons to help them with steps that require finer motor skills. Older children, however, can typically handle most of the steps independently, fostering a greater sense of accomplishment.
- Embrace and Celebrate Imperfection: Gently remind both yourself and your children that handmade items are inherently meant to be unique and perfectly imperfect. A slightly smudged year, a few misplaced beads, or an uneven ribbon simply add to the distinctive charm and rich story of each individual ornament. It’s a testament to their personal effort!
- Make it a Cherished Annual Event: Transform this delightful craft into a cherished yearly family tradition. By doing so, you’ll gradually build a wonderful, evolving collection of ornaments that beautifully reflect your children’s growth, their changing interests, and the precious memories made together over time.
- Expand the Creative Horizons: Don’t feel limited to just one idea or one type of filling! Encourage experimentation. Try incorporating different fillings for different ornaments, or even exploring various types of clear containers, such as plastic fillable stars, hearts, or even miniature clear gift boxes.
Beyond the Christmas Tree: Other Uses for These Versatile Ornaments
While these delightful DIY clear ornaments are absolutely perfect for adorning your festive Christmas tree, their versatility and charm extend far beyond! Consider these creative and imaginative alternative uses for your beautiful, handmade creations:
- Thoughtful Gift Toppers: Elevate your gift-giving by foregoing a traditional bow and instead, tying one of these personalized ornaments to a wrapped present. It instantly adds an extra layer of thoughtfulness, acting as a small, cherished secondary gift that the recipient can then proudly hang on their own tree.
- Personalized & Budget-Friendly Gift Ideas: These ornaments themselves make fantastic, inexpensive, yet deeply personal gifts. Imagine filling them with tiny toys for a child’s best friend, small individually wrapped candies for teachers and neighbors, or even miniature craft supplies for a creative loved one. My older kids, who haven’t made theirs yet, are already considering this approach for giving small items like Legos or loom bands as thoughtful, handmade presents.
- Unique Party Favors: If you’re hosting a holiday party, a winter-themed birthday celebration, or even a craft-themed get-together close to Christmas, these personalized ornaments could serve as incredibly unique and memorable party favors that guests can take home, serving as a lasting memento of the event.
- Heartfelt Classroom or Teacher Gifts: A handmade ornament from a student is often considered a truly special and appreciated gesture. Teachers and educators would surely value a personalized keepsake for their classroom decor or their own home Christmas tree.
- Year-Round Nursery or Kids’ Room Decor: These don’t have to be exclusively for Christmas! Fill them with items that perfectly match a child’s room decor (e.g., soft pastel beads for a nursery, miniature superhero figures for a themed room) and hang them year-round from curtain rods, shelves, or even mobile stands.
- Sparkling Window Decorations: Hang them in a sunny window to beautifully catch the light, adding a festive sparkle and colorful reflections that can brighten any room, regardless of the season.
The Enduring Joy and Benefits of Crafting Together
Crafting with your children offers a multitude of wonderful benefits that extend far beyond just producing a pretty finished product. It’s a fantastic and engaging way to help them develop crucial fine motor skills, encourage boundless self-expression, and significantly boost their confidence as they see their own creative ideas beautifully come to life. More importantly, it carves out a dedicated space for invaluable quality family time, away from the constant distractions of screens and daily routines, fostering meaningful conversations, shared laughter, and a stronger bond. These precious moments of shared creativity and connection are truly among the greatest gifts of the holiday season, creating memories that will last a lifetime.
We sincerely hope that this super easy, endlessly customizable, and incredibly rewarding ornament craft inspires you to gather your little ones and embark on your own unique creative journey. What kind of personal ornaments do you enjoy making with the kids in your life? We’d absolutely love to hear your brilliant ideas, cherished traditions, and heartwarming stories in the comments section below!
Thanks so much for visiting our space today – happy crafting and a very happy, festive holiday season to you all!
Sharing our festive ideas and creative inspirations at:
Tip Me Tuesday