
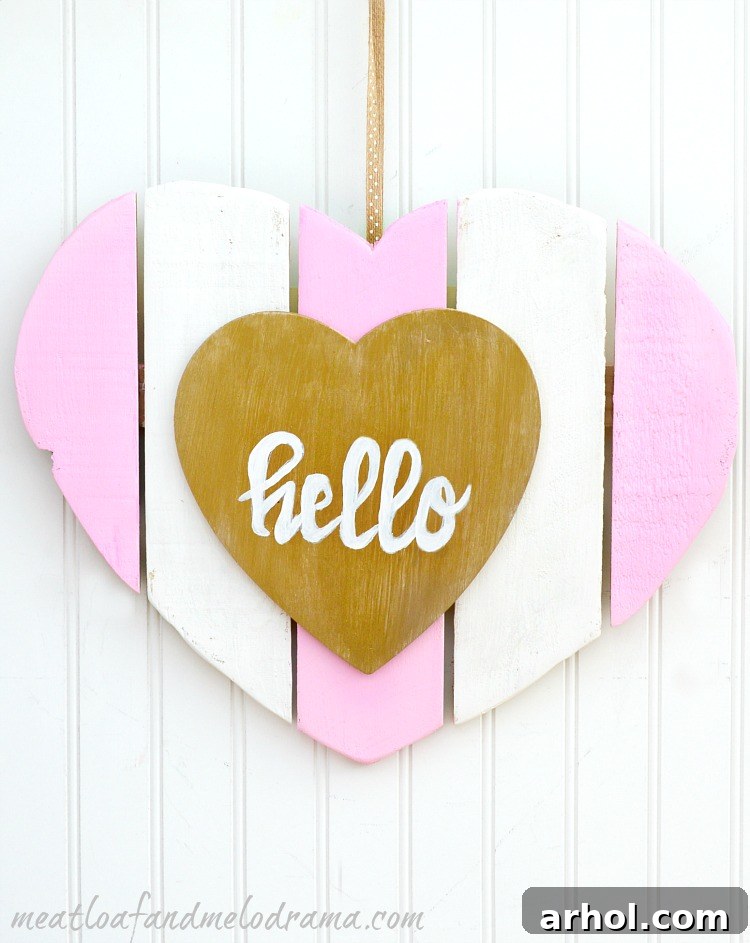
Transform your front door into a charming and welcoming display this Valentine’s Day with a beautiful DIY Valentine Door Hanger. This engaging craft project utilizes simple scrap wood and a splash of paint to create a personalized touch that’s perfect for greeting guests and spreading festive cheer. Say goodbye to generic store-bought decorations and embrace the satisfaction of crafting a unique, rustic glam accent for your home.
Craft Your Own Charming DIY Valentine Door Hanger: A Rustic Glam Project
Valentine’s Day, though a short season, offers a wonderful opportunity to infuse your home with warmth and affection. While extensive decorating isn’t always my focus for this holiday, I always enjoy having something sweet and inviting on our front door. The challenge? Doing so without breaking the bank, especially for decorations that might only be up for a few weeks. This year, instead of a quick wreath, we embarked on a delightful scrap wood craft project: a unique wooden heart hanger.
The idea sparked from previous successful projects, like a rustic pumpkin made from scrap wood for fall and an elegant heart crafted from wood slices. My husband, always keen to help with woodworking, generously offered to create the wooden base, making this DIY endeavor even more special and collaborative. It’s truly a fantastic way to add a personal touch to your Valentine’s Day decor without overspending.
Embracing the Spirit of Valentine’s Day Decor with DIY
The beauty of DIY projects for holidays like Valentine’s Day lies in their ability to be both cost-effective and deeply personal. We often have an abundance of leftover wood from various home improvement projects, making it incredibly easy for my husband to whip up custom pieces spontaneously. This not only minimizes waste but also allows for truly unique creations that you simply can’t find in stores.
For those who may not have access to woodworking tools or the desire to cut their own wood, fret not! Many craft stores offer pre-cut plain wood pieces, including heart shapes, that are perfect for painting and decorating. Opting for a ready-made blank can significantly streamline the process, allowing you to focus purely on the creative design and painting aspects. Honestly, if it were just me taking on the woodworking, I’d certainly head straight to the craft store for a pre-cut base!
How to Make a DIY Valentine Door Hanger: A Step-by-Step Guide
Creating this charming homemade Valentine decoration is a rewarding experience that combines woodworking (or pre-made bases) with artistic painting. Here’s everything you’ll need and how to bring your rustic glam vision to life.
Supplies You’ll Need:
- 1 x 3 wood fence boards (or similar scrap wood), cut to desired size for the heart base. Alternatively, purchase a pre-cut wooden heart blank.
- Coping saw (if cutting your own wood for the heart shape)
- Wood glue for assembly
- Sandpaper (various grits for smoothing)
- Paint (white base coat, accent colors like light pink, metallic gold for details). Interior flat paint, acrylic craft paint, or spray paint are all suitable options.
- Smaller thin heart piece (balsa wood, craft foam, or a small pre-made wooden heart)
- Paintbrushes (various sizes)
- Ribbon or sturdy twine for hanging
- Screws or eye hooks (for attaching the ribbon/twine, optional but recommended for durability)
Crafting Your Valentine Wood Heart Base: The Foundation
The initial phase of this scrap wood project involves preparing and assembling the main heart shape. This step is where you transform raw materials into the canvas for your Valentine’s masterpiece.
Preparing Your Wood Pieces
My husband meticulously cut, trimmed, and sanded the wood pieces, carefully spacing them to achieve that desirable “pallet wood” aesthetic. This look, characterized by slightly uneven gaps and rustic textures, adds significant character to the final piece. If you’re using your own scrap wood, aim for consistent board widths but don’t shy away from minor imperfections; they contribute to the charm!
Assembling the Heart Shape
Once the individual boards were prepared, he skillfully attached them together. This was done by securing a longer, thinner board horizontally across the back, ensuring all the vertical pieces formed a cohesive unit. This back support not only holds the heart together but also provides stability. For cutting the heart’s curved edges, a coping saw is an excellent tool, allowing for precise and intricate cuts. Always prioritize safety when using cutting tools, wearing appropriate protective gear.
Bringing Your Heart to Life with Paint and Personal Touches
With the wooden heart base expertly constructed, the artistic fun truly begins! This is where you can unleash your creativity, transforming a simple wood piece into a vibrant expression of Valentine’s spirit. My kids were eager to lend a hand during this part, making it an enjoyable family activity.
The Base Coat: A Blank Canvas
Our first step was to apply a generous coat of white paint over the entire wooden heart. We used interior flat paint because we had plenty left over from a previous painting project, but almost any type of paint will work here – acrylic craft paint, chalk paint, or even a light spray paint primer. The white base coat provides a clean, uniform surface for subsequent colors to pop and ensures better coverage. Allow this coat to dry completely before moving on.
Adding Pops of Color and Dimension
Next, we introduced accent colors. We chose to paint three of the individual boards a lovely light pink. This creates visual interest and depth, breaking up the solid white and adding that classic Valentine’s Day charm. You could experiment with different shades of pink, classic reds, or even subtle grays for a more modern look. Consider staggering the colored boards or creating a striped effect for variations. Let these accent colors dry thoroughly.
The “Hello” Heart: A Glimmer of Glam
To add a focal point and a touch of “rustic glam,” we incorporated a smaller heart-shaped piece. I found a thin balsa wood heart at a craft store, which was perfect for this detail. My little one, a true admirer of anything pink and glamorous, was particularly excited about this step, already claiming the piece for her room once Valentine’s Day passes!
We began by giving the small heart a thin coat of white paint to mask the wood grain, providing a smooth canvas for the metallic finish. Following this, we applied two coats of dazzling metallic gold paint. This instantly elevated its appeal, adding a sophisticated shimmer. Inspired by popular “hello” heart designs, I decided to hand-letter the word “hello” onto the gold heart.
This part was undoubtedly the most time-consuming aspect of the entire project, mainly because my hand-lettering skills were a bit rusty. While I frequently write on our chalkboard, painting on a small surface with precision presents a different challenge – you really don’t want to make a mistake and have to start over! It’s important to remember that handmade items embrace imperfections; mine is far from flawless, but its charm lies in its uniqueness.
Final Assembly and Display of Your Rustic Glam Heart
With all the painting complete and thoroughly dry, it was time to bring all the elements together to finish our front door decoration.
Attaching the Embellishment and Hanging Hardware
I carefully glued the smaller, metallic gold “hello” heart onto the larger wooden heart base. It’s crucial to use strong wood glue and allow ample drying time for a secure bond. Once the glue was set, the final touch was adding the hanging mechanism. My husband kindly inserted two screws into the back of the top boards. This provided sturdy anchor points for a beautiful ribbon, allowing the DIY Valentine Door Hanger to be securely displayed. If you prefer, you can also use eye hooks or simply staple a strong piece of twine or ribbon directly to the back.
Your Finished Valentine’s Day Masterpiece
Though I’m not usually a huge fan of pink, the combination of white, light pink, and metallic gold on this DIY Valentine Door Hanger turned out absolutely stunning. It achieved the perfect balance of rustic charm and a touch of modern glam, ready to adorn our front door. This crafting for Valentine’s project was not only fun but also yielded a unique piece that beautifully celebrates the season of love. After its stint on the front door, it will likely find a new home in my girls’ room, a testament to its enduring appeal. And next year? We’ll undoubtedly come up with another exciting DIY project!
Beyond the Door: Creative Ways to Use Your Wooden Heart Decor
While designed as a front door decoration, this versatile wooden heart has many other uses around your home. Consider hanging it on an interior wall in an entryway, living room, or even a child’s bedroom to maintain a festive touch indoors. Its rustic charm would also make it a wonderful handmade gift for a friend or loved one, showing them you care with a truly personalized present. The simple design also allows for easy adaptation for other holidays or seasons. Imagine painting it in pastels for spring, vibrant colors for summer, or earthy tones for fall. The possibilities are endless!
Happy Crafting and Spreading Love!
Embarking on a DIY project like this wooden heart hanger is more than just making a decoration; it’s about investing your time and creativity into something beautiful and meaningful. Whether you’re a seasoned crafter or just starting, the joy of creating something with your own hands is truly unparalleled. We hope this guide inspires you to create your own charming DIY Valentine Door Hanger and add a dash of homemade love to your home this season. Share your creations and happy crafting!
sharing at
Inspiration Monday, Met Monday, The Scoop, Wow Us Wednesday, Weekend Retreat, TT&J, Share It One More Time