
Hello, and welcome to a vibrant new season! As the days grow longer and nature awakens, there’s a renewed sense of freshness and light in the air. This spring, I’ve found myself utterly captivated by the serene beauty of aqua blue, a color that instantly brings a sense of calm and sophistication to any space. I’ve been on a mission to infuse my home with this delightful hue, adding little touches here and there to brighten things up and usher in the joyful spirit of spring.
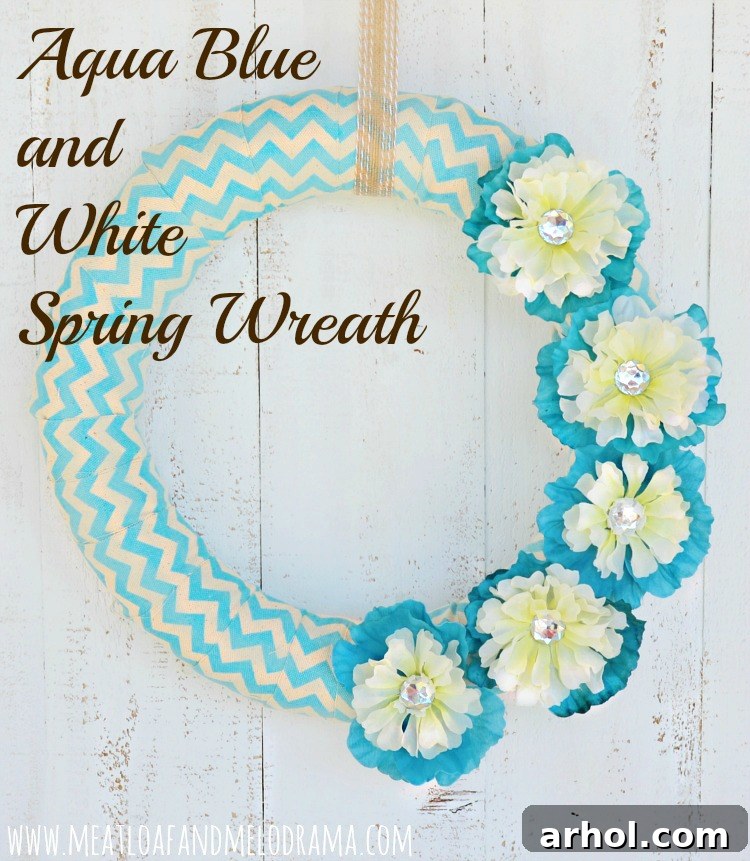
My recent creative journey began during a visit to the local craft store. Serendipity struck when I discovered a stunning chevron ribbon on clearance – the perfect shade of aqua! It was an irresistible find, and I knew instantly it was meant for a special project. With my beloved Easter egg wreath having gracefully adorned our front door for weeks, it was time for a seasonal refresh. Inspired by my exciting ribbon discovery, I envisioned and then crafted this beautiful **aqua blue and white spring wreath** to greet our guests. This project embodies everything I love about DIY: it’s budget-friendly, incredibly satisfying, and allows for a personal touch that store-bought decor often lacks.
If you’ve been following my crafting adventures for a while, you’ll know that I’m a firm believer in frugal decorating. There’s immense joy and pride in creating stunning home accents without breaking the bank. So, after securing my chevron ribbon, my next essential step was a quick, purposeful trip to the Dollar Store to gather the remaining supplies needed for this **budget-friendly spring wreath**. This approach not only saves money but also sparks creativity, challenging me to find inventive ways to use everyday items.
Initially, I considered repurposing my existing Easter wreath. However, I was so pleased with how it turned out that I decided to store it away carefully to enjoy again next year. This meant I needed a new wreath form, and foam forms can be surprisingly expensive. That’s when inspiration struck: a pool noodle! The Dollar Store had just started stocking their summer essentials, and their shelves were overflowing with colorful noodles. Not only did I grab a couple for the kids to enjoy in the pool – just like any normal summer preparation – but I also snagged one for my innovative wreath base. This clever substitute is a fantastic way to create a sturdy yet lightweight foundation for your **DIY spring decor** without the premium price tag.
Crafting Your Own Aqua Blue Spring Wreath: Essential Supplies
Embarking on a new craft project is always exciting, and gathering your materials is the first step towards bringing your vision to life. For this charming aqua blue and white spring wreath, I focused on readily available and affordable items that contribute to both its aesthetic appeal and structural integrity. Here’s a detailed list of what you’ll need:
- 1 Pool Noodle: The secret ingredient for a cost-effective and lightweight wreath form. Choose a color that won’t show through your ribbon, or one that complements it.
- Duck Tape: Essential for securely joining the ends of the pool noodle to create a perfectly round wreath shape. Its strong adhesive power ensures durability.
- Floral Pins: These small, U-shaped pins are indispensable for neatly securing the ribbon to your wreath form, ensuring a smooth and polished finish.
- 2 Spools of Aqua Blue Chevron Ribbon: The star of the show! Chevron patterns add a modern, dynamic touch, while the aqua blue brings that refreshing spring feel. The amount may vary based on your noodle size and ribbon width.
- Teal Blue and White Flowers (from the Dollar Store): Frugal yet beautiful embellishments that allow for creative layering and color mixing. Look for different sizes and textures to add depth.
- Craft Glue: A strong adhesive is needed to attach your custom flower embellishments and other small details securely to the ribbon-wrapped wreath.
- Small Brads: These are perfect for assembling your layered flower petals, providing a neat and secure center point before adding decorative stones.
- Wire Cutters: Handy for trimming flower stems or any wire elements, ensuring your floral additions sit flush against the wreath.
- Thin Ribbon for Hanging the Wreath: Choose a sturdy, attractive ribbon in a coordinating color (like burlap or a matching aqua) to create a loop for hanging your finished masterpiece.
- Sharp Knife: Crucial for making a clean, precise cut through the pool noodle to form your circular wreath base. Safety first when handling sharp objects!
Having all your supplies ready makes the crafting process much smoother and more enjoyable. Now, let’s dive into the simple steps to create your very own stunning **aqua blue and white chevron wreath**!
Step-by-Step Guide: Assembling Your DIY Spring Wreath
Creating this vibrant spring wreath was surprisingly easy, making it an ideal project for crafters of all skill levels. The first crucial step is transforming that straight pool noodle into a perfectly round wreath form. To achieve a seamless circular shape, gently bend the noodle until it forms a circle. While holding it in this desired curvature, carefully use a sharp knife to cut off any excess length. This method helps ensure your wreath will be perfectly round rather than an awkward oval. Always exercise caution when using sharp tools, and consider having a cutting mat or protective surface underneath.
Once you have the noodle shaped into a circle, the next task is to secure the ends together. Duck Tape is your best friend here! Its strong adhesive and durability make it perfect for holding the flexible noodle firmly in place. While this step sounds simple, I highly recommend enlisting a helper to hold the noodle ends together tightly while you apply the tape. I bravely attempted this by myself, and let me tell you, it was quite the wrestling match! Though my kids found my solo struggle highly entertaining, having an extra set of hands would have made it much smoother. Securely taping the ends creates a robust foundation for your **pool noodle wreath**, ready for the next decorative layers.
With the wreath form securely in place, it’s time for the fun part: wrapping it with the gorgeous aqua blue chevron ribbon. Start by securing one end of the ribbon to the back of the wreath form using a floral pin or a dab of strong glue. Then, begin tightly wrapping the ribbon around the entire noodle, overlapping slightly to ensure full coverage and a continuous pattern. While I strove to align the chevron lines as perfectly as possible, remember that handmade charm often comes with slight imperfections. Don’t stress too much about achieving absolute precision; a little character only adds to its unique appeal! Once the entire wreath form is covered, secure the other end of the ribbon on the back with more floral pins, making sure it’s taut and neat. This step transforms the humble pool noodle into a chic and stylish base for your **chevron ribbon wreath**.
Next, it was time to add the beautiful floral embellishments. This is where you can truly let your creativity shine! I carefully disassembled the Dollar Store flowers, separating the petals. Then, I began layering different shades of teal and white petals to create custom, multi-dimensional blooms. This technique adds depth and interest that a single-layered flower simply can’t achieve. To hold these layered petals together, I used small brads in the center. For an extra touch of sparkle and sophistication, I then attached clear acrylic stones over the top of the brads using craft glue. This process is actually a familiar one to me; it’s the same technique I use when crafting hair flowers for my daughter. So, if she ever needs a new hair accessory, she knows exactly where to “borrow” one from – ha ha! Attach your finished custom flowers to the ribbon-wrapped wreath using strong craft glue, arranging them in a visually pleasing cluster or spread them out for a different look. These handmade flowers are the perfect complement to your **aqua blue and white spring wreath**.
With the flowers securely in place, the final step was to prepare the wreath for hanging. I chose a thin, natural burlap ribbon to create a simple yet elegant hanger. Simply loop the ribbon around the top portion of the wreath, tying the ends securely to form a loop. This rustic touch provides a lovely contrast to the modern chevron pattern and the delicate flowers, completing the overall aesthetic of this beautiful **aqua blue spring wreath**. And just like that, it was ready to adorn our front door and welcome spring!
Personalizing Your DIY Wreath and Embracing Handmade Charm
I’ll admit, I’m not typically one to follow trends rigidly, and this project marks my first foray into using chevron patterns. Unbelievable, right? But I was so drawn to the refreshing aqua color, and I absolutely adore how this **aqua blue and white spring wreath** turned out. It feels like a little bit of handcrafted “bling” for our front door, adding personality and a welcoming touch that store-bought decor often lacks. The satisfaction of creating something beautiful with your own hands is truly unparalleled.
The beauty of DIY projects like this is their inherent customizability. While I chose aqua and white, you could easily adapt this tutorial to match your own home’s color scheme or seasonal preferences. Imagine it with soft pastels for an Easter theme, vibrant oranges and reds for autumn, or traditional greens and berries for the winter holidays. Experiment with different ribbon patterns – polka dots, stripes, or even solid colors – and a variety of embellishments, such as faux berries, small birds, or personalized wooden tags. The pool noodle wreath base provides a versatile canvas for endless creative possibilities, allowing you to craft unique **spring home decor** year after year.
Caring for your handmade wreath is also straightforward. If displayed outdoors, consider a sheltered spot to protect it from harsh weather elements, which can prolong the life of your ribbon and flowers. A quick dust-off every now and then will keep it looking fresh and vibrant throughout the season. When the season changes, simply store your **DIY spring wreath** in a sturdy box in a cool, dry place to ensure it’s ready to bring joy again next year.
Creating this **easy craft project** not only brightened our home but also added a personal touch that speaks volumes. It’s a wonderful reminder that beautiful decor doesn’t have to be expensive; often, the most charming pieces are those made with love and creativity.
So, tell me, what charming piece of decor is currently gracing your front door? I love hearing about how you personalize your living spaces!
Thank you so much for stopping by and taking a peek at my latest creation, this lovely **aqua blue and white spring wreath**! I hope it inspires you to embark on your own creative journey this season. Happy crafting!
You may also like these inspiring DIY projects: