
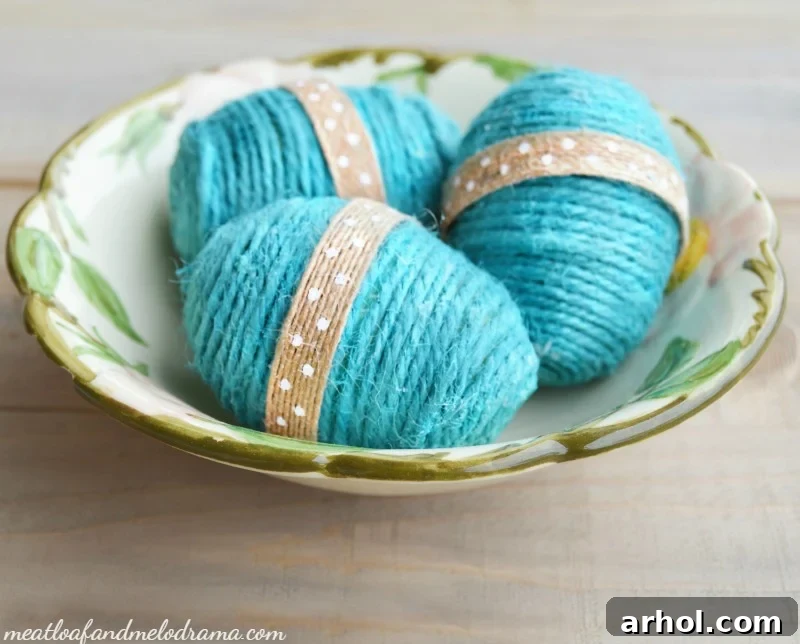
As the days grow longer and the first whispers of spring fill the air, many of us feel an irresistible urge to refresh our homes. After the coziness of winter, spring brings a desire for light, color, and renewed energy. What better way to welcome this vibrant season and prepare for Easter than with charming, handmade decorations? This guide will show you how to create beautiful, rustic DIY twine-covered Easter eggs – a simple, affordable craft that adds warmth and character to any spring setting.
These delightful twine-wrapped eggs are not only incredibly easy to make, but they also offer a wonderful opportunity to personalize your holiday decor. Whether you’re looking to add a touch of farmhouse chic to your Easter display or simply enjoy the satisfaction of a creative project, these eggs are the perfect solution. You can effortlessly source inexpensive plastic eggs from your local dollar store, or even better, give new life to old Easter eggs you already have tucked away. This project champions both creativity and sustainability, making it a truly rewarding endeavor.
Embracing Spring with Handmade Decor: Why DIY Twine Eggs?
The transition from the muted tones of winter to the bright hues of spring is always invigorating. For many, this seasonal shift sparks a desire to “nest” again, to infuse our living spaces with fresh energy and decorative touches. While elaborate decorating isn’t for everyone, adding a few strategic pops of color and texture can make a huge difference. Spring crafts, especially those that are budget-friendly and straightforward to assemble, are a fantastic way to achieve this.
Our DIY twine eggs perfectly embody these ideals. They offer a unique rustic aesthetic that complements a wide range of decor styles, from modern minimalist to cozy farmhouse. Beyond their visual appeal, there’s an immense joy in creating something with your own hands. This simple project is a testament to how easily you can transform ordinary objects into charming decorative pieces, making your home feel more personal and inviting for the Easter holiday and the entire spring season. I first brought this project to life last year and shared the tutorial over at PinkWhen, and now I’m thrilled to share an enhanced version of this timeless craft with you once more, as these delightful eggs continue to be a staple in my spring home styling.
How to Make DIY Twine Covered Easter Eggs: Your Step-by-Step Guide
Crafting these beautiful twine-wrapped Easter eggs is a relaxing and enjoyable process. It requires minimal supplies and can be completed in an afternoon, leaving you with charming decorations that will last for seasons to come. Let’s gather our materials and dive into the creative process!
Essential Supplies Needed:
- Plastic Eggs: These are the foundation of your craft. You can easily find them at dollar stores, craft shops, or simply repurpose old plastic eggs from previous Easters. Their lightweight and durable nature make them ideal for this project.
- Craft Glue (Dries Clear): A strong, clear-drying craft glue is crucial for securing the twine. Look for glues suitable for fabric or multi-surface applications. The clear-drying aspect ensures a seamless, professional finish without any visible residue.
- Colored Twine: This is where the magic happens! Jute twine, cotton twine, or even baker’s twine in various spring-inspired colors (aqua, pastel pink, light green, cream) will work wonderfully. Consider mixing colors for a varied display.
- Burlap Ribbon (Optional): A thin strip of burlap ribbon adds an extra layer of rustic charm and texture. It’s perfect for creating a decorative band around the center of your finished eggs.
- Sharp Scissors: Essential for cleanly cutting the twine and burlap ribbon.
- Wet Paper Towels: Keep these handy for wiping excess glue from your fingers as you work, ensuring a tidy crafting experience.
Step 1: Laying the Foundation – Preparing Your Egg and Starting the Twine
Begin by selecting your first plastic egg. The key to a successful twine egg is a solid start. Apply a generous dab of craft glue to one end of the egg. Don’t be shy with the glue here; you need enough to create a strong anchor for the twine. Since we’re using clear-drying glue, any visible excess will become invisible once dry, so there’s no need to worry about it showing through. Take one end of your chosen colored twine and firmly press it into the glue, holding it in place for a few moments until it begins to adhere. This initial bond is critical for preventing the twine from unraveling later on.
Step 2: The Art of Wrapping – Achieving a Smooth, Consistent Finish
Once your initial twine end is secure, the real fun begins. Start winding the twine around the egg in small, tight, concentric circles. As you progress, continuously add more glue to the surface of the egg, working in small sections. It’s best to apply a thin bead or a few dots of glue directly onto the egg, then immediately press the twine into it. This ensures continuous adhesion without making a sticky mess. Keep pressing the twine firmly onto the egg’s surface, allowing it a moment to catch before moving on to the next section. Patience is key in this stage to prevent gaps or loose areas.
Maintain consistent tension as you wrap, guiding the twine strands as close together as possible. The goal is to completely cover the plastic egg, leaving no gaps. As you wrap, gently push the twine strands upwards with your fingers, compacting them against each other. This technique helps create a solid, uniform surface and prevents any plastic from showing through. You’ll find that once you get a rhythm going and the initial few rows are established, the process becomes significantly easier and more meditative. Continue this careful winding and gluing until you’ve covered almost the entire egg, leaving just a small area on the opposite end to finish.
Step 3: Finishing Touches – Sealing and Embellishing Your Twine Eggs
As you approach the other end of the egg, continue wrapping the twine in tight circles until only a tiny opening remains. Apply a final dab of glue to this remaining area, then carefully cut the twine, leaving a small tail. Press this tail firmly into the glue, creating a neat and secure finish. Hold it in place for a moment until it starts to dry. Allow all the glue to dry completely – this might take a few hours depending on the type of glue you used. Once the glue is fully cured and your twine is firmly set, you have the option to add an extra decorative touch. A thin strip of burlap ribbon wrapped around the center of the egg and secured with a small dot of glue can elevate the rustic appeal of your finished creation. You could also experiment with lace, small fabric flowers, or even painted details for different looks.
Displaying Your Beautiful Twine Masterpieces
Once your charming DIY twine-covered Easter eggs are complete, the next exciting step is deciding how to display them! These versatile decorations can instantly elevate any corner of your home, bringing a natural, handmade aesthetic to your spring and Easter arrangements. Consider arranging them in a decorative bowl, much like I love to do with my grandmother’s treasured Desert Rose bowls – heirlooms that always make an appearance around Easter, adding a touch of sentimental history to my seasonal decor. A simple woven basket filled with these textured eggs can create a beautiful centerpiece for your dining table or coffee table.
Beyond traditional bowls, envision them nestled in a rustic wooden crate, scattered amongst greenery on a mantelpiece, or even strung together to create a unique garland. For an outdoor touch, place them in a bird’s nest replica for a truly enchanting display. These eggs also make wonderful additions to Easter wreaths, adding texture and a pop of color to your front door. Their simple elegance allows them to blend seamlessly with existing decor while still making a distinct statement. This year, I’m particularly fond of aqua tones, so while I might explore other colors, I’ll definitely be adding more aqua eggs to my collection to complement my spring palette!
A Family-Friendly Craft for All Ages
One of the most wonderful aspects of this DIY project is its accessibility and appeal to all ages. Making twine-covered Easter eggs is a fantastic activity to share with children. Not only is it a fun way to spend quality time together, but it also offers numerous developmental benefits for younger crafters. The repetitive motion of wrapping twine helps improve fine motor skills, hand-eye coordination, and concentration. Kids love the tactile experience of working with glue and twine, and the immediate gratification of seeing their creations come to life is incredibly rewarding.
You might even find that having a few extra helping hands makes the process smoother and more enjoyable! Children can assist with applying glue, holding the twine, or picking out colors. This collaborative effort transforms a simple craft into a cherished family memory, resulting in unique, handmade decorations that everyone can be proud of. It’s a beautiful way to introduce the joy of crafting and the spirit of Easter to the younger generation.
Final Thoughts on Your Rustic Easter Creations
And there you have it – the complete guide to crafting your very own DIY twine-covered Easter eggs! This simple yet incredibly effective project offers a delightful way to infuse your home with rustic charm and the fresh spirit of spring. From sourcing budget-friendly supplies to the satisfying process of winding the twine, every step is designed to be enjoyable and accessible. These handmade treasures are more than just decorations; they’re expressions of creativity, sustainability, and the joy of a season of renewal.
Whether you’re creating a few accent pieces or a whole collection, these twine eggs promise to be a beautiful addition to your Easter and spring decor. Experiment with different twine colors, consider adding various embellishments, and most importantly, have fun with the process. We hope this tutorial inspires you to embrace the warmth and charm of handmade crafts this season. Happy crafting!
Sharing this creative project at wonderful community hubs:
The Scoop, Wow Us Wednesday, Weekend Retreat, TT&J, Thoughts of Home