
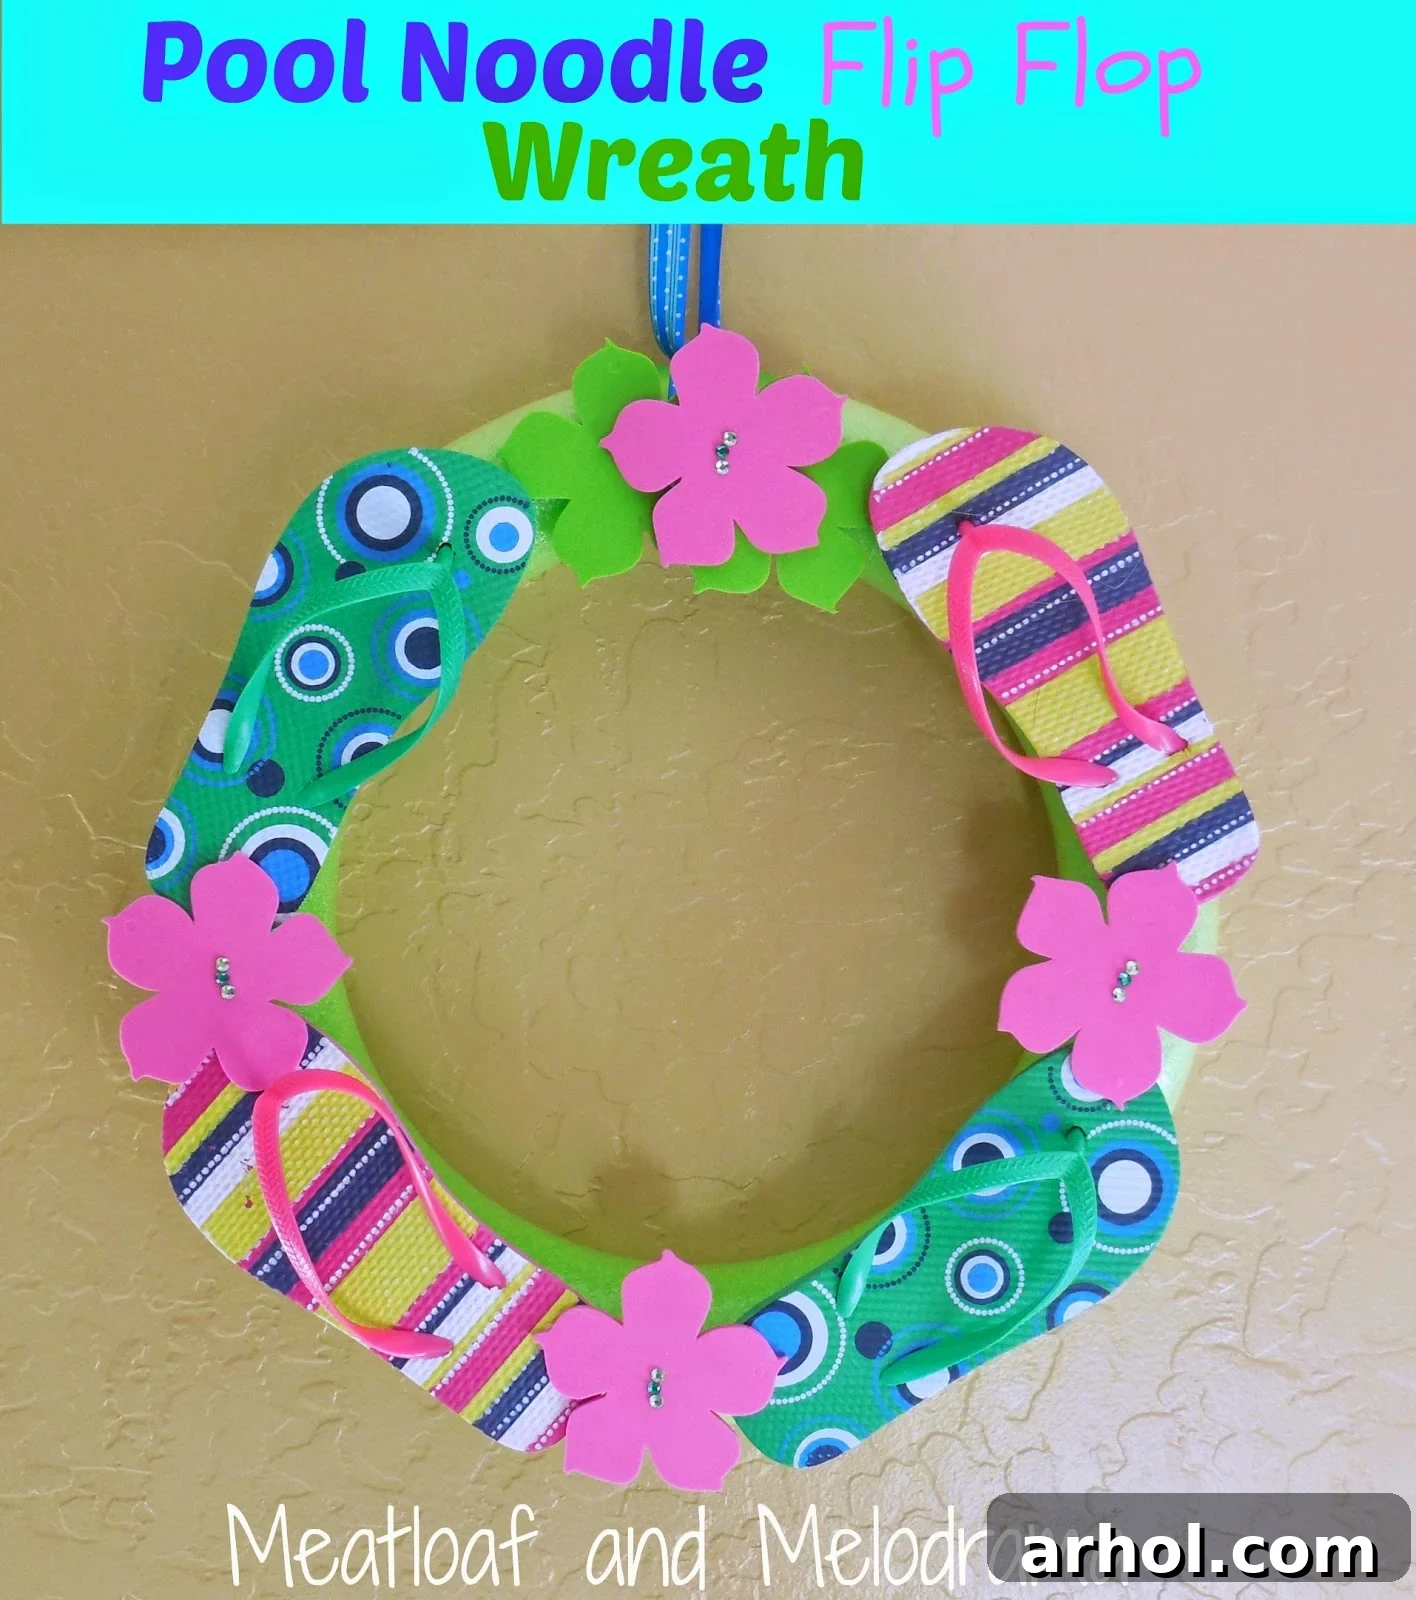
The anticipation of summer fills the air, bringing with it the promise of sunshine, relaxation, and countless opportunities for celebration. Whether you’re marking birthdays, graduations, or simply embracing the end of a busy school year, there’s a collective yearning for calm and joyful moments. What better way to usher in the season than with a splash of vibrant, handmade decor? Today, we’re diving into a delightful DIY project that’s as charming as it is easy on the wallet: a Pool Noodle Flip Flop Wreath. This project isn’t just a craft; it’s an invitation to infuse your home with the carefree spirit of summer, all while showcasing your creative flair. Get ready to transform simple materials into a stunning, seasonal masterpiece!
DIY Summer Fun: Crafting a Vibrant Pool Noodle Flip Flop Wreath
Crafting your own home decor offers a unique blend of personal satisfaction and practical benefits. Not only do DIY projects allow you to express your individual style, but they are also incredibly rewarding, often saving you a significant amount compared to store-bought items. This particular Pool Noodle Flip Flop Wreath stands out as a prime example of a truly thrifty craft. Imagine creating a dazzling summer decoration for a mere fraction of what you’d spend at a specialty store! The total cost for this project can be as low as $3, making it an accessible and enjoyable activity for everyone, regardless of their crafting budget. By utilizing readily available, inexpensive materials, you can craft a personalized piece that radiates summer joy. Let’s gather our supplies and begin this exciting journey into handmade summer charm!
Gather Your Essential Supplies for a Sunny Summer Wreath
One of the best aspects of this DIY summer wreath is its simplicity and reliance on readily available, budget-friendly materials. You might even have some of these items stashed away in your craft bin already! The key to keeping costs down is often found in places like dollar stores, where you can find many of the core components for just a few dollars. Here’s what you’ll need to bring this cheerful vision to life:
- Pool Noodle: The flexible foundation of our wreath. Opt for a standard size and any color, as much of it will be covered, though a vibrant color can add an extra pop of fun.
- Kid-Sized Flip Flops: These provide the iconic summer look. Choosing smaller sizes ensures they fit well on the wreath without overpowering it. Look for an assortment of bright colors and playful patterns to maximize visual appeal.
- Duct Tape: A crafting superhero! Duct tape will be crucial for securing the pool noodle ends and providing a stable, heat-resistant surface for attaching the flip-flops.
- Ribbon: Select a couple of complementary ribbons. One will be used to neatly cover the taped seam of your pool noodle, and another, perhaps a wider or more decorative one, will form the hanger for your finished wreath. Choose colors and patterns that evoke summer – think stripes, florals, or bold solids.
- Foam Flowers: These durable, weather-resistant embellishments will fill gaps and add a tropical touch. Hibiscus or plumeria shapes are perfect for a summer vibe.
- Hot Glue Gun and Glue Sticks: Your trusty tool for quick and secure adhesion. Ensure you have plenty of glue sticks on hand.
- Crystal Stickers: Small, sparkling accents to add an extra touch of pizzazz to your foam flowers or other elements. Green or clear crystals work wonderfully.
With these simple items in hand, you’re well on your way to creating a dazzling summer decoration that’s both personal and incredibly affordable.
Step-by-Step Guide: Crafting Your Pool Noodle Flip Flop Wreath
Now that you’ve gathered all your materials, let’s embark on the fun and creative process of assembling your very own summer wreath. Each step is designed to be straightforward, ensuring a smooth and enjoyable crafting experience from start to finish.
Step 1: Forming the Perfect Wreath Base with Your Pool Noodle
The foundation of your wreath is the pool noodle. Begin by carefully trimming the ends of the pool noodle. The goal here is to create a seamless, even circle. You’ll want to connect the two trimmed ends to form a ring. Depending on the size of the wreath you envision, you might need to trim off a small portion to get the desired circumference. Once you’re happy with the size and shape, firmly secure the two ends together using a generous amount of duct tape. Wrap the tape tightly around the join, ensuring it’s strong and stable. This initial step is crucial for the overall integrity and circular shape of your wreath, so take your time to make it secure and well-rounded.
Step 2: Adding a Decorative Ribbon Trim and Hanger
With your pool noodle base formed, it’s time to add the first layer of aesthetic appeal and functionality. To neatly conceal the duct-taped seam where the pool noodle connects, select one of your ribbons. A plain, solid-colored ribbon works well for this purpose, providing a clean backdrop. Wrap this ribbon snugly around the taped section, securing it with a dab of hot glue at the beginning and end to prevent unraveling. Next, choose your second ribbon – perhaps a wider or more decorative one – to create the hanger for your wreath. Loop this ribbon around the top of the wreath base and tie or glue the ends together to form a sturdy hanging loop. Ensure the hanger is securely attached and balanced, allowing your wreath to hang evenly.
Step 3: Arranging and Securing Your Festive Flip Flops
This is where the wreath truly begins to take on its playful, summery personality! Lay out your pool noodle wreath and start arranging the kid-sized flip flops. Experiment with different patterns and orientations until you achieve a look you love. You might alternate colors, group them in pairs, or create a symmetrical design. This ‘dry run’ is essential before gluing to ensure you’re satisfied with the layout. Now for a crucial tip: directly applying hot glue to the pool noodle can cause it to melt due to its foam composition. To avoid this, press loops of duct tape onto the pool noodle exactly where you want each flip-flop to be placed. The duct tape creates a protective, heat-resistant surface. Once the duct tape is in position, then apply hot glue to the back of the flip-flops and press them firmly onto the duct tape loops. This two-step process ensures a strong, melt-free attachment that will last all season long.
Step 4: Embellishing with Tropical Flowers and Sparkling Crystals
To truly complete your summer masterpiece, it’s time to add those delightful finishing touches. Notice any small gaps between your flip flops or areas that could use a little extra flair? This is where your foam flowers come in! Hot glue your vibrant foam hibiscus or other tropical flowers along the edges of the flip flops or directly onto the pool noodle where space allows. These flowers are fantastic for bridging gaps and adding a lush, vacation-ready feel. While the wreath already looks fantastic, a touch of sparkle can elevate it even further. Gently peel and stick your green crystal stickers into the center of each foam flower. The crystals catch the light beautifully, adding a subtle shimmer and making your wreath truly pop. Feel free to add other small embellishments like miniature shells, beads, or small plastic charms if you wish to further personalize your creation.
Displaying Your Summer Masterpiece
And voilà! Your charming, budget-friendly summer wreath is now complete. It’s truly amazing how a few simple items can transform into such a vibrant and inviting decoration. Once finished, you’ll be eager to find the perfect spot to display your handcrafted beauty. Imagine it gracing your front door, welcoming guests with its cheerful colors, or brightening up your patio for outdoor gatherings. It would also look fantastic hanging near the pool, in a sunroom, or anywhere you want to infuse a little extra summer joy. Initially, you might even find it so captivating that you wish you could hang it permanently in an indoor space, like a family room with a beachy theme. While some might consider it “a little too casual” for year-round indoor display, its undeniable charm makes it perfect for seasonal celebrations and adding a relaxed, festive vibe to any area. Don’t be afraid to let its playful spirit shine!
Tips for Customization and Longevity
The beauty of DIY projects lies in their endless potential for personalization. While this guide provides a fantastic blueprint, don’t hesitate to make this wreath truly your own! Consider experimenting with different color themes for your flip flops and ribbons to match your existing outdoor decor or to celebrate a specific holiday. For instance, red, white, and blue flip-flops would make a fantastic Fourth of July wreath, while pastels could suit an Easter or spring theme. You can also vary the embellishments; instead of foam flowers, think about small plastic beach toys, miniature seashells, or even colorful buttons for a unique touch. To ensure your wreath withstands the elements, especially if displayed outdoors, consider applying a clear UV-resistant sealant spray to your foam flowers and ribbons. This will help prevent fading and general wear from sun exposure and light moisture, allowing you to enjoy your creation for many summers to come. Involving children in the selection of flip-flops and flowers can also turn this into a wonderful family crafting activity, creating cherished memories along with a beautiful decoration.
Embrace the Spirit of Summer!
As the days grow longer and the temperatures rise, there’s an undeniable excitement for all that summer brings. Crafting projects like this DIY Pool Noodle Flip Flop Wreath are more than just a way to decorate; they’re an opportunity to embrace the season’s joyful energy, unwind, and express your creativity. This project is a testament to how easily you can transform inexpensive materials into something truly special and inviting. We hope this guide inspires you to create your own unique summer wreath and to add a touch of handmade charm to your home. Are you as excited for summer as we are? What other budget-friendly summer crafts are you planning?
Thank you for joining us on this creative journey today. Happy crafting, and may your summer be filled with endless fun and sunshine!
Warmly,
The Crafting Team