
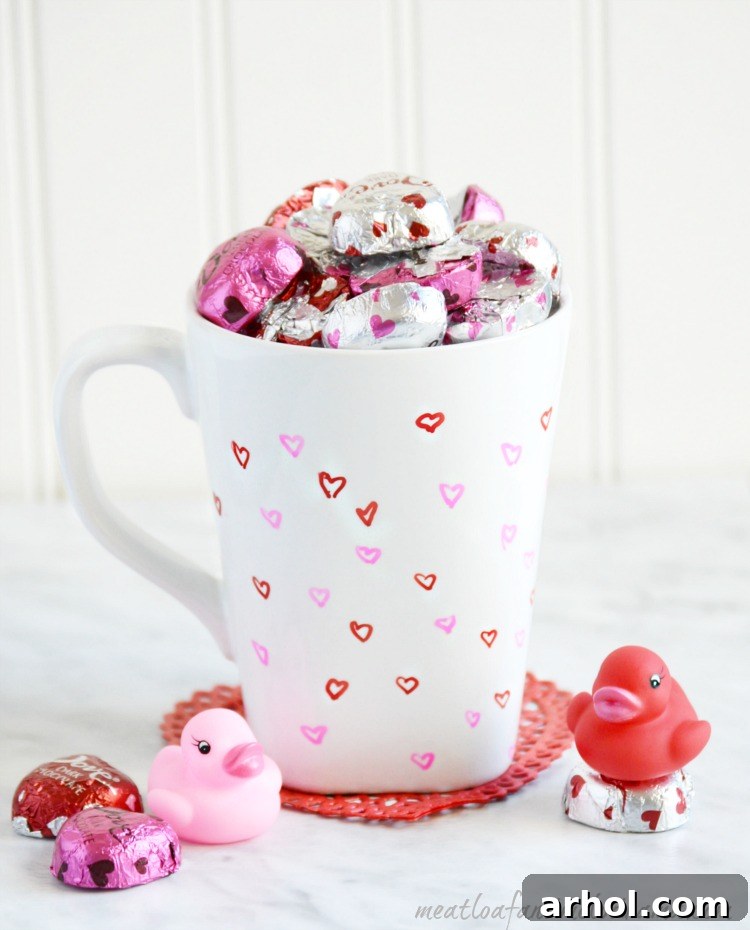
Welcome to a world where thoughtful gestures meet creative flair! As Valentine’s Day approaches, the air fills with anticipation for expressing love and appreciation. While store-bought gifts have their charm, there’s an undeniable magic in something crafted with your own hands. This year, why not create a truly unique and heartfelt present that doubles as a cherished keepsake? We’re diving into the delightful project of making a “Love in a Mug” Valentine’s Day gift – a personalized coffee cup adorned with vibrant Sharpie markers and filled with sweet treats, ready to bring a smile to anyone’s face.
In a world increasingly driven by convenience, the value of a homemade gift stands out more than ever. It’s a tangible representation of time, effort, and affection – qualities that money simply cannot buy. A DIY Valentine’s gift isn’t just an item; it’s an experience, a memory, and a testament to your unique relationship with the recipient. Whether it’s for a romantic partner, a beloved family member, a dear friend, or even a hardworking teacher, a personalized handmade gift carries a deeper meaning that resonates long after the holiday itself.
This “Love in a Mug” project is perfect for anyone looking to create something special without needing extensive crafting experience. It’s wonderfully simple, budget-friendly, and offers endless possibilities for customization, making each mug a one-of-a-kind masterpiece. Imagine the joy of gifting a beautifully decorated mug, filled with their favorite candies, coffee, or tea, knowing that every stroke of the marker was made with them in mind. It’s a daily reminder of your thoughtfulness and love.
It’s been quite a while since I last shared a creative craft project, but with Valentine’s Day just around the corner, my thoughts naturally turned to heartwarming DIY gift ideas. The inspiration for this particular project actually came from my imaginative little diva! She not only conceived the brilliant idea for this adorable Sharpie mug but was also kind enough to let me join in on the fun. Her most charming contribution was suggesting we call this craft “Love in a Mug,” a name I absolutely adore and find incredibly fitting.
Last year, we ventured into making DIY painted coffee mugs for Valentine’s Day using regular paint pens. While the designs were lovely and brought joy for a good while, I’ve recently noticed that some of the artwork is starting to fade, especially after a few rounds in the dishwasher. Initially, I was very careful, hand-washing them to preserve the delicate designs. However, once they started making their way into the dishwasher, the paint began to show signs of wear and tear, which was a bit disappointing.
So, when my daughter proposed another painted mug project this year, I saw an opportunity to refine our technique and aim for greater durability. This time, our goal was to create a design that would truly last, resisting the rigors of daily use and washing. We decided to switch gears and experiment with oil-based Sharpie markers, hoping their inherent permanence would make a significant difference. The idea was simple: create beautiful, lasting art that wouldn’t chip or fade away quickly. Here’s a detailed look at how we brought our vision to life, ensuring this “Love in a Mug” would stand the test of time.
How to Make a DIY Love in a Mug Valentine’s Day Gift That Lasts
Creating a personalized Sharpie mug is a rewarding experience, and with the right materials and techniques, your design can last for years. Follow these steps to craft your own unique “Love in a Mug” gift:
Essential Supplies Needed
- White ceramic coffee mug (or any plain ceramic mug you wish to decorate)
- Oil-based Sharpie Markers (available in a wide range of colors for vibrant designs)
- Assortment of wrapped candies or other thoughtful fillers to complete your gift
Step-by-Step Crafting Instructions
1. Prepare Your Canvas: Clean and Dry the Mug(s)
Before you begin any artistic endeavors, it’s crucial to ensure your mug is impeccably clean and completely dry. Any residual oils, dust, or dirt on the ceramic surface can prevent the Sharpie ink from adhering properly, leading to a less durable design. A simple wash with soap and water, followed by thorough drying with a lint-free cloth, will prepare your canvas perfectly. You can also wipe the surface with rubbing alcohol for an extra clean finish, allowing it to air dry completely.
2. Unleash Your Creativity: Design Your Masterpiece
Now comes the fun part – designing! Grab your oil-based Sharpie markers and let your imagination run wild. For this particular “Love in a Mug” project, we opted for a charmingly simple approach: scattering small pink and red hearts in various sizes and placements all over the mug. This effortless design is perfect for beginners and creates an adorable, festive look for Valentine’s Day. However, don’t feel limited to hearts! Consider:
- Personalized Messages: Write names, initials, “I Love You,” or special dates.
- Quotes: A favorite inspiring quote, a line from a song, or a funny saying.
- Patterns: Dots, stripes, chevrons, geometric shapes, or even intricate mandala-inspired designs.
- Illustrations: Small flowers, stars, abstract swirls, or anything that reflects the recipient’s interests.
- Stencils: If you’re nervous about freehand drawing, use stencils to create crisp, clean designs.
You can even sketch your design lightly with a pencil first, as the Sharpie will cover it, or practice on paper until you’re confident. Remember, oil-based Sharpies are more permanent, so take your time. If you make a small mistake, a cotton swab dipped in rubbing alcohol can help clean it up before it fully dries.
3. The Crucial Step: Baking to Set the Design
Once your design is complete and thoroughly dry to the touch (give it at least 15-30 minutes), it’s time to permanently set the ink. This baking step is what transforms your artwork into a durable, long-lasting design, significantly enhancing its resistance to washing and wear. While some might consider this step optional, based on our previous experiences, I strongly recommend it for the best results and longevity.
Here’s how to properly bake your mug:
- Placement: Place your decorated mug(s) in a cold oven. It’s important for the mug to heat up gradually with the oven to prevent thermal shock, which could cause the ceramic to crack.
- Temperature: Set the oven to 300 degrees Fahrenheit (approximately 150 degrees Celsius).
- Baking Time: Once the oven reaches 300°F, bake the mug for approximately 30 minutes.
- Cool Down: After 30 minutes, turn off the oven but leave the mug inside. Allow it to cool down completely with the oven. This gradual cooling process is just as important as the gradual heating to ensure the ceramic doesn’t stress and the ink sets properly.
This baking process essentially cures the oil-based ink, making it much more resilient. Think of it as hardening the paint onto the ceramic surface, creating a protective layer that helps it withstand daily use.
4. The Grand Finale: Filling with Love
Once your mug has completely cooled, your beautiful hand-painted gift is almost ready! The final touch is filling it with thoughtful treats. We opted for an assortment of wrapped chocolate candies, and perhaps “sampled” one or two (purely for quality control purposes, of course – and they passed with flying colors!).
However, the beauty of the “Love in a Mug” gift is its incredible versatility. While chocolate is undeniably a fantastic choice (in my humble opinion, it’s always a winner!), you can truly personalize the contents to suit the recipient’s preferences and interests. Consider these delightful ideas:
- For the Coffee Lover: Small bags of gourmet coffee beans, a few artisan coffee pods, or a selection of unique instant coffee mixes.
- For the Tea Enthusiast: An assortment of premium tea bags, loose leaf tea with a small infuser, or a selection of herbal blends.
- For the Sweet Tooth (beyond chocolate): Hard candies, lollipops, mini cookies, brownie bites, or homemade fudge.
- For the Self-Care Advocate: Small scented candles, a bath bomb, mini hand cream, or a luxurious lip balm.
- For the Office Buddy: A cool pen, sticky notes, small clips, or a personalized bookmark.
- For the Green Thumb: A small succulent, a packet of interesting seeds, or a tiny gardening tool.
- For the Avid Reader: A gift card to a bookstore, a decorative bookmark, or a novelty book light.
The possibilities are endless! Just add some colorful tissue paper or crinkle cut filler to the bottom of the mug before adding your gifts to make it look even more festive and inviting. A small, handwritten tag tied with a ribbon around the handle adds the perfect finishing touch. This “Love in a Mug” isn’t just a gift; it’s a thoughtful bundle of joy, perfectly tailored to its recipient. It’s also an absolutely charming and fun Valentine’s Day teacher gift – a wonderful way to show appreciation to educators who pour their hearts into their work every day.
Caring for Your Hand-Painted Sharpie Mug
To ensure your beautiful “Love in a Mug” creation lasts for many years to come, proper care is essential. Even with the use of oil-based Sharpies and the crucial baking step, hand-washing is always recommended. The harsh detergents and high temperatures of a dishwasher can, over time, still cause the design to fade or chip. A gentle hand wash with mild soap and warm water will help preserve the vibrant colors and intricate details of your artwork, keeping your personalized mug looking as good as new.
We hope this detailed guide inspires you to create your own unique and heartwarming “Love in a Mug” gift this Valentine’s Day. It’s a project that combines creativity, sentiment, and practicality, resulting in a present that is sure to be treasured.
Have you ever tried your hand at making a custom hand-painted Sharpie mug before? What were your experiences, and what clever designs or filling ideas did you come up with? We’d love to hear your stories and tips!
Happy crafting and happy gifting!
Sharing At
TT&J, Inspiration Monday, Met Monday, The Scoop, Wow Us Wednesday