
DIY Valentine’s Day Hair Flowers: Craft Adorable Hair Accessories Easily
Welcome, fellow craft enthusiasts! We all know the charm of a beautifully styled hairdo, and for many, hair accessories are the perfect finishing touch. While intricate hair bows often demand a certain level of skill and patience (which, let’s be honest, not all of us possess!), there’s a delightful alternative that is incredibly simple, fun, and yields stunning results: DIY hair flowers. My little girl, for instance, is absolutely enamored with them, and for a good reason – they’re effortlessly charming and can be customized to match any outfit or occasion.
With Valentine’s Day just around the corner, what could be sweeter than creating your own special Valentine’s Day hair flowers? These handmade treasures make for a fantastic personal touch to any festive look, or even a thoughtful, heartfelt gift for friends and loved ones. The best part? This craft is so straightforward that even the youngest members of your family can join in the fun, fostering creativity and providing a wonderful bonding experience.
Why Choose DIY Hair Flowers for Valentine’s Day?
Beyond their undeniable cuteness, crafting your own hair flowers offers numerous benefits. Firstly, it’s incredibly cost-effective. You can often find beautiful faux flowers on clearance racks or at discount craft stores, especially after holidays. This means you can create a multitude of unique accessories without breaking the bank. Secondly, the creative freedom is boundless. Unlike store-bought items, your handmade flowers can be perfectly tailored to your style, preferred colors, and desired level of sparkle.
For Valentine’s Day, this project is particularly fitting. It embodies the spirit of giving and creating something with love. Imagine a vibrant red and white heart-shaped flower, adorned with a dazzling crystal center, adding a festive touch to a child’s school outfit or a subtle sparkle to an adult’s ensemble. These accessories aren’t just for children; they can be sophisticated and chic, making them suitable for all ages.
Sourcing Your Supplies: A Treasure Hunt for Crafty Hearts
One of the most exciting parts of any DIY project is gathering your materials. For these Valentine’s hair flowers, the primary component, the flowers themselves, can often be found in unexpected places at incredible prices. I’ve had great luck discovering charming red and white heart-shaped flowers at craft stores like Michael’s, often significantly discounted during post-holiday clearance sales. Keep an eye out after major holidays like the Fourth of July or Christmas, as patriotic or festive-themed flowers in reds, whites, and pinks can be repurposed beautifully for Valentine’s Day.
Don’t limit yourself to heart shapes! Any fabric or silk flowers in reds, pinks, whites, or even purples can work wonderfully. Look for flowers with multiple layers of petals, as these often lend themselves well to being disassembled and reassembled into new designs. Consider different textures too – satin, velvet, or even organza flowers can add unique dimensions to your creations. If you can’t find specific heart flowers, don’t worry! Standard round flowers can be layered and combined to create equally stunning, custom designs that celebrate the essence of love.
Essential Supplies You’ll Need:
- Metal Hair Clips: Alligator clips are ideal for their strong grip and ease of attachment. Ensure you choose a size appropriate for the hair thickness and the desired placement of the flower. Snap clips or even barrettes can also work depending on your preference.
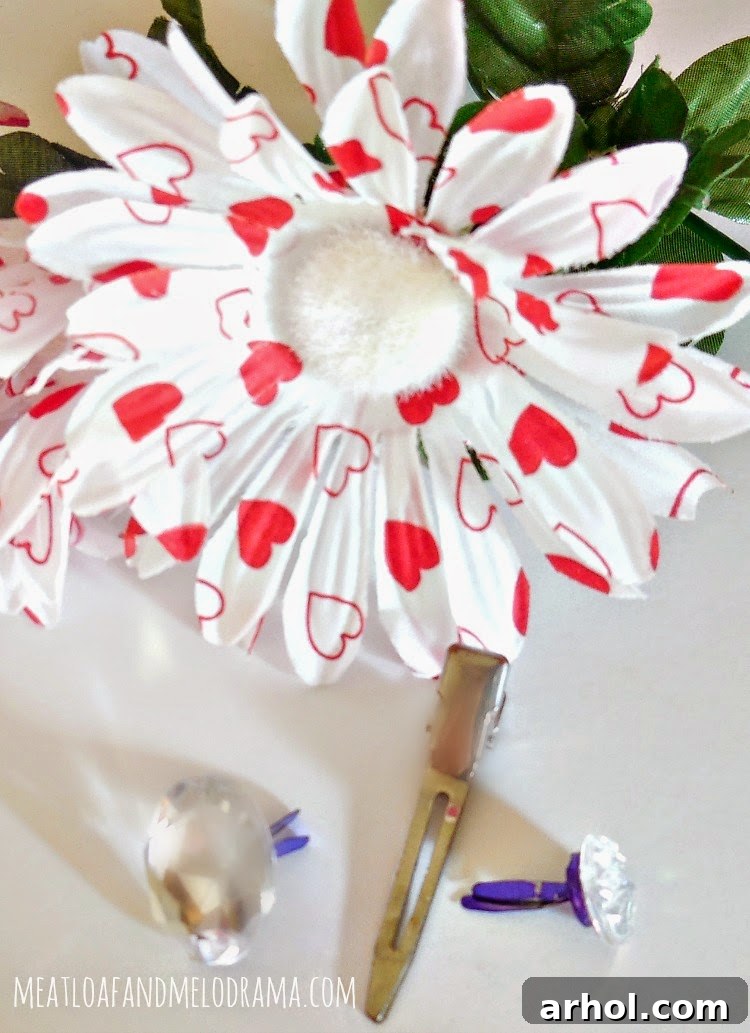
- Small Brads: These are tiny fasteners with bendable prongs that will act as the core of your flower assembly, holding multiple layers together and providing a stable base for your decorative center. They come in various metallic finishes; choose one that complements your chosen flowers.
- Large Crystals for the Center: This is where you can add serious sparkle! Opt for flat-backed rhinestones, decorative buttons, or even small cabochons. Clear, red, or pink crystals would be perfect for the Valentine’s theme.
- Strong Craft Glue: A good quality craft glue is crucial for durability. Hot glue guns work quickly and are excellent for attaching the flower to the clip (with adult supervision if kids are involved). For attaching crystals and ensuring a lasting bond, an industrial-strength adhesive like E6000 or a strong fabric glue is highly recommended.
Before you begin, lay out all your chosen flowers and embellishments. This pre-planning helps visualize your designs and ensures you have everything at hand, making the crafting process smooth and enjoyable.
Crafting Your Valentine’s Hair Flowers: A Simple Step-by-Step Guide
Once your supplies are gathered, the real fun begins! The beauty of this project lies in its simplicity – it’s mostly a matter of carefully disassembling the faux flowers and then creatively re-assembling them into your unique designs. This modular approach makes it incredibly versatile and allows for endless customization.
- Deconstruct Your Flowers: Gently pull apart the individual layers of petals from your chosen faux flowers. Most fabric flowers are constructed with layers glued or threaded together, making them easy to separate. Handle them carefully to avoid tearing the fabric.
- Design Your Layers: Experiment with different combinations of petals. You can mix and match colors, sizes, and even textures from various flowers. For instance, start with a larger, solid-colored petal as a base, then layer a smaller, heart-shaped petal on top for that classic Valentine’s look.
- Add the Crystal Center: Take one of your brads. Apply a small dab of strong craft glue to the center of the brad’s head. Carefully press your chosen crystal or embellishment onto the glue, ensuring it’s centered and secure. Allow it to dry completely according to the glue’s instructions. This step is crucial for a durable and dazzling center.
- Assemble the Flower Layers: Once the crystal is firmly attached to the brad, thread the brad through the center holes of your chosen flower layers. Start from the front (the side with the crystal) and push the brad through all the layers you’ve selected, ending with the prongs on the back of the outermost layer.
- Secure to the Hair Clip: Take your metal hair clip. Position the assembled flower on the top part of the clip where you want it to sit. Carefully bend the prongs of the brad through the fabric of the flower and around the top bar of the metal clip. You might need to make a small incision in the fabric with scissors to help the prongs pass through if the fabric is very dense. Once threaded, bend the prongs flat against the back of the flower and the clip to secure everything tightly. Add a small drop of hot glue or strong craft glue underneath the flower where it meets the clip for extra stability.
And just like that, you’ve created a beautiful, personalized hair flower! The process is truly that simple and intuitive, making it a perfect activity for crafters of all skill levels.
Unleash Your Creativity: Unique Design Ideas
The real magic happens when you start experimenting with different combinations. Each hair flower you create can be a unique reflection of your personal style or a special sentiment for Valentine’s Day. Here are some ideas to inspire your next creation:
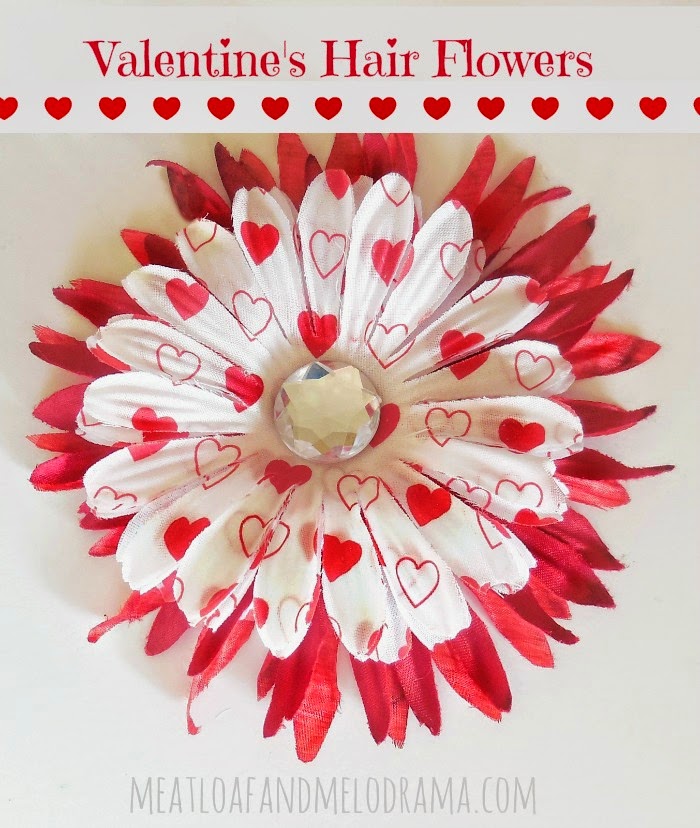
- Layering with Depth: As demonstrated by one of our examples, adding part of a larger, solid-colored flower to the back of a heart flower creates a beautiful halo effect, adding depth and visual interest. This technique makes the central design pop even more.
- Color Splash: Don’t be afraid to mix colors! Our daughter got creative by adding pink and white flower petals to a red base, resulting in a vibrant and playful design. Think about classic Valentine’s combinations like deep reds with soft pinks, or elegant whites with subtle lavender tones.
- Keeping It Classic: Sometimes, simplicity speaks volumes. A straightforward red and white heart flower, perhaps with a clear crystal, is timeless and elegant. It celebrates the traditional colors of Valentine’s Day beautifully without needing extra embellishments.
- Beyond Petals: Consider adding other small elements like tiny satin ribbons tied into bows at the base of the flower, or even a sprinkling of fine glitter (sealed with a clear spray) for an extra touch of sparkle.
One of the most delightful aspects of this craft is watching the individuality of each piece emerge. My daughter’s creation, incorporating pink and white petals, truly showcases how personal touches can elevate a simple idea into something extraordinary. Encourage your little ones to let their imaginations run wild – there’s no right or wrong way to combine colors and shapes!
Crafting with Little Hands: Safety and Fun
This project is wonderfully kid-friendly, making it an excellent opportunity for family crafting time. While children can easily handle selecting flowers, layering petals, and even threading brads, adult supervision is always recommended, especially when using scissors or a hot glue gun. For younger children, pre-cut petals or pre-glued brads can make the activity safer and more accessible, allowing them to focus on the fun of design and assembly.
Crafting together not only creates beautiful accessories but also develops fine motor skills, encourages decision-making, and sparks creativity. It’s a fantastic way to spend quality time, fostering conversation and shared joy. Imagine the pride on your child’s face when they wear a hair flower they’ve made themselves!
Our little Diva loves her creations so much that she practically has a flower to match every outfit. Here she is, sporting a simple yet elegant red and white heart flower, clipped to her bun before heading off to dance class. It just goes to show how versatile and effortlessly chic these handmade accessories can be, even for a quick, everyday style. Gotta love those top buns!
Caring for Your Handmade Hair Flowers
To ensure your beautiful Valentine’s hair flowers last, a little care goes a long way. Avoid excessive moisture, as it can weaken the glue and potentially damage the fabric. If they get dusty, a gentle brush with a soft cloth or a quick blast of cool air from a hairdryer on a low setting can help. Store them in a jewelry box or a designated container to protect them from getting crushed or tangled with other accessories.
Embrace the Joy of Handmade: Conclusion
So, even if your bow-making attempts have left you feeling all thumbs, don’t despair! You can still create a plethora of cute, charming, and utterly unique Valentine’s Day hair accessories with this simple hair flower tutorial. The ease of this craft means you can whip up as many as your heart desires, matching them to every outfit or gifting them to every special person in your life. Each flower, with its personalized touch, will carry a little piece of your creativity and affection.
We hope this guide inspires you to dive into the delightful world of DIY hair flowers. It’s a truly rewarding experience, perfect for celebrating love, fostering creativity, and adding a touch of handmade charm to your everyday life. Thanks so very much for stopping by and sharing in our crafting adventure. Take care, and have a wonderful, craft-filled day!

You may also like these crafts:
If you enjoyed making these Valentine’s hair flowers, you might love exploring other simple and fun DIY projects: