
Hi There!
Easy Cheeseburger Sliders: The Perfect Game Day Snack!
The energy in the air during Super Bowl season is simply infectious! While I might not be a die-hard fan of every team, the excitement surrounding the big game always draws me in, especially when it’s hosted in our home state. There’s something undeniably special about the buzz around the stadium, watching the preparations unfold, and seeing the pure joy in my little one’s eyes as he takes it all in. We even captured a quick moment on Instagram, soaking up the pre-game atmosphere.
Even if we’re not throwing a massive Super Bowl bash, my family loves to celebrate game day with delicious, easy-to-eat food. For us, the key is keeping it simple, flavorful, and fuss-free, allowing us to focus on the game – and, of course, those iconic commercials! That’s where these incredible cheeseburger sliders come into play. They are an absolute home run in our house and have become a beloved tradition for any gathering.
Why Cheeseburger Sliders Are Your Go-To for Any Occasion
While often associated with game day, cheeseburger sliders are incredibly versatile and perfect for so much more. In fact, I often find myself reaching for this recipe over traditional full-sized burgers for several compelling reasons. First, they are remarkably easier to prepare. Instead of grilling individual patties, you can cook a batch of mini sliders in a pan, making the process much quicker and more efficient.
Secondly, their small size makes them ideal for little hands. Kids absolutely adore these bite-sized burgers, making them a fantastic, less messy option for family meals. No more struggling with oversized buns and patties! Plus, for adults, their manageable portions mean you can enjoy a few without feeling overly stuffed, leaving room for other delicious snacks or even a second helping without guilt.
Beyond game day, these sliders shine at potlucks, birthday parties, or as a fun, quick weeknight dinner. They offer all the satisfying flavor of a classic cheeseburger but in a convenient, appetizer-friendly format. The ease of preparation, combined with their universal appeal, makes them an indispensable recipe in our kitchen.
Essential Ingredients for Perfect Cheeseburger Sliders
Gathering your ingredients is the first step to creating these delightful mini burgers. The beauty of this recipe lies in its simplicity, requiring just a few staple items to create maximum flavor. Here’s what you’ll need:
- 2 pounds lean ground beef
- 1 tablespoon dried minced onions (or fresh minced if preferred)
- Salt and black pepper, to taste (I recommend about 1 teaspoon salt and 1/2 teaspoon pepper to start)
- 1/2 large onion, diced (for cooking with the patties, adding a caramelized sweetness)
- Your favorite cheese for topping (cheddar, American, provolone, or Monterey Jack all work wonderfully)
- Kings Hawaiian Rolls or any mini hamburger buns (the slightly sweet Hawaiian rolls add a fantastic touch!)
Step-by-Step Directions to Craft Your Sliders
Follow these simple steps to create a batch of irresistible cheeseburger sliders. You’ll be amazed at how quickly these come together!
- Prepare the Ground Beef: In a large mixing bowl, combine the lean ground beef with the dried minced onions, salt, and pepper. Use your hands to gently mix the ingredients until just combined. Be careful not to overmix, as this can lead to tough patties.
- Form the Patties: Take small portions of the seasoned ground beef, about the size of a golf ball, and gently roll them into spheres. Then, press each ball to form small, thin patties. They should be slightly larger than the Hawaiian rolls as they will shrink slightly when cooked. For best results, aim for about 30 patties from 2 pounds of beef.
- Organize for Cooking: Place the formed patties on wax paper or parchment paper as you make them. This prevents sticking and makes transfer to the pan easier, ensuring they keep their shape.
- Cook the Patties: Heat a large frying pan or skillet over medium heat. Add a tablespoon or two of olive oil to the bottom of the pan. Once the oil is shimmering, carefully place the hamburger patties in a single layer. Add the diced fresh onions around the patties in the pan.
- Flip and Finish: Cook the patties for about 3-4 minutes on the first side, or until a nice brown crust forms. Flip them over and continue cooking for another 3-4 minutes, or until the juices run clear and the internal temperature reaches at least 160 degrees F (71 degrees C). The diced onions will caramelize as they cook alongside the patties, infusing them with extra flavor.
- Add the Cheese: During the last minute of cooking, place a slice or a small portion of your favorite cheese on top of each patty. You can cover the pan for a moment to help the cheese melt perfectly.
- Assemble Your Sliders: Once the cheese is melted and bubbly, transfer the cheesy patties and cooked onions onto the Kings Hawaiian rolls or mini buns.
- Serve Immediately: Arrange all the sliders on a large platter and get ready for everyone to dig in!
Customize Your Sliders: Topping Bar Ideas
One of the best parts about cheeseburger sliders is how incredibly customizable they are! I love setting up a “slider bar” with a variety of toppings and condiments, allowing everyone to build their perfect mini burger. It adds a fun, interactive element to any meal and caters to all tastes.
Classic Toppings Everyone Loves:
- Fresh Produce: Shredded lettuce, sliced tomatoes, pickle chips, thinly sliced red onion.
- Condiments: Ketchup, mustard (Dijon, yellow, honey), mayonnaise, barbecue sauce, special burger sauce.
- Extra Cheese: Offer different cheese options like pepper jack for a kick, or even crumbled blue cheese.
Elevate Your Slider Experience with These Additions:
- Caramelized Onions: Beyond the pan-cooked onions, a separate bowl of slowly caramelized onions adds a gourmet touch.
- Bacon Bits: Crispy bacon pieces are always a crowd-pleaser.
- Jalapeños: Fresh or pickled jalapeños for those who enjoy a bit of heat.
- Sautéed Mushrooms: Earthy and savory, they pair wonderfully with beef.
- Avocado Slices or Guacamole: For a creamy, fresh addition.
- Fried Onion Strings: Add a fantastic crunchy texture.
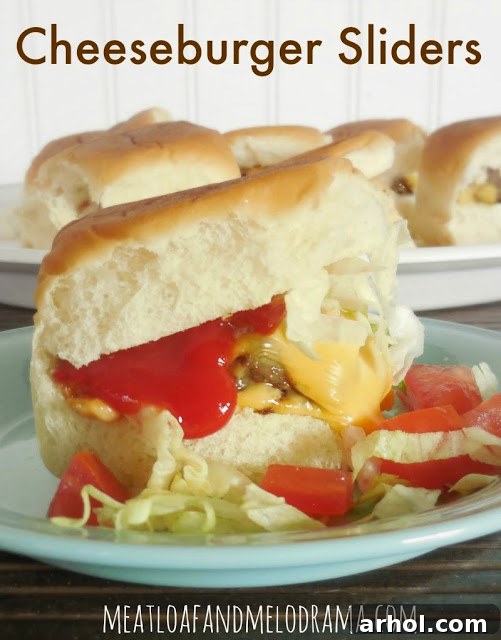
For me, I load my little cheeseburgers up with shredded lettuce, juicy tomatoes, tangy ketchup, and a dollop of mustard – truly “the works!” The kids, on the other hand, tend to favor just loads of ketchup or a generous swirl of barbecue sauce. The possibilities are endless, so feel free to get creative with your favorite fixings!
Perfect Pairings and Beyond Game Day
These cheeseburger sliders are satisfying on their own, but they truly shine when accompanied by the right side dishes. For a classic game day spread, a simple bowl of crispy chips is always a hit. However, if you’re looking to round out your meal, consider these fantastic additions:
- Classic Sides: French fries, onion rings, or sweet potato fries.
- Lighter Options: A fresh green salad, coleslaw, or a vibrant pasta salad provides a refreshing contrast.
- Heartier Choices: Baked beans, corn on the cob, or even a side of macaroni and cheese.
This recipe yields approximately 30 delicious sliders, which is perfect for feeding a crowd or ensuring you have plenty of leftovers. Speaking of leftovers, these cheeseburger sliders make fantastic next-day meals! Simply warm them up in the microwave or a toaster oven for a quick and easy lunch or a busy weeknight dinner. They hold up beautifully, making your meal prep a breeze.
Join the Conversation!
I hope you give these easy cheeseburger sliders a try for your next gathering or family meal. They are truly a delicious, stress-free way to enjoy a classic comfort food.
What’s your ultimate go-to food for game day? And when Super Bowl Sunday rolls around, are you glued to the game, eagerly anticipating the commercials, or perhaps a bit of both? Share your thoughts in the comments below – I’d love to hear from you!
Thanks so much for visiting!
You Might Also Enjoy These Recipes: