
Welcome to a journey of transforming cherished memories into stunning home decor! There’s something truly magical about browsing through a beautifully curated catalog, like Anthropologie’s, and stumbling upon an item that instantly captivates your imagination. Recently, I had one of those “aha!” moments when a charming crossed spoon plate stand caught my eye. It wasn’t just its aesthetic appeal, but the creative potential it sparked within me that truly resonated. This wasn’t merely about replicating a design; it was an invitation to infuse a store-bought concept with a deeply personal touch, turning a simple decor piece into a meaningful heirloom display.
While I don’t typically venture into “knock-off” projects, this particular item felt different. It presented a unique opportunity to celebrate and preserve a collection of vintage spoons passed down from my beloved grandmother. These aren’t just ordinary utensils; they are tangible links to family history, each carrying stories and memories. Crafting a retro crossed spoon plate stand from these treasured pieces seemed like the perfect way to honor their legacy, giving them a new purpose beyond the kitchen drawer and transforming them into a focal point of sentimental beauty in my home.
Bringing Sentimental Value to Your Home Decor
My grandmother’s collection isn’t a complete set, and in a bustling household like mine, flatware tends to mysteriously disappear at an alarming rate. With kids helping to clear the table, a stray spoon often finds its way into the trash or vanishes into the unknown. Losing an ordinary utensil is one thing, but the thought of misplacing one of these vintage pieces, imbued with such personal history, fills me with dread. This DIY project offered a brilliant solution: a way to keep these precious spoons safe, visible, and celebrated, ensuring they remain a cherished part of our daily lives without the risk of accidental disappearance.
Each spoon boasts a beautiful starburst pattern on its handle – a design detail that speaks volumes about the craftsmanship of yesteryear. I’ve often wondered about its specific name or origin. If you happen to be a vintage flatware connoisseur and recognize this distinctive pattern, please do share your knowledge! I would absolutely love to learn more about the history behind these beautiful pieces, further connecting me to their past and enhancing their story.
Gathering Your Materials for This Easy DIY Craft
The Anthropologie plate stand that captured my imagination featured a sleek, silver finish. To replicate this elegant look without the hefty price tag, I opted for a clever workaround: transforming a simple, clear plastic plate stand I already owned. This approach not only saved money but also allowed me to customize the finish precisely to my liking, proving that high-end aesthetics can absolutely be achieved on a modest budget.
What You’ll Need:
- Vintage Spoons: Ideally, two spoons with sentimental value or an interesting design.
Tip: Look for unique patterns at thrift stores or antique markets if you don’t have heirlooms. - Plastic Plate Stand: A basic, sturdy stand that will serve as your base.
Tip: You can also use a wooden stand and paint it accordingly. - Metallic Spray Paint: Choose a color that matches your desired aesthetic (silver, gold, bronze). I used Rustoleum for a lovely, subtle metallic sheen.
Safety Note: Always work in a well-ventilated area and wear appropriate protective gear when spray painting. - Strong Adhesive: This is crucial for securely attaching the spoons. Hot glue worked wonders for me, but other strong craft glues like E6000 (ensure proper curing conditions) can also be used.
Consider: The climate you live in can affect glue’s efficacy, as I learned firsthand! - Cleaning Supplies: For preparing your plate stand and spoons (e.g., rubbing alcohol, soap and water).
- Protective Drop Cloth or Newspaper: For your spray painting area.
Step-by-Step Guide to Crafting Your Unique Plate Stand
Step 1: Prepare Your Plate Stand
First, thoroughly clean your plastic plate stand. Any dust, grease, or grime can prevent the paint from adhering properly, leading to a patchy or peeling finish. A simple wash with soap and water, followed by a wipe-down with rubbing alcohol, will ensure a pristine surface. Once clean and completely dry, take your stand to a well-ventilated outdoor area or a garage with open doors. Lay down a drop cloth or old newspapers to protect your workspace.
Using your metallic spray paint, apply several light, even coats to the stand. Rather than trying to cover it all in one go, which can lead to drips and unevenness, build up the color gradually. Allow each coat to dry to the touch before applying the next, typically about 15-20 minutes, depending on your paint and humidity levels. My Rustoleum metallic paint wasn’t overtly shiny, but it imparted just the right amount of metallic luster, making the plastic remarkably resemble actual metal. This step is crucial for achieving that desired high-end look without the actual high-end material.
Step 2: Clean and Prepare Your Vintage Spoons
While your plate stand dries, it’s the perfect time to prepare your vintage spoons. Give them a good cleaning to remove any tarnish or residue. For stainless steel, a simple wash with dish soap and water should suffice. If you’re using silver-plated or sterling silver spoons, a gentle polish can bring out their natural shine and highlight intricate patterns like the starburst design on my grandmother’s spoons. The goal is to make them sparkle and stand out as the decorative focal point of your new stand.
Step 3: Attach the Spoons
Once your painted plate stand is completely dry and cured (refer to your spray paint’s instructions for full cure time, usually 24-48 hours), it’s time for the exciting part: attaching the spoons. The idea is to create a crossed pattern, mimicking the elegant design of the Anthropologie original. I experimented with E6000 adhesive first, known for its strong bond, but to my surprise, it struggled to hold in our intensely hot weather. Perhaps the heat prevented proper curing, or it just wasn’t the right fit for this particular application.
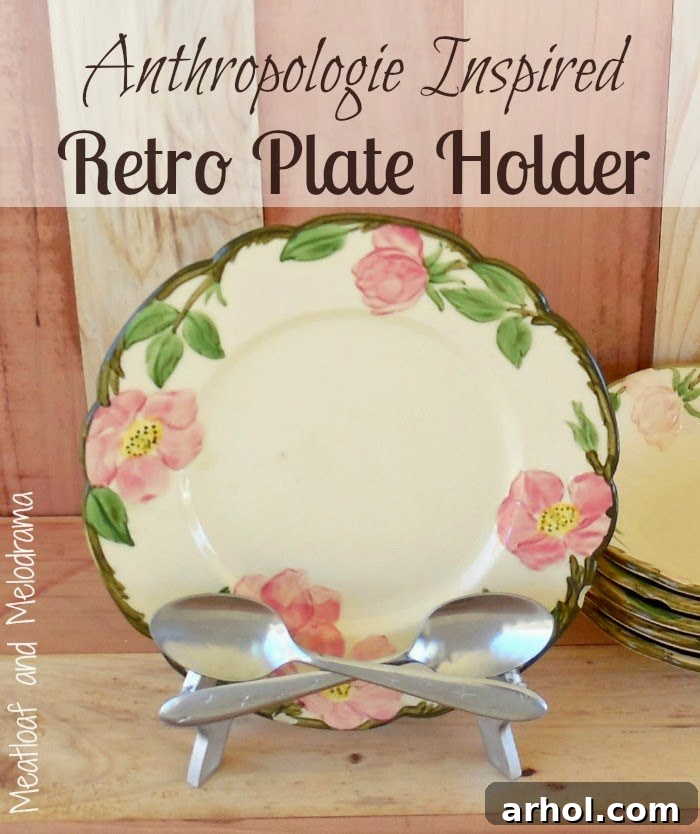
Undeterred, I switched to hot glue, and the results were instantaneous and secure. Hot glue sets quickly, making it ideal for positioning and holding the spoons in place right away. Carefully arrange the two spoons on the front of the stand, crossing them over each other. Apply a generous amount of hot glue to the points where the spoons meet the stand and where they overlap each other. Hold them firmly in place for a few moments until the glue cools and sets. I specifically chose to position the spoons a little lower than the original Anthropologie design. This thoughtful placement ensures they don’t obscure too much of the plate, allowing both the decorative spoons and the beauty of the displayed plate to be fully appreciated.
The Perfect Match: Displaying Your Cherished Pieces
I must say, I think the finished product is a pretty close match to the original inspiration, if not better, thanks to its unique story and personal touch! The subtle metallic sheen of the stand beautifully complements the vintage luster of the spoons, creating an elegant and timeless piece of decor. The satisfaction of seeing a vision come to life, especially one that incorporates family heirlooms, is incredibly rewarding. This crossed spoon plate stand now proudly displays one of my grandmother’s vintage Franciscan Ware plates, specifically from the beloved Desert Rose collection. This pairing feels absolutely perfect and incredibly appropriate, creating a cohesive and deeply meaningful vignette in my home.
This project was not only incredibly easy to execute but also remarkably affordable. The only cost incurred was for the spray paint, which came to about $4. I already had the plastic plate stand and, most importantly, the invaluable vintage spoons. Compare this to the original Anthropologie plate stand, which retailed for approximately $20 or more. The savings are substantial, but the value extends far beyond mere economics.
Beyond the cost efficiency, I genuinely prefer my DIY version. It elevates the plate, keeping it off the flat surface and adding a touch of sophisticated flair. More importantly, it carries an immense amount of sentimental value that no store-bought item could ever replicate. It’s a constant, gentle reminder of my grandmother, her legacy, and the beautiful memories we share. This handmade piece isn’t just decor; it’s a conversation starter, a tangible piece of family history, and a testament to the power of personalizing your living space.
Join the Conversation: What Inspires You?
Creating this piece has been such a joyful experience, transforming something ordinary into something extraordinary and deeply personal. It got me thinking: have you ever encountered an item, perhaps in a store window or an online catalog, that “spoke” to you in a profound way, inspiring you to create something uniquely yours? What sentimental items have you found creative ways to integrate into your home decor, giving them new life and purpose?
I would absolutely love to hear about your own DIY inspirations, knock-off successes, or cherished heirloom projects. Sharing our creative journeys not only inspires others but also strengthens our connection to the objects that fill our homes and hearts. Thank you so much for stopping by and sharing a moment of creative inspiration. Have a wonderful day filled with beauty and personal touches!
Warmly,
Dee 🙂
Sharing At:
- Wonderful Wednesday
- Wow Us Wednesdays
- Whimsy Wednesday
- Wow Me Wednesday
- Wednesday Roundup
- Worthwhile Wednesdays
- Thursday Favorite Things
- Feathered Nest Friday
- Weekend Retreat
- Craft Frenzy Friday
- Fab Creative Friday
- Flaunt It Friday
- Party In Your PJs
- Pretty Pintastic
- I Heart Naptime
- Best of the Weekend
- Say G’Day
- DIY Sunday Showcase
- Funky Junk
- Inspiration Monday
- Clever Chicks
- Monday Funday
- Metamorphosis Monday
- Inspire Me Tuesday
- The Scoop
- Tweak It Tuesday
- Treasure Box Tuesday
- Show Me What Ya Got
- Take A Look Tuesday
- Twirl and Take A Bow
- Lou Lou Girls
- July Before and After