
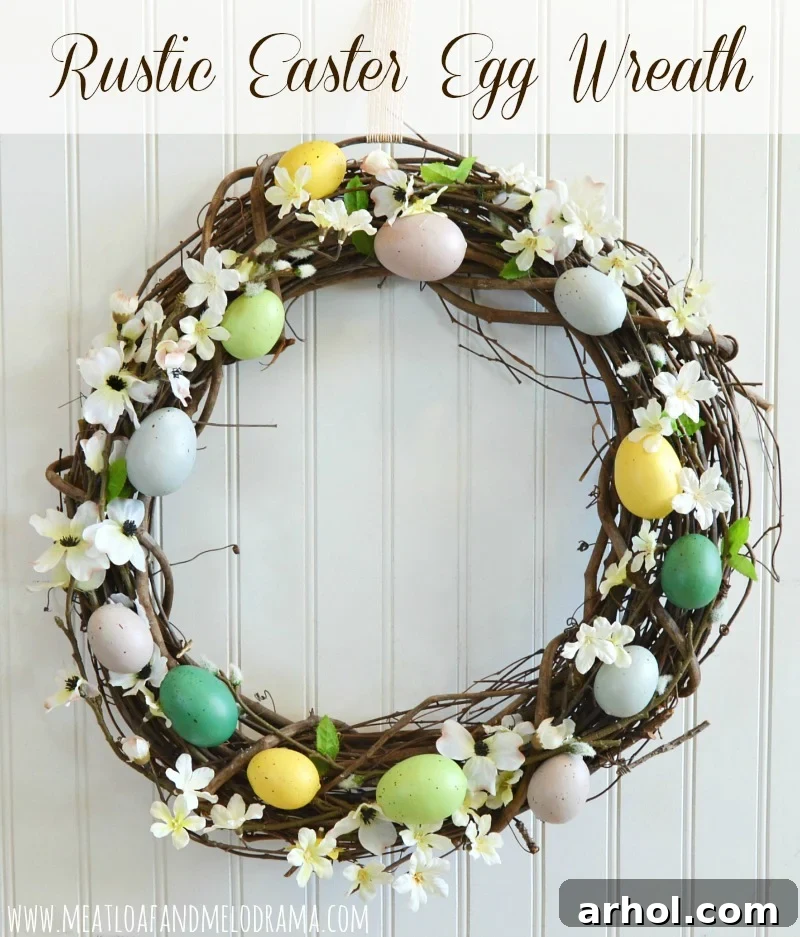
Embrace Spring: Craft Your Own Rustic Easter Egg Wreath on a Budget
Welcome, fellow craft enthusiasts and spring lovers! Can you believe how quickly the seasons fly by? As March unfolds, bringing with it the promise of warmer days and blossoming nature, many of us start dreaming of fresh, vibrant home decor. My front door, for one, was looking decidedly bleak after the festive cheer of Valentine’s Day faded, leaving a bare spot where a lovely wood slice heart wreath once hung. With spring break just around the corner and Easter arriving early this year, it was high time to infuse some much-needed seasonal joy. That’s why I decided to create a beautiful and budget-friendly rustic Easter egg wreath – a perfect touch of early spring charm for any home.
This guide will walk you through the simple steps to craft your own unique spring decor, offering tips for smart shopping and personalizing your wreath to perfectly match your home’s aesthetic. Get ready to transform your entryway and celebrate the arrival of spring with a delightful handmade touch that will captivate all who visit.
The Allure of a Handmade Easter Wreath: Why DIY?
For quite some time now, I’ve harbored a secret desire to craft an exquisite Easter egg wreath. There’s something undeniably captivating about their charm, instantly elevating the spirit of spring. However, a quick browse through boutique stores or online marketplaces quickly reveals that these delightful decorations often come with a hefty price tag, easily ranging from $40 to over $100 for a quality piece. As a passionate DIYer, I firmly believe that beautiful home decor shouldn’t break the bank. Last year, my crafting adventures led me to create an adorable bunny wreath instead, which was lovely, but my yearning for an egg wreath persisted.
The motivation to create rather than buy often stems from a desire for authenticity and personal expression. A store-bought wreath, no matter how pretty, lacks the story and soul of something you’ve crafted yourself. The moment I stumbled upon a vibrant collection of pastel faux speckled eggs at my local craft store just last week, I knew, without a shadow of a doubt, that this was the year for the ultimate homemade egg wreath! The thrill of finding the perfect supplies at an affordable price is truly one of the greatest joys of crafting, sparking creativity and proving that stunning decor can be accessible to everyone.
Beyond the significant cost savings, making your own DIY spring wreath offers a unique sense of accomplishment and allows for complete creative freedom. You get to choose every element, from the texture of the grapevine to the specific shades of pastel eggs and the delicate faux blooms. This personal touch ensures your decor perfectly complements your home’s aesthetic, creating a truly one-of-a-kind piece that reflects your individual style and flair. It’s more than just a decoration; it’s a labor of love that adds warmth, character, and a welcoming ambiance to your living space, making your home feel truly yours as you usher in the new season.
Inspiration Strikes: From High-End to Handmade with Smart Shopping
My primary inspiration for this project stemmed from a truly gorgeous wreath I spotted in a Pottery Barn catalog. It featured an elegant blend of pussy willows and delicate eggs, exuding a sophisticated yet natural charm that immediately caught my eye. While their design was slightly different, and undoubtedly came with a premium price tag, I immediately envisioned how I could adapt the concept using resources I already had or could acquire affordably. This creative challenge is often where the most satisfying DIY projects begin. Reusing and upcycling are cornerstones of smart crafting, not only saving money but also reducing waste. I was fortunate enough to already possess a sturdy grapevine wreath base from a previous project, saving me an initial expense and giving this new creation a head start.
Savvy shopping is absolutely key to keeping DIY projects budget-friendly without compromising on quality or aesthetics. I made sure to take advantage of sales and coupons, securing the faux eggs at a fantastic discount with a special craft store coupon I’d been saving. The beautiful faux flowers, which provide so much texture and color to the wreath, were also a steal, being half off their original price during a seasonal sale. For the charming pussy willow branches and additional small floral accents, I explored a local dollar store. These often prove to be a goldmine for inexpensive yet beautiful embellishments, proving that you don’t need to spend a fortune to achieve a high-end look. This strategic approach to sourcing materials allowed me to create a stunning, high-quality wreath without compromising my budget, ultimately demonstrating that creativity and resourcefulness can lead to truly exceptional results. It’s amazing what you can achieve when you combine a clear vision with a little bit of patience and smart shopping.
Essential Supplies for Your Rustic Easter Egg Wreath
Before you dive into the joyful process of crafting, gathering all your materials ensures a smooth and enjoyable experience. Here’s everything you’ll need to create your very own charming rustic Easter egg wreath, transforming simple supplies into a stunning piece of spring decor:
- 1 Grapevine Wreath: The natural, rustic base for your creation. You can use a new one or repurpose an old one for an eco-friendly approach.
- 1 Package of Faux Speckled Eggs: Choose pastel shades like soft blues, greens, pinks, and yellows for that classic, gentle Easter aesthetic. Their speckled detail adds an authentic touch.
- Assorted Faux Flowers and Greenery Stems: Think delicate blossoms, small leaves, and especially pussy willows. Pussy willows are fantastic for achieving that rustic, natural look, adding texture and subtle elegance.
- Thin Burlap Ribbon: Perfect for creating a sturdy yet stylish hanging loop that complements the rustic theme.
- Hot Glue Gun: Your essential tool for securely attaching the eggs and any stubborn floral pieces. Make sure you have plenty of glue sticks!
- Thin Craft Wire: Ideal for securing your floral arrangements to the grapevine wreath, ensuring everything stays in place.
- Wire Cutters: Absolutely essential for snipping floral stems and craft wire cleanly and safely.
Remember, these are suggestions, and you can always substitute items based on what you have on hand, what’s on sale, or what truly inspires you at the craft store. The beauty of DIY lies in its flexibility and the opportunity to personalize every aspect. Don’t hesitate to experiment with different flower types or egg colors to create a wreath that is uniquely yours.
Crafting Your Dream Spring Wreath: A Step-by-Step Guide
Step 1: Preparing and Arranging Your Floral Elements
The first step in bringing your rustic Easter egg wreath to life involves carefully preparing your faux flowers and pussy willow branches. Using your reliable wire cutters, begin by snipping the individual flower and pussy willow stems apart from their main branches. This process gives you smaller, more manageable pieces to work with, allowing for precise placement and a more intricate design. Think of it as deconstructing your floral bundles into individual components ready for assembly.
Once your stems are separated, it’s time to begin the artistic process of tucking them into the intricate weave of the grapevine wreath. Start by circling the entire wreath, aiming for an even distribution of flowers and pussy willows. This initial layer creates a lush, natural base that will beautifully support and frame your eggs. As you arrange, experiment with different placements, observing how the colors and textures interact. You might find certain colors clash or that one area feels too dense. For instance, I initially had some vibrant yellow flowers, but decided I preferred the softer, lighter pastel palette for this particular wreath, so I set them aside for another project. Don’t be afraid to adjust and rearrange until you’re completely satisfied with the overall look and balance of your floral foundation. The goal is to create a sense of natural growth and abundance.
Once your floral arrangement is pleasing to the eye and appears well-distributed, secure the stems firmly in place using thin craft wire. This step is absolutely crucial for ensuring that your delicate elements remain fixed and withstand being hung on a door or wall. Gently wrap the wire around the stems and thread it through the grapevine, tucking the ends away neatly so they aren’t visible or snagging. This foundational layer, once secured, is what gives your wreath its enduring charm and natural, abundant feel, ready for the next delightful additions.
Tip for a Cleaner Crafting Experience: Work Outdoors!
A quick word of advice from personal experience that will save you some cleanup time: grapevine wreaths, while beautiful and rustic, can be quite “sheddy” when first handled. Little bits of dried vine, twigs, and debris tend to fall off as you manipulate them, especially when you’re tucking in the floral stems. To avoid a significant mess indoors, particularly on your crafting table or floor, I highly recommend doing this initial arrangement stage outside. On the day I worked on mine, the weather was wonderfully cooperative – a mild, breezy day perfect for an outdoor crafting session! A clean workspace, even if it’s your patio, deck, or a shaded spot in the garden, makes the entire crafting process much more enjoyable and less stressful, allowing you to focus purely on the creative aspects.
Step 2: Attaching Your Rustic Easter Eggs
With your floral base firmly and beautifully in place, it’s time for the true stars of the show: the Easter eggs! Heat up your hot glue gun, ensuring it’s ready for continuous use, and begin the delightful process of attaching the faux speckled eggs to the grapevine wreath. I found that placing most of the eggs towards the center of the wreath created a beautiful, cohesive cluster, drawing the eye inward and giving the wreath a sense of fullness.
However, to add a special touch of whimsy and intriguing visual interest, I strategically glued two of the eggs so that they protruded slightly from the main body of the wreath, rather than being fully nestled within. This small, intentional detail creates a dynamic effect, making the wreath feel more playful, organic, and less uniformly arranged. It gives the impression of eggs naturally peeking out from the foliage, adding to its rustic charm.
When gluing, apply a generous yet controlled dot of hot glue to the back of each egg and press it firmly onto the grapevine. Hold it in place for a few seconds until the glue sets and the egg feels secure. Be mindful of spacing and color distribution as you go, ensuring a balanced and aesthetically pleasing arrangement across the entire wreath. Remember, the inherent beauty of a rustic wreath lies not in absolute perfection, but in its natural charm and the unique imperfections that make it truly handmade. This step is where your wreath truly starts to embody the spirit of Easter and spring.
Step 3: Adding the Finishing Touch – A Burlap Hanger
You’re almost there! The final, yet crucial, step is to add a functional and aesthetically pleasing hanger to your newly created masterpiece. From a previous project, an old blue ribbon had been hanging on the grapevine wreath, but it certainly didn’t align with the natural, rustic aesthetic of my new spring creation. Therefore, I carefully removed it, making way for a more suitable option.
Instead, I carefully threaded a piece of thin burlap ribbon through one of the sturdy, interwoven branches of the grapevine. Burlap, with its earthy texture and natural tones, perfectly complements the rustic feel of the wreath, providing a subtle yet stylish hanging solution. It’s durable enough to hold the weight of the wreath and adds an extra layer of charming, homespun appeal. Once threaded, tie the burlap ribbon securely in a sturdy loop at the top, creating a reliable hanger. And just like that, your beautiful, handmade rustic Easter egg wreath is officially complete and ready to bring cheer to your home!
Displaying Your Masterpiece: Simple Charm and Sweet Temptations
I purposefully kept the design of this Easter egg wreath simple and rustic, allowing the natural beauty of the materials to shine through. In my opinion, it truly doesn’t need any further embellishment; its understated elegance and organic charm speak for themselves. The thoughtful blend of the raw grapevine, the soft textures of the pussy willows, the gentle hues of the faux flowers, and the delicate speckled eggs creates a harmonious, inviting look that is perfectly suited for welcoming the spring season into your home. It’s a testament to the idea that sometimes, less is indeed more, especially when aiming for a timeless, rustic appeal.
Now, the only thing left to do is patiently wait for the persistent March rain to subside so I can proudly hang it on my front door! It will serve as a cheerful beacon, greeting guests and spreading spring joy throughout the neighborhood. While I briefly considered the idea of keeping the wreath indoors, perhaps above a mantel or in a entryway, a humorous thought quickly changed my mind. The pastel speckled eggs, with their inviting hues and slight sheen, bear an uncanny resemblance to delicious malted milk candy eggs, and I certainly don’t need that kind of sweet temptation lurking inside my home every day! This rustic Easter egg wreath is meant to be admired and enjoyed by all who approach, setting a delightful and welcoming tone for the season from its outdoor perch.
One of the most rewarding aspects of this entire project, beyond the sheer joy of creating, is the incredible affordability. This charming, personalized Easter egg wreath cost me less than ten dollars to make! That’s right, a beautiful, unique piece of seasonal decor for a mere fraction of the price of store-bought alternatives that often lack the same character and personal touch. It’s a powerful testament to the value of smart shopping, the satisfaction of creating something beautiful with your own hands, and the incredible joy that comes from DIY projects. I encourage you to try it yourself and experience the rewarding feeling of crafting budget-friendly, beautiful home decor.
Join the Spring Crafting Community!
As the days grow longer, the air gets crisper, and nature awakens from its winter slumber, spring is truly the perfect season for embracing your creative side. There’s a renewed energy that inspires us to refresh our surroundings and infuse our homes with the vibrancy of the season. Have you embarked on any spring wreath projects yet, perhaps using different materials or themes? Or have you tried your hand at other delightful spring crafts, such as creating floral centerpieces, decorating Easter baskets, or even painting spring-themed artworks?
I’d absolutely love to hear about your creative endeavors in the comments below! Share your ideas, tips, and successes – let’s inspire each other to make this spring the most creative one yet. Your insights could spark the next great DIY project for someone else in our crafting community.
Thank you so much for visiting and joining me on this crafting journey. I hope this detailed guide has inspired you to gather your supplies, unleash your creativity, and craft your own beautiful rustic Easter egg wreath. Adding such a personal touch to your spring home decor is not only rewarding but also incredibly fun. Happy crafting, and may your spring be filled with beauty and joy!
Discover More Inspiring Spring DIY Projects
If you enjoyed crafting this charming rustic Easter egg wreath and are looking for more ways to infuse your home with handmade spring cheer, you might also love exploring these other delightful spring-themed DIY projects to further brighten your home and unleash your creativity: