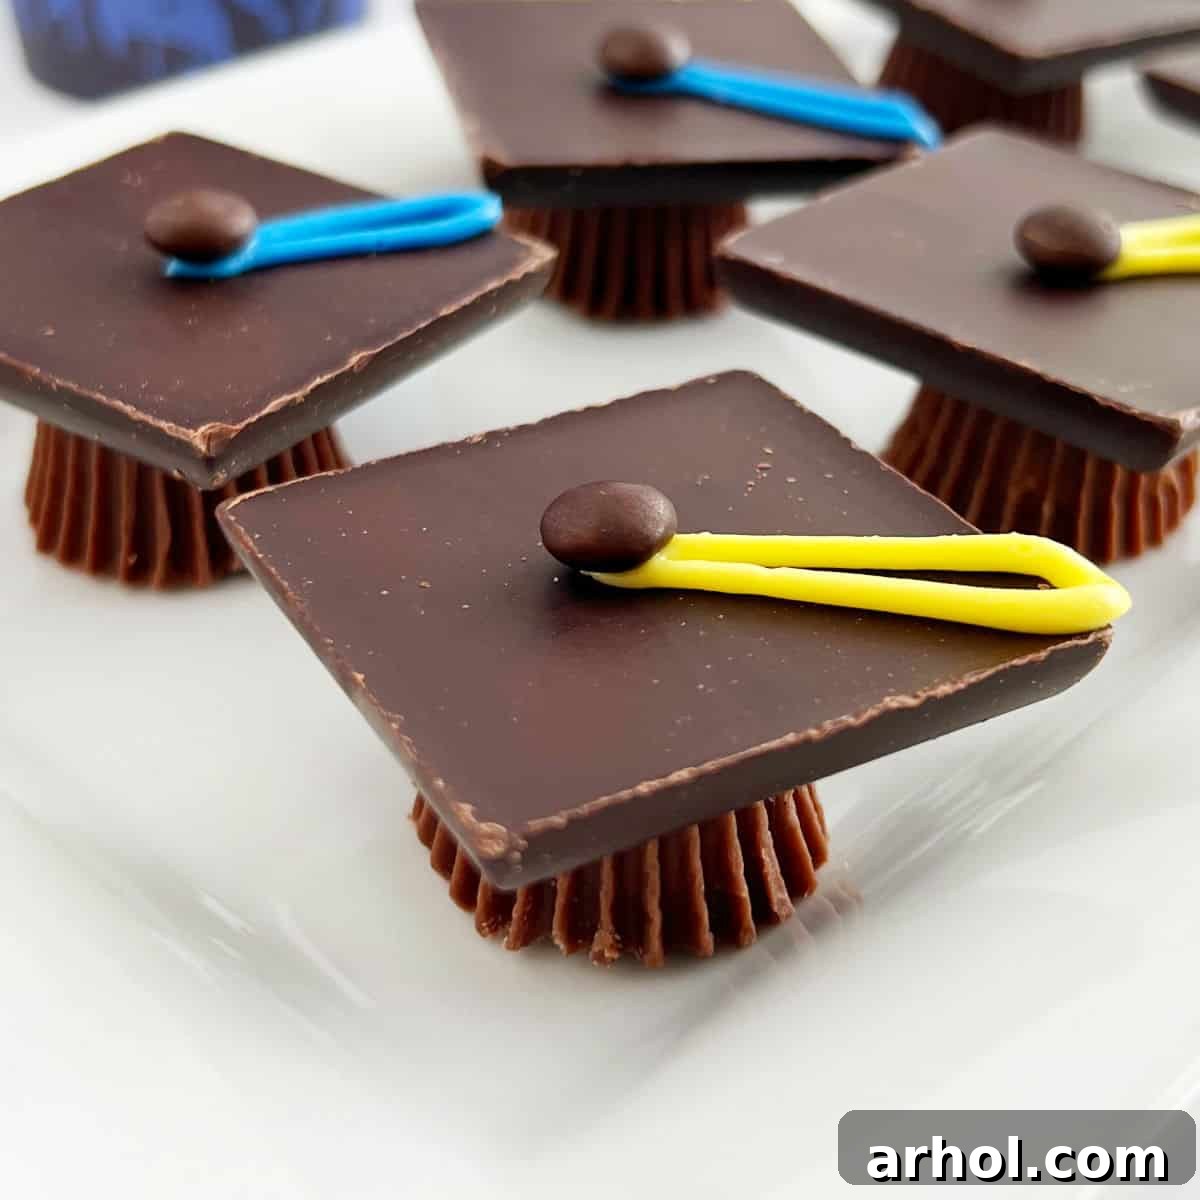
Mark this momentous occasion with a sweet touch! These adorable Chocolate Graduation Caps Treats are not only a fun and festive way to celebrate your graduate’s hard-earned achievements but also incredibly simple to make. Crafted with beloved Reese’s Peanut Butter Cups, smooth chocolate squares, and a few basic ingredients, this easy, no-bake recipe is destined to be the star dessert at any graduation party. Whether you’re honoring a kindergartner, a high school senior, or a university graduate, these charming confections add a personalized and delightful flair to the celebration.
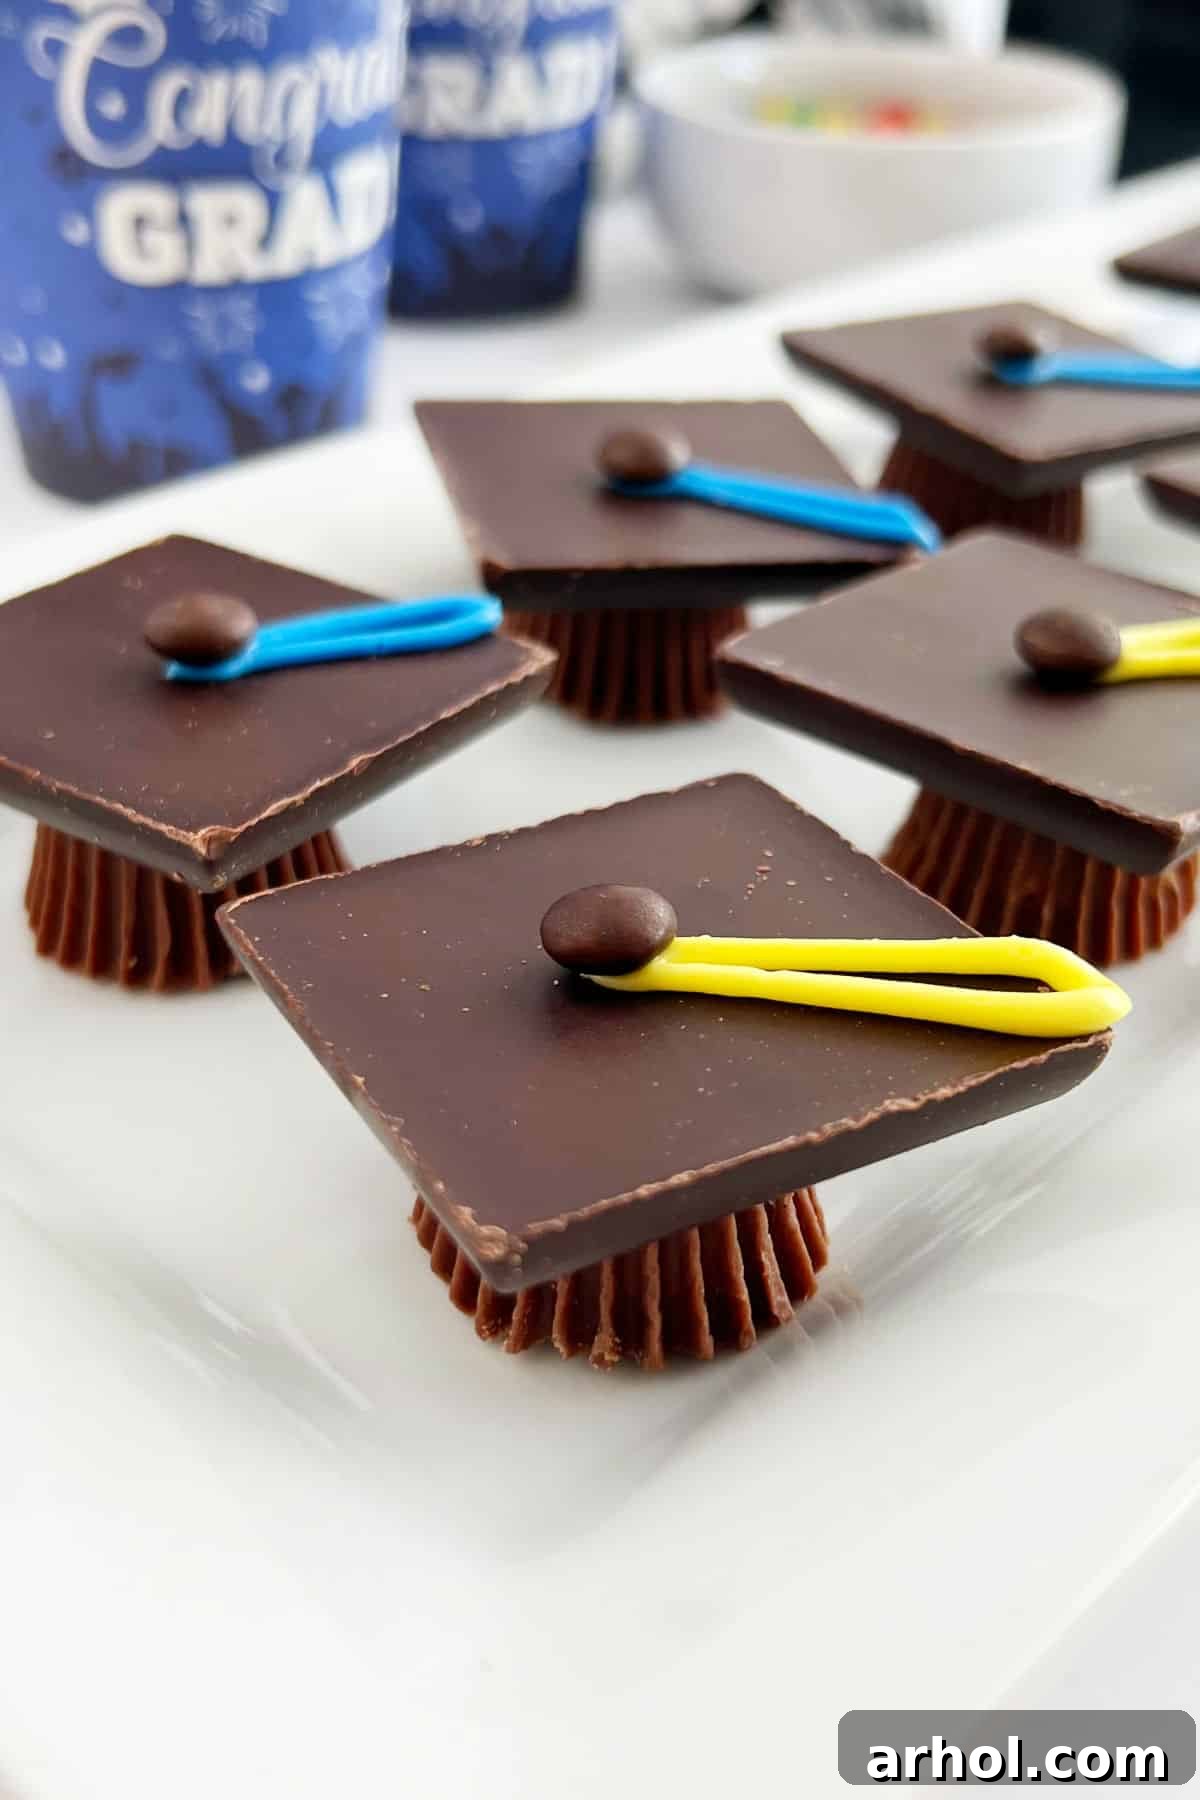
Table of Contents
- Why Chocolate Graduation Caps are a Must-Have
- Essential Ingredients
- Equipment You’ll Need
- Step-by-Step Assembly Guide
- Customization and Personalization Tips
- Serving and Display Ideas
- Storage Best Practices
- Expert Tips for Success
- Frequently Asked Questions (FAQs)
- Chocolate Graduation Caps Treats Recipe
- A Recipe for Memories
Every graduation marks a significant milestone, filled with pride, joy, and a touch of nostalgia. What better way to honor the hard work and dedication of your graduate than with a homemade treat that’s as special as they are? For years, these adorable candy graduation hats have been a go-to for family celebrations. Now, with two Class of 2024 graduations on our calendar, it’s the perfect time to share this incredibly simple, yet impressive, dessert recipe with you. It’s a fantastic project for busy graduation seasons, offering a quick and satisfying result that everyone will love.
Why Chocolate Graduation Caps are a Must-Have
These delightful treats are more than just candy; they are miniature edible symbols of accomplishment. Their charm lies in their universal appeal and incredible versatility. Whether your graduate is moving from preschool to kindergarten, elementary to middle school, high school to college, or stepping into the professional world, these treats fit every occasion. They are:
- Effortlessly Easy: No baking required, just simple assembly. Perfect for all skill levels, even kids can help!
- Visually Stunning: Their distinct cap shape instantly brings a festive, celebratory vibe to any dessert table.
- Highly Customizable: Easily match school colors with tinted frosting, making them unique to your graduate.
- Crowd-Pleasing: Who can resist the classic combination of chocolate and peanut butter? They’re a guaranteed hit!
- Versatile: Serve them individually, arrange them on a platter, or use them as toppers for cupcakes or cakes.
Forget complicated desserts; these chocolate graduation caps offer maximum impact with minimal effort, allowing you more time to enjoy the celebration!
Essential Ingredients
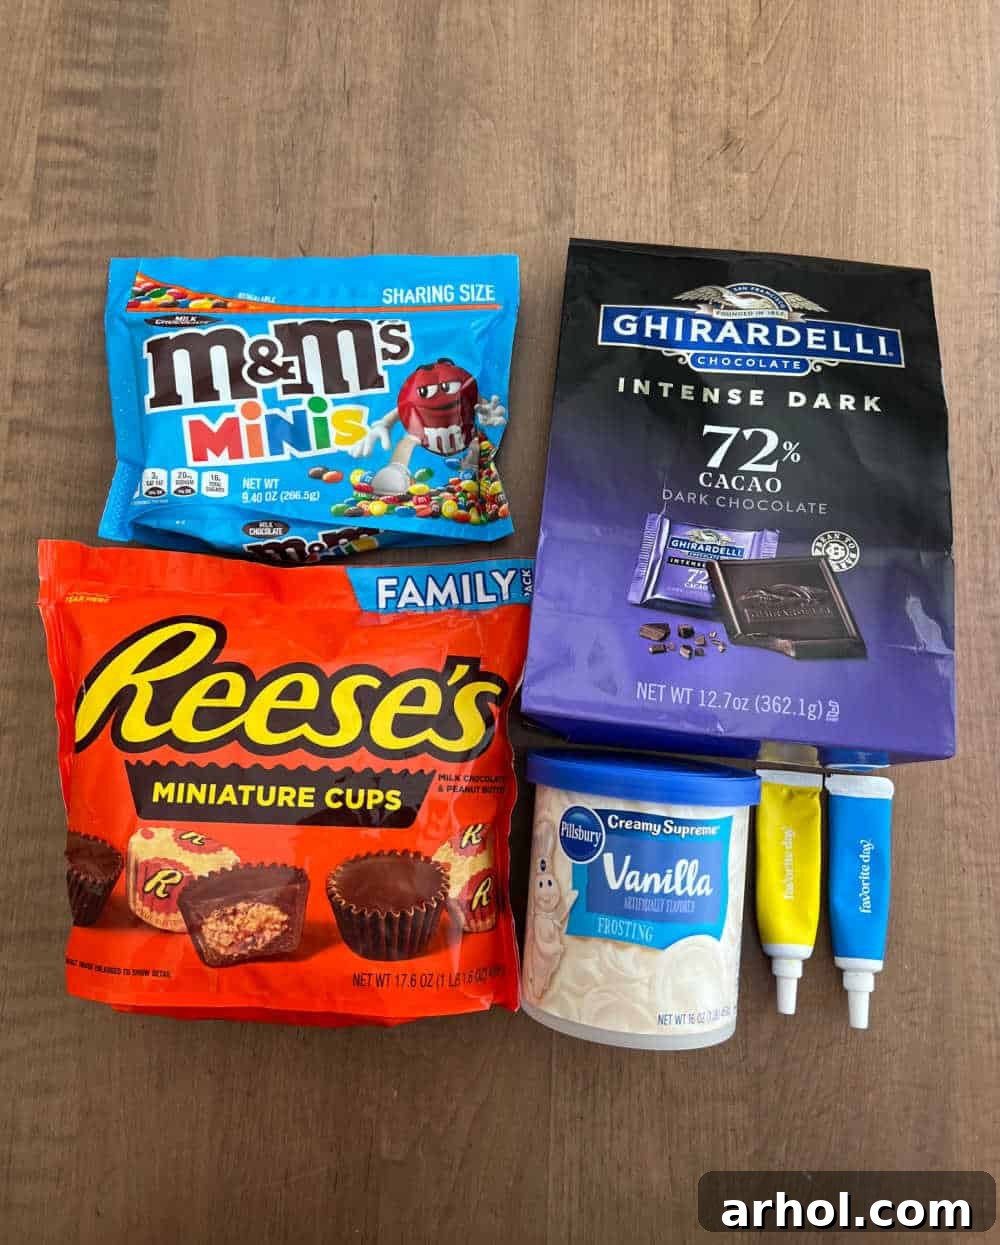
You’ll be amazed at how few ingredients are needed to create these impressive treats. All items are readily available at your local grocery store, making this a convenient last-minute party dessert option. The full, detailed quantities are available in the printable recipe card below, but here’s a look at what you’ll need:
- Reese’s Miniature Cups: These are the perfect base for the “cap.” Their iconic shape forms the bottom of the graduation hat. If Reese’s aren’t your preference, any small peanut butter cups will work. For a caramel twist, Rolo candies make an excellent substitute and add a different flavor dimension. Just ensure they are miniature-sized for the best cap proportion.
- Chocolate Squares: I typically opt for Ghirardelli Dark Chocolate Squares for their rich flavor and elegant appearance, but any brand or flavor of square-shaped chocolate will do beautifully. Milk chocolate, semi-sweet, or even white chocolate squares can be used to match your preferences or party theme. These form the flat top of the graduation cap.
- Vanilla Frosting: This acts as the “glue” to hold your cap together and provides the perfect medium for creating the tassel. Vanilla frosting is ideal because it has a neutral color and flavor, making it easy to tint with food coloring. This allows you to customize your treats to perfectly match the graduate’s school colors, adding a thoughtful and personalized touch.
- Mini M&M’s Candies: These tiny candies serve as the “button” at the top of the graduation cap’s tassel. While brown M&M’s blend seamlessly with chocolate, don’t hesitate to use vibrant colors to add a playful pop, perhaps even coordinating with the frosting color. You can also scatter extra mini M&M’s on the dessert table for an additional splash of color and fun.
- Food Coloring: Essential for personalizing your frosting! Gel food coloring typically provides more vibrant and concentrated color with fewer drops, ensuring you can achieve deep school colors without altering the frosting’s texture too much.
Equipment You’ll Need
Good news! You don’t need any specialized equipment for this recipe. Just a few basic kitchen tools will get the job done:
- Baking sheet or large platter
- Parchment paper or wax paper
- Piping bag with a small round tip (or a small food storage bag with a corner snipped)
- Small bowl for tinting frosting (if using)
- Spatula or butter knife (for spreading frosting if not piping)
How to Make Chocolate Graduation Caps Treats
Assembling these delightful graduation caps is a quick and enjoyable process. Here’s a detailed guide to creating perfect treats every time:
- Prepare Your Workspace: First, ensure your Reese’s Miniature Cups and chocolate squares are unwrapped. Lay out a sheet of parchment paper or wax paper on a baking sheet or large flat surface. This prevents sticking and makes cleanup a breeze.
- Position the Bases: Place each unwrapped peanut butter cup upside down on the prepared wax paper. The wider, flat side should be facing up, ready to receive the chocolate square.
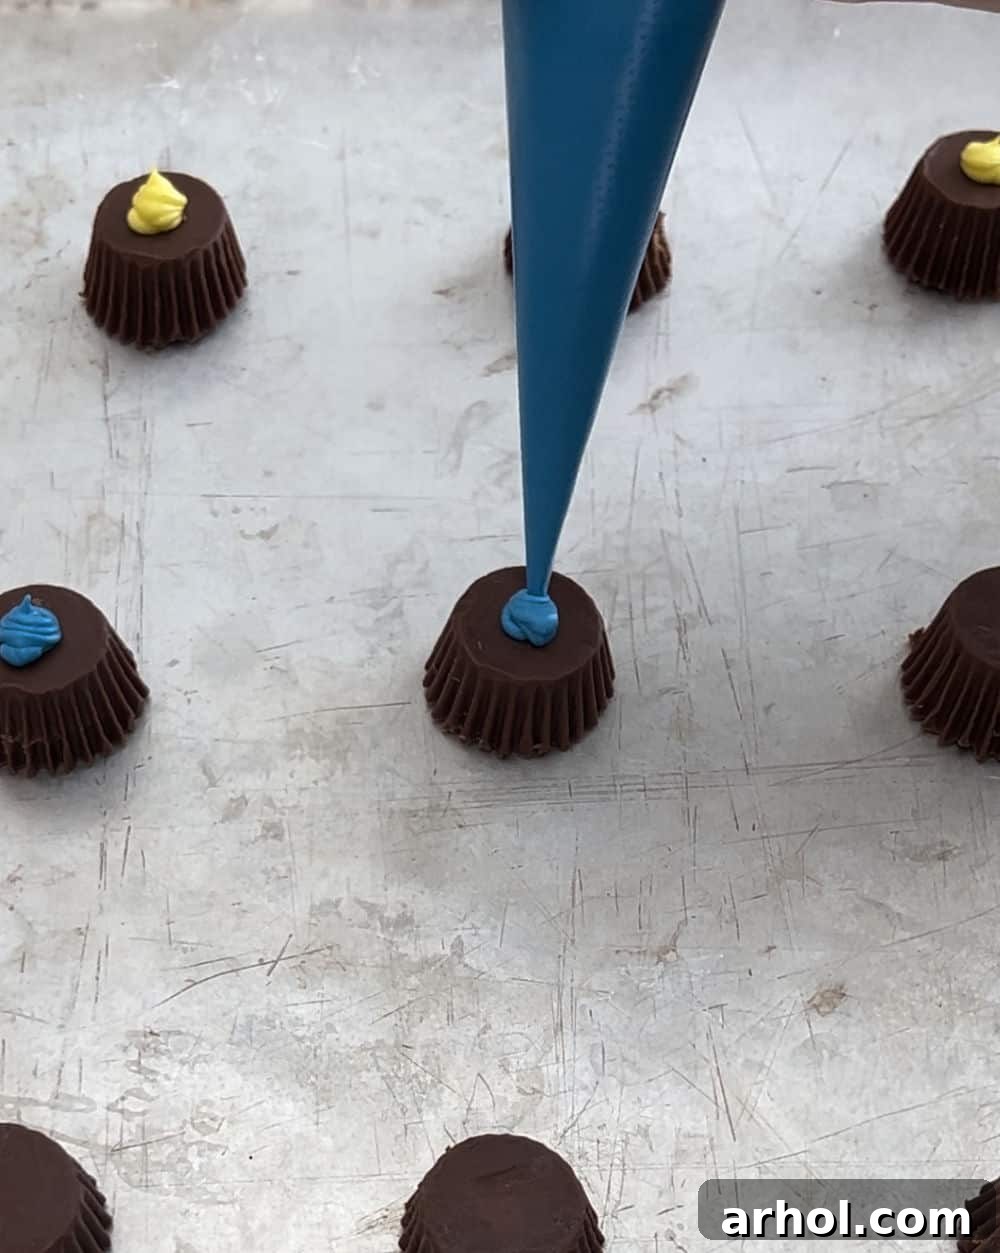
- Color the Frosting (Optional but Recommended): If you plan to match school colors, now is the time to tint your vanilla frosting. Add a few drops of your chosen food coloring to a small bowl of frosting and mix thoroughly until you achieve the desired hue. Remember, a little gel food coloring goes a long way! Transfer the colored frosting into a piping bag fitted with a small round tip, or into a small food storage bag with a tiny corner snipped off. This allows for precise application.
- Apply the Frosting “Glue”: Using your piping bag (or a toothpick/small knife for a dab), pip a small amount of frosting directly in the center of the flat base of each peanut butter cup. This dab of frosting serves as the adhesive to secure the chocolate square.
- Attach the Chocolate Squares: Gently place one chocolate square on top of the frosting dab on each peanut butter cup. Press down lightly to ensure the square adheres firmly and the frosting spreads slightly to create a secure bond. You’ve just formed the main cap!
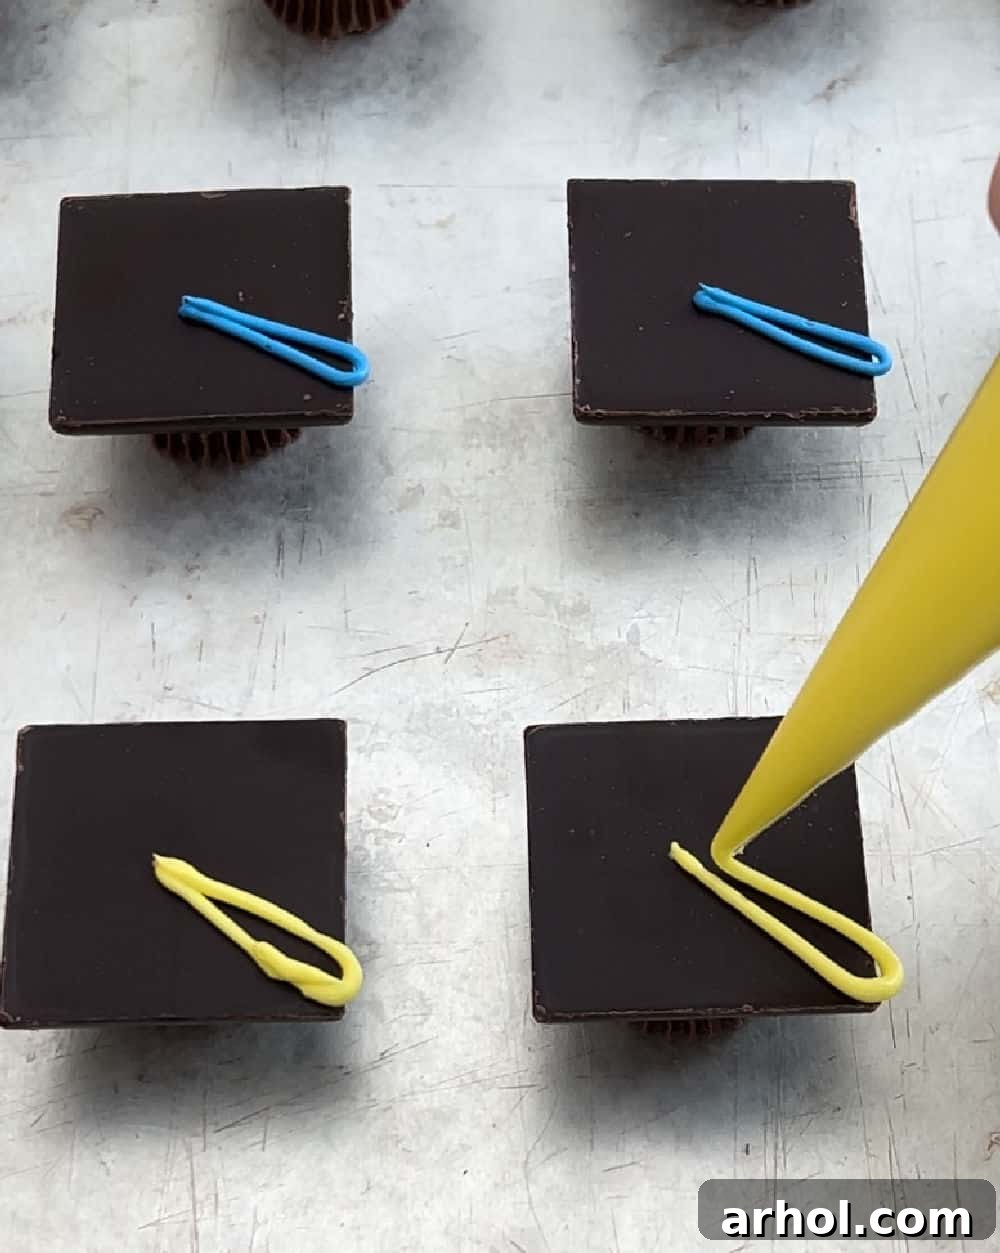
- Create the Tassels: Now for the iconic tassel! Using your piping bag, pipe a small, short line or loop of frosting from the center of the chocolate square outwards, resembling a tassel. You can make them straight or slightly curved, depending on your preference.
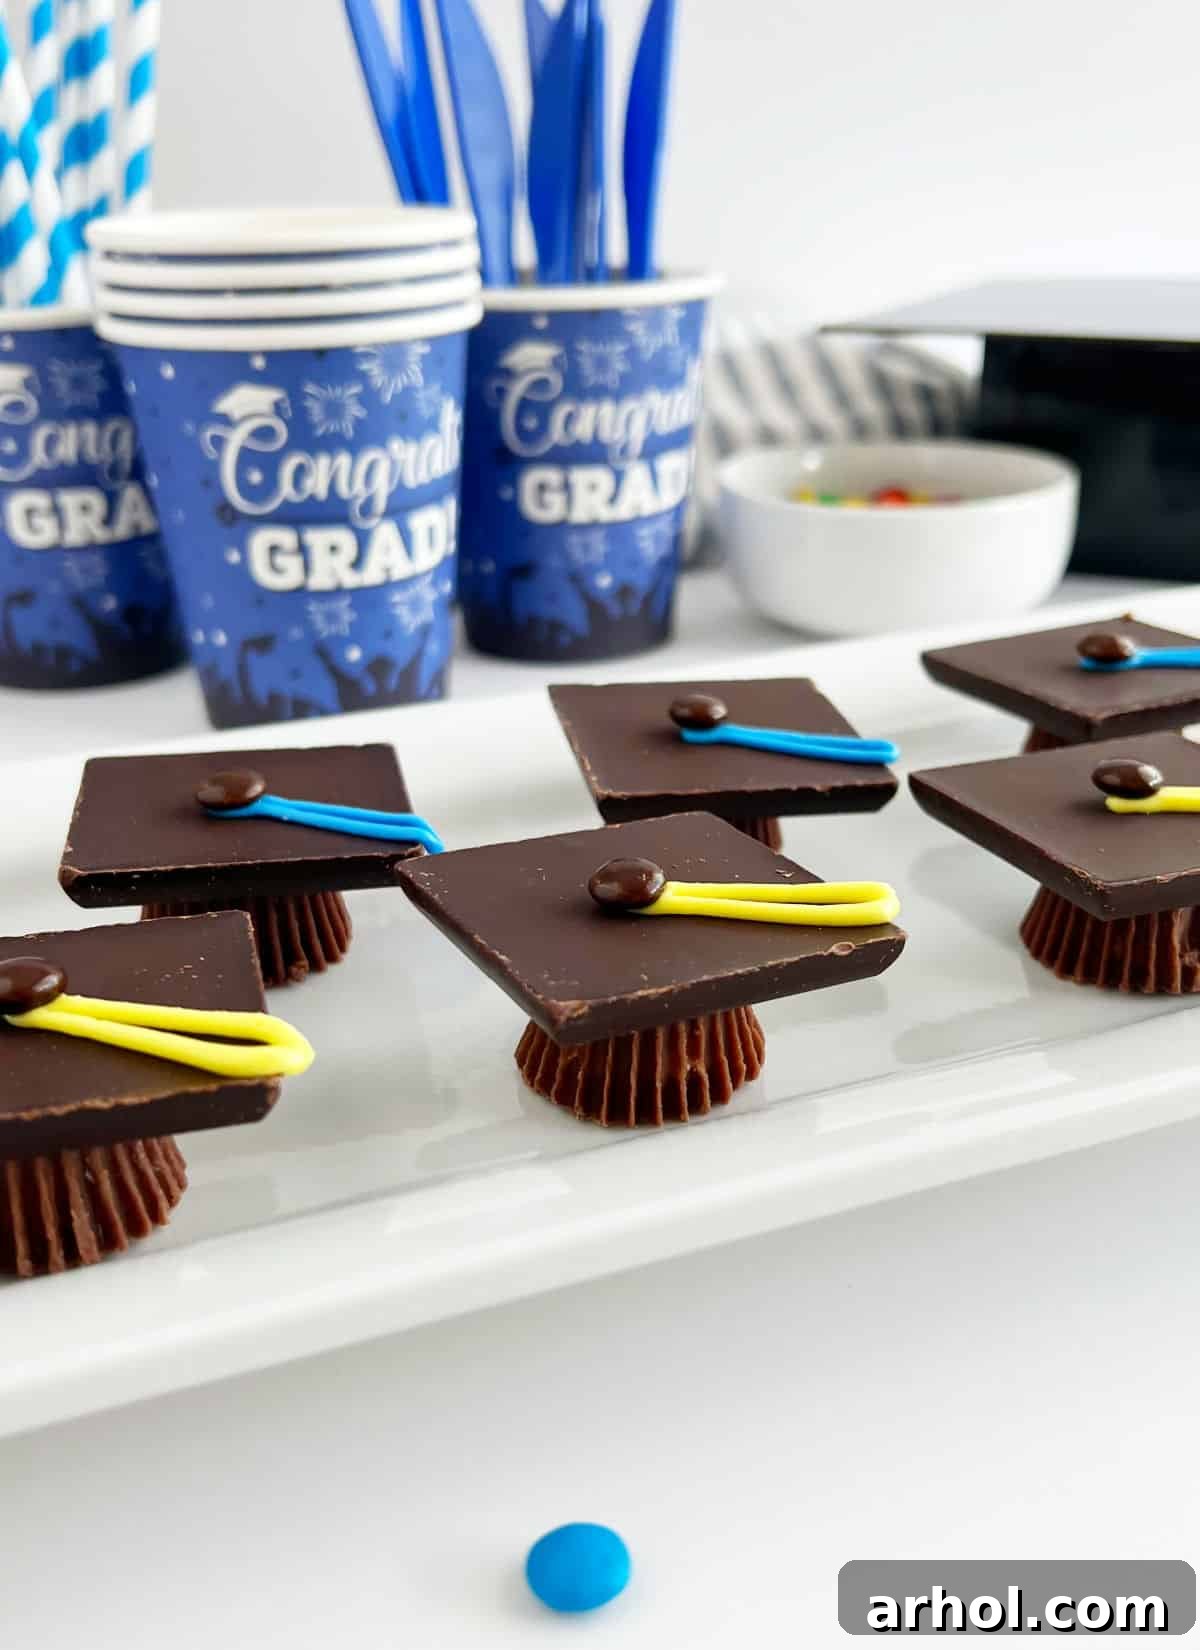
- Add the Mini M&M’s “Button”: Carefully place one mini M&M candy on the tip of each piped tassel, where it meets the chocolate square (the “button” that holds the tassel in place). Press gently into the frosting to secure it. You can choose M&M colors that match your theme or school colors for an extra personalized touch.
- Chill to Set: For best results and to ensure the caps are stable for handling and serving, place the baking sheet with the assembled graduation caps into the refrigerator. Allow them to chill for at least one hour, or until the frosting has fully set.
Customization and Personalization Tips
One of the best aspects of these graduation cap treats is how easily they can be customized to make them truly unique for your graduate:
- School Colors: As mentioned, tinting the vanilla frosting to match your graduate’s school colors is the most popular way to personalize.
- Different Candies: Experiment with different chocolate squares (milk, white, dark, caramel-filled) or even other small candies for the base. For the tassel “button,” small edible pearls or silver dragees can add a touch of elegance instead of M&M’s.
- Sprinkles and Edible Glitter: Before the frosting sets, you can add a sprinkle of edible glitter or tiny sprinkles to the top of the chocolate square for extra sparkle.
- Flavor Variations: Beyond peanut butter cups, consider using mint chocolate patties or other flavored miniature candies for the base to offer a variety of tastes.
- Tassel Alternatives: Instead of piping frosting, you can use thin strips of fruit leather (like Twizzlers Pull ‘n’ Peel or Air Heads Xtremes) cut to size for colorful and edible tassels.
Serving and Display Ideas
Once your Chocolate Graduation Caps Treats are chilled and set, they are ready to impress! Here are some ideas for serving and displaying them:
- Elegant Platter: Arrange them neatly on a large serving platter, perhaps interspersed with fresh berries or mint leaves for a pop of color.
- Cupcake Toppers: These treats make fantastic toppers for cupcakes. Simply place one on top of a frosted cupcake for an instant upgrade to your dessert table.
- Dessert Skewers: For a fun, interactive option, gently skewer them with other fruit or small sweets.
- Individual Favors: Place them in small cellophane bags tied with a ribbon in school colors for a charming take-home party favor.
- Tiered Stand: Display them on a multi-tiered dessert stand to create a stunning focal point.
Storage Best Practices
To keep your Reese’s graduation caps fresh and firm, proper storage is key:
- Airtight Container: Always store these treats in an airtight container to prevent them from drying out or absorbing other food odors.
- Refrigeration is Recommended: Due to the frosting, it’s best to keep them in the refrigerator. This helps the frosting stay firm and prevents melting, especially in warmer environments.
- Shelf Life: When stored correctly in the refrigerator, the caps should remain fresh for up to 2 weeks. However, keep in mind that the frosting may start to dry out slightly over time, affecting its texture. For optimal freshness and taste, it’s best to consume them within the first week.
- Freezing is Not Recommended: I do not advise freezing these treats. The chocolate components, particularly the Reese’s Cups and chocolate squares, can sometimes develop a white “bloom” (a harmless but aesthetically unpleasing discoloration) or change in texture after thawing.
Expert Tips for Success
Achieving perfect chocolate graduation caps is easy with a few insider tips:
- Chill Time is Crucial: Don’t skip the refrigeration step! Allowing the caps to set in the fridge for at least an hour ensures the frosting hardens properly, preventing the caps from sliding apart when handled or served.
- Piping Precision: A piping bag fitted with a small round tip offers the neatest way to apply frosting for both the “glue” and the tassels. If you don’t have one, a small resealable food storage bag with a tiny corner snipped off works just as well. For an even simpler approach, a sturdy toothpick or the tip of a sharp knife can be used to dab and draw the frosting.
- Temperature Matters: Work in a cool environment if possible. If your kitchen is warm, the chocolate and frosting can become too soft, making assembly challenging. You might even pop the peanut butter cups and chocolate squares into the fridge for a few minutes before starting.
- Get Creative with Tassels: While piped frosting tassels are charming, consider using thin strips of colorful candy, like Twizzlers Pull ‘n’ Peel or Air Heads Xtremes, for a different texture and a vibrant, playful look.
- Batch Preparation: These treats are ideal for making in batches. You can easily scale up the recipe to accommodate larger parties without much added effort.
Frequently Asked Questions (FAQs)
Q: Can I make these graduation caps ahead of time?
A: Absolutely! These treats are perfect for making in advance. You can assemble them up to a week before your event and store them in an airtight container in the refrigerator. This helps reduce stress on the day of the party.
Q: What if I can’t find Reese’s Miniature Cups or Ghirardelli squares?
A: No problem! For the base, any small, individual-sized peanut butter cup will work. If you prefer, miniature Rolo candies are also a delicious alternative. For the cap top, any square-shaped chocolate candy will do. You can even use thin squares of a chocolate bar if you cut them carefully to size.
Q: Are there any nut-free alternatives for the Reese’s Cups?
A: Yes! If you need a nut-free option, you can use mini chocolate-covered caramels (ensure they are nut-free), or even use larger round chocolate candies as the base and attach a slightly smaller chocolate square on top. Always double-check ingredient labels for allergen information.
Q: How can I make the frosting tassels look perfect?
A: Practice makes perfect! If you’re new to piping, try a few practice tassels on a piece of wax paper first. Use firm, even pressure on the piping bag, and quickly lift away when the tassel is formed to create a clean line. For a less precise but equally charming look, a simple swirl or dab of frosting works too!
Chocolate Graduation Caps Treats
These adorable Chocolate Graduation Caps Treats are a fun way to celebrate your graduate. Made with Reese’s Cups, chocolate squares and a few simple ingredients, this easy recipe is the perfect dessert for a graduation party!
Prep Time: 10 minutes
Refrigeration Time: 1 hour
Total Time: 1 hour 10 minutes
Servings: 16
Ingredients
- 16 mini Reese’s peanut butter cups, unwrapped
- 16 Ghirardelli chocolate squares, unwrapped (or any similar chocolate square)
- 16 mini M&M’s candies
- ½ cup vanilla frosting
- Food coloring (optional, for tinting frosting)
Instructions
- Place each unwrapped peanut butter cup top side down on a wax paper-lined baking sheet.
- If desired, use a few drops of your chosen food coloring to tint the vanilla frosting to match school colors. Transfer to a piping bag.
- Pipe a dab of frosting in the center of each peanut butter cup base.
- Place a chocolate square on top of each frosting dab, pressing gently to secure.
- Pipe a tassel with frosting on top of each chocolate square, starting from the center and extending outwards.
- Carefully place a mini M&M candy on the center of each tassel, pressing lightly to adhere.
- Allow the assembled treats to set in the fridge for about 1 hour before serving to ensure stability.
Video Guide
Watch a quick video demonstration on how to assemble these delightful chocolate graduation caps. Find the video on our YouTube channel for visual instructions!

Notes
- You can easily adjust the quantity of ingredients to make as many graduation caps as needed for your party.
- Store leftover candy graduation caps in an airtight container in your refrigerator to maintain freshness.
- For piping the frosting, a piping bag with a small round tip works best. Alternatively, you can use a small food storage bag with a corner cut off, or even a toothpick or sharp knife for precise application.
- Consider using candy strips like Twizzlers or Air Heads Xtremes to create colorful, edible tassels for a different look.
Nutrition (Approximate per serving)
Calories: 76 kcal, Carbohydrates: 10g, Protein: 1g, Fat: 4g, Saturated Fat: 1g, Polyunsaturated Fat: 1g, Monounsaturated Fat: 1g, Trans Fat: 0.002g, Cholesterol: 1mg, Sodium: 39mg, Potassium: 35mg, Fiber: 0.4g, Sugar: 8g, Vitamin A: 6IU, Vitamin C: 0.03mg, Calcium: 8mg, Iron: 0.3mg
Nutrition information is automatically calculated and should be used as an approximation.
Additional Info
- Course: Dessert
- Cuisine: American
Like this recipe? We’d love to hear from you! Leave a comment below and share your creations!
A Recipe for Memories
These Chocolate Graduation Caps Treats are more than just a sweet ending to a meal; they’re a delightful way to create lasting memories. Their charming appearance and delicious taste make them a standout at any graduation celebration, perfectly embodying the joy and achievement of the moment. They are simple enough for anyone to make, yet impressive enough to be a cherished part of your graduate’s special day. So gather your ingredients, enlist some helpers, and get ready to whip up a batch of these irresistible treats that will have everyone cheering “Congratulations!”
For more easy and festive recipes like this one, be sure to sign up for our weekly newsletter and follow us on social media. Happy celebrating!