
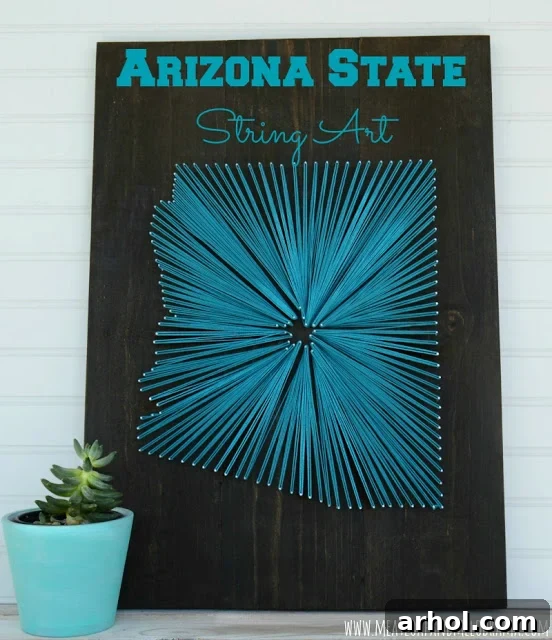
Hello fellow DIY enthusiasts and home decor lovers! Have you ever considered diving into the fascinating world of string art? This classic craft has enjoyed a significant resurgence in popularity, captivating creative minds with its simplicity and stunning visual impact. While string art has been a beloved trend for quite some time, I recently decided it was the perfect moment to incorporate this charming technique into our own home. My objective was to fill a particular empty space in our family room, specifically a bare wall section located next to our impressive giant USA wall map. After much thought, I concluded that a piece reflecting the unique shape of Arizona would be an absolutely perfect fit for that area, offering a personalized touch without merely adding another map to the collection. The result? A beautiful and truly unique Arizona state string art piece that I couldn’t be happier with! It adds warmth, character, and a pop of color to our living space, truly transforming the wall from drab to fab.
What started as a personal creative endeavor quickly evolved into a delightful family project, and I wouldn’t have it any other way! There’s something truly special about collaborating on a craft, especially when it involves multiple generations. Not only does working together make the entire process move along much faster and more efficiently, but it also creates lasting memories and a shared sense of accomplishment. Of course, the older kids sometimes have a mysterious knack for disappearing when I announce a new DIY adventure, but even their fleeting contributions make a difference! This project, in particular, was a wonderful opportunity to bond and create something beautiful as a team, proving that the best decor often comes from hands-on effort.
When it came to choosing the color scheme for this string art masterpiece, my vision was clear. Our family room has been gradually infused with vibrant aqua accents, and I knew that this new wall art needed to harmonize perfectly with the existing decor. My husband, ever the pragmatist, gently questioned why I wasn’t opting for the colors from the actual Arizona state flag. His suggestion was valid, but when it comes to creative projects, sometimes you just have to follow your artistic instinct! And now that the project is proudly completed and displayed, I am absolutely thrilled with my decision to go with aqua. It blends seamlessly with the room’s aesthetic, adding a fresh, cohesive, and personalized touch that truly makes the space feel complete.
Creating string art might seem intricate at first glance, but I assure you, it’s far from difficult. The process is incredibly rewarding and highly customizable, making it accessible even for those new to crafting. However, it’s important to note that while the technique itself is straightforward, the preparation phase does require a bit of patience and time before you even begin looping your first piece of string. This particular Arizona state string art project took me a few dedicated days to complete from start to finish. I wasn’t in any rush, allowing myself to enjoy each step of the creative journey, which I highly recommend. Taking your time ensures precision and a more satisfying final outcome. For those eager to try their hand at this captivating craft, here’s a detailed breakdown of how I brought our Arizona state string art to life, along with some tips to help you on your own DIY adventure.
Supplies You’ll Need for Your String Art Project
- Large Wood Board for the Background: The foundation of your string art. I repurposed a sturdy board crafted from pine slabs that we already had on hand, perfect for a rustic feel. You can choose any type of wood or even a canvas, depending on your desired aesthetic.
- Wood Stain (or Paint) in Your Chosen Color: To give your background board a rich, finished look. I opted for a dark walnut shade to complement our newly built wood mantel, ensuring continuity in our decor.
- Paint Brush or Applicator: Essential for evenly applying your stain or paint to the wood surface.
- Small Nails: These will form the outline and internal details of your design. The size can vary, but generally, smaller gauge nails work best for intricate patterns.
- Hammer: A small, lightweight hammer is ideal for precise nail placement without damaging the wood.
- Paper: For creating your template. Multiple sheets of standard printer paper (8×10 or A4) taped together work perfectly for larger designs.
- Pencil: For sketching your design onto the paper template.
- Ruler: Useful for straight lines, precise measurements, and ensuring proper scaling of your design.
- String or Embroidery Floss: The star of the show! Choose a color and thickness that complements your decor and desired visual effect. I used a vibrant aqua string for my project.
The initial step in our crafting journey was preparing the wooden board. We began by thoroughly staining the board with a dark walnut shade, carefully applying the stain to ensure an even and rich finish. This particular color choice was intentional, as I wanted the string art background to perfectly match the rustic wood mantel we had recently constructed in the family room, creating a cohesive and harmonious look throughout the space. While paint is certainly an option for the background, staining truly brings out the natural beauty and grain of the wood, adding depth and character. After the staining was complete, we allowed ample time for the board to dry completely, ensuring a smooth and durable surface for the next stages of the project.
With the board prepped, the next crucial step was creating the template for our Arizona state shape. Fortunately, I have a daughter with exceptional artistic talent, a true whiz at drawing and sketching! I was able to enlist her help in carefully sketching a rough, yet accurate, map of Arizona. For projects involving larger surfaces like our string art board, a single sheet of paper simply won’t suffice. We overcame this by using four standard sheets of 8×10 paper, meticulously taping them together to create a large enough canvas for her to draw the state outline to scale. This collaboration made the process not only easier but also much more enjoyable.
Once the Arizona outline was perfectly drawn on the taped paper, I carefully positioned and secured the entire paper template onto the stained wood board using masking tape. This step is critical to prevent any shifting during the nail-pounding phase. Then, the rhythmic sound of hammering began! I started carefully pounding the small nails directly over the pencil marks of the Arizona outline. My wonderful husband, always supportive and ever so handy, very generously stepped in to assist with this part, making the task much quicker and more efficient. His help was truly invaluable in achieving consistent nail depth and spacing. This is how the board looked after all the perimeter nails were firmly in place, ready for the next stage.
You might notice what appear to be double lines in some areas of the outline in the image. This actually came about because I decided, partway through, to slightly enlarge the shape of Arizona on the board to better fill the space. This creative adjustment meant I had to reposition some nails, resulting in the appearance of a slightly thicker, more robust outline, which I think adds to its charm and presence on the wall. Don’t be afraid to make minor adjustments as you go to get the perfect fit for your space!
With the primary outline nails in place, the paper template had served its purpose. I carefully tore the paper off the board, leaving behind a clean wood surface punctuated by the precise nail pattern of Arizona. To add a meaningful focal point to the center of the state, I then used a small star stencil. This simple addition elevates the design, giving it a touch of symbolic flair. Once the stencil was positioned, I added more nails around its perimeter, creating a distinct star shape right in the heart of Arizona. This small detail truly makes the piece pop and adds an extra layer of visual interest to the overall string art.
Now, for the most creative and truly enjoyable part of the entire process: adding the string! This is where the magic really begins to happen, transforming a series of nails into a vibrant piece of art. I started by taking one end of my beautiful aqua string and securing it with a firm knot around the nail located in the lower right corner of the Arizona outline. This initial knot provides a stable anchor point for the rest of the design. From there, I began the rhythmic process of looping the string around the various nails. I focused on weaving the string first around the central star, crisscrossing back and forth to fill its shape, and then extending those loops outwards to connect with the nails forming the perimeter of the state. The goal is to create a dynamic, interwoven pattern that gradually fills the entire shape with color and texture.
It was during this captivating stringing phase that my youngest, my little Diva, enthusiastically took over! She absolutely adored this part of the project, finding immense joy in the repetitive and creative process of weaving the string. Her small, nimble fingers proved to be incredibly adept at navigating around the nails, making it surprisingly easy for her to manipulate the string and create intricate patterns. This particular step, the actual stringing, took us approximately 30 minutes to complete, which is quite reasonable for such an engaging activity. It was fantastic to see her so engrossed and proud of her contribution to our shared artwork.
A crucial tip for achieving a professional-looking string art piece is to consistently pull the string tightly as you loop it around each nail. Maintaining good tension ensures that the strings remain taut, preventing any sagging or looseness that could detract from the final appearance. Tightly pulled strings create crisp lines and a vibrant, dimensional texture that truly makes the design pop off the board.
Once every nail had been carefully looped around, and the Arizona shape was beautifully filled with the aqua string, it was time to finalize our masterpiece. I secured the end of the string with another tight knot around the same bottom nail where we initially began. And just like that, our vibrant and personalized Arizona state string art was officially complete! The transformation from a blank board and a handful of supplies to a stunning piece of custom home decor was incredibly satisfying.
I am absolutely delighted with how this project turned out! The finished Arizona state string art piece perfectly captures the warmth and personality I envisioned for our family room. The aqua string against the dark stained wood creates a striking contrast that is both eye-catching and soothing. I was so eager to showcase its beauty that I immediately set it up to admire. While I’ve included several photos of the completed project, I promise to take an updated picture once it’s officially mounted on the wall in its designated spot, so you can truly appreciate how it integrates into the overall room decor and adds that perfect splash of color and artistry.
The success and enjoyment derived from this project were so significant that it sparked even more creativity in our household! My daughter, after experiencing the joy of crafting this Arizona string art, is now brimming with enthusiasm to create a dance-themed string art piece for her own room. It sounds like another exciting, albeit possibly challenging, adventure awaits! I’ll definitely keep you updated on her progress and share how that unique project unfolds. It just goes to show how one successful DIY can inspire a cascade of new creative endeavors.
Thank you for stopping by and taking the time to peek at our Arizona state string art project. We truly enjoyed sharing our creative process and the beautiful outcome with you. If this post has inspired you to create your own state-themed or other string art decor, I would absolutely love to hear about it! Please don’t hesitate to share your projects or any tips you’ve discovered along the way. Your creativity is always a source of inspiration, and I’m eager to check out what unique designs you’ve brought to life! Happy crafting!
You May Also Like