
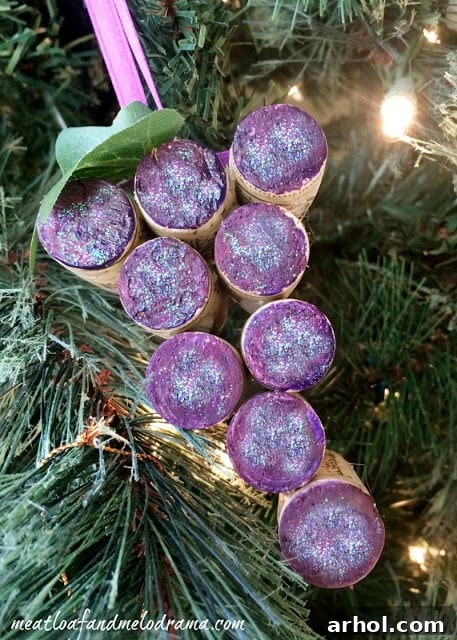
Crafting Elegance: Your Guide to a DIY Wine Cork Grape Ornament
As the festive season twinkles around us, the magic of handmade decorations brings a special warmth to our homes. If you’re looking for a quick, charming, and utterly unique DIY project, especially as the holidays draw near, you’ve landed in the right spot! This delightful wine cork grape ornament is not just an easy craft; it’s a brilliant last-minute gift idea that will enchant any wine enthusiast. Whether you’re adorning your own tree or searching for a thoughtful present for a friend, this craft combines sustainability with festive flair.
Last month, while browsing for Christmas decorations, I stumbled upon some charming wine cork ornaments. While undeniably cute, they came with a rather hefty price tag. That’s when inspiration struck! Why buy when you can create a superior version yourself for a fraction of the cost? If you’re like me and often find yourself with a collection of leftover wine corks, you already possess the main ingredient for this fantastic DIY project. It’s an incredibly budget-friendly way to add a personalized touch to your holiday decor or to craft a unique gift.
Wine corks are incredibly versatile crafting materials. I frequently use them as vase fillers or for other decorative projects, so I always have a supply readily available. Even if you don’t have a personal stash from your favorite vintages, wine corks can be easily purchased at craft stores or online, making this project accessible to everyone. The best part? This qualifies as a genuinely quick and easy craft. From start to finish, you can expect to complete this project in well under an hour – in fact, it often takes only about thirty minutes. It’s the perfect activity for a cozy afternoon or a creative break.
Why Choose Wine Corks for Your Crafts?
Repurposing wine corks isn’t just a creative endeavor; it’s also a wonderfully sustainable choice. Each cork you transform into a beautiful ornament or another craft item is one less item headed to the landfill. Beyond their eco-friendly appeal, wine corks offer a unique texture and rustic charm that can elevate any handmade project. Their natural, earthy tones provide a fantastic base, making them ideal for a wide range of decorative themes. For wine lovers, they carry an inherent sentimental value, each cork potentially holding memories of shared meals, celebrations, or quiet evenings. This intrinsic connection makes a wine cork ornament an even more meaningful gift.
A Thoughtful, Handmade Gift for Any Occasion
While this ornament shines brightly as a Christmas tree decoration, its charm extends far beyond the holiday season. Imagine gifting this beautifully crafted grape cluster to a dear friend for their birthday, as a hostess gift for a dinner party, or as a thoughtful gesture for a housewarming. Pair it with a bottle of their favorite wine, some artisanal cheese, or even a small book about wine regions, and you’ve created a truly personalized and memorable gift basket. It’s a versatile item that speaks volumes about your care and creativity, proving that the best gifts often come from the heart and hands.
Gather Your Supplies: What You’ll Need for Your Grapevine Creation
One of the many advantages of this DIY project is the minimal number of supplies required. You likely have many of these items already at home, making it an incredibly convenient craft. Here’s a detailed look at what you’ll need to bring your wine cork grape ornament to life:
Essential Materials:
- 9 Wine Corks: These are the stars of your ornament. Opt for natural corks if possible, as they are easier to paint and glue. If you don’t drink wine, consider asking friends, visiting local wineries, or purchasing bags of corks from craft stores or online retailers.
- Hot Glue Gun and Glue Sticks: A hot glue gun is essential for quickly and securely attaching the corks. Ensure you have plenty of glue sticks on hand. Remember to exercise caution when using a hot glue gun, as the nozzle and glue can get very hot. Always work on a protected surface.
- Craft Paint (Purple or Green): To give your corks the appearance of grapes, purple is a classic choice, mimicking red grapes. However, you could also use a vibrant green for white grapes, or even a deep burgundy for a rich, sophisticated look. Acrylic craft paint works perfectly and dries quickly.
- Fine Glitter (Matching Color): While optional, a touch of glitter will make your grapes truly sparkle and catch the light beautifully on the tree. Choose a fine glitter in a color that complements your paint – purple glitter for purple paint, or clear iridescent glitter for an extra shimmer on any color.
- Ribbon (Coordinating Color): A length of ribbon is needed to create a loop for hanging your ornament. Choose a color that harmonizes with your grape color – a deep purple, a rich green, or even a natural twine for a rustic feel. About 6-8 inches should be sufficient.
- Faux Green Leaves (Optional but Recommended): Attaching a small cluster of artificial green leaves at the top truly enhances the grape bunch illusion. You can snip these from existing faux floral arrangements, purchase small craft leaves, or even cut simple leaf shapes from green felt or paper.
Step-by-Step Guide: Crafting Your Wine Cork Grape Ornament
Now that you have all your materials ready, let’s dive into the fun part: assembling your beautiful wine cork grape ornament. Follow these simple steps for a flawless finish:
Step 1: Arranging Your Corks into a Grape Cluster
Before you start gluing, lay out your nine wine corks on a flat surface to determine your desired grape cluster pattern. For a classic, elongated grape bunch shape that isn’t too wide, I recommend a pattern similar to a reverse pyramid: start with a row of three corks at the top, followed by two rows of two corks, and finally, stack two corks vertically at the very bottom. This arrangement creates a natural, tapering grape cluster appearance. Experiment with different layouts until you find one that you like.
Step 2: Securely Gluing Your Corks Together
With your pattern decided, it’s time to assemble. Begin with the top row. Apply a line of hot glue along the side of one cork and press it firmly against the side of an adjacent cork. Repeat this for the third cork in the top row, ensuring they are tightly bonded. Once your top row of three corks is secure, flip the entire piece so it lays flat on your work surface. Now, start building downwards, gluing the remaining corks onto the top row and to each other, maintaining your chosen grape cluster formation. Apply glue liberally enough to create a strong bond, but not so much that it oozes excessively. Allow each bond to set for a few seconds before moving to the next cork.
Step 3: Adding a Pop of Color and Sparkle
Once your cork structure is fully assembled and the glue has cooled, it’s time to bring your grapes to life with color! Using your chosen craft paint (purple, green, or burgundy), carefully paint the front surfaces of all the corks. Aim for an even coat, but don’t worry about perfection, as the texture of the corks adds to the charm. While the paint is still wet, gently sprinkle a small amount of fine glitter over the painted areas. The wet paint will act as an adhesive for the glitter, ensuring it adheres beautifully. I often hesitate with glitter, but for this project, it’s a game-changer – it transforms the flat painted surface into sparkling, dimensional grapes that truly pop on your Christmas tree or wherever you choose to display them. Allow the paint and glitter to dry completely before proceeding.
Step 4: The Finishing Touches: Ribbon and Greenery
The final step involves adding the hanging loop and the realistic touch of greenery. Take your chosen ribbon and form a loop. Apply a dab of hot glue to the top center of your cork cluster (where the “stem” would naturally be) and firmly press the ends of the ribbon loop into the glue. Hold it in place until the glue sets. Next, if you’re adding faux green leaves, carefully glue them over the base of the ribbon loop. This not only conceals the glue but also dramatically enhances the “grapevine” aesthetic. The vibrant green against the rich purple (or chosen color) creates a beautiful contrast, adding a delightful pop of color and making your ornament truly look like a freshly picked bunch of grapes.
Personalize Your Grape Ornament: Tips and Creative Variations
While the classic purple grape look is charming, don’t hesitate to unleash your creativity! Here are some ideas to personalize your wine cork grape ornaments:
- Color Variations: Experiment with light green or yellow for white wine grapes, or even a vibrant pink for rosé-inspired clusters. You could also use metallic paints (gold, silver, bronze) for a more elegant, contemporary feel.
- Glitter Galore: Beyond matching glitter, consider iridescent glitter for a rainbow sparkle, or chunky glitter for a bolder texture. You could also use glitter glue for more precise application or to add swirling patterns.
- Aromatherapy Twist: Before gluing, soak your corks in essential oils like grape seed oil (if food-safe and won’t damage corks/paint) or a cinnamon/clove blend for a festive scent. Just ensure the corks are dry before painting.
- Embellishments: Add tiny beads, faux pearls, or small charms (like a tiny wine glass or bottle) to the ornament for extra whimsy. You could even attach a small personalized tag with a name or a special date.
- Rustic Charm: Instead of ribbon, use natural jute twine or raffia for the hanger. You could also leave some corks unpainted for a more rustic, multi-textured appearance.
Displaying and Gifting Your Handmade Treasure
Once your DIY wine cork grape ornament is complete, it’s ready to shine! Hang it prominently on your Christmas tree, where its unique texture and sparkle will surely draw admiration. But don’t limit its display to just the holidays. It can also be a year-round decorative accent. Consider grouping several together in a decorative bowl as a unique centerpiece, or hanging a few from a decorative branch for a rustic wall display. As mentioned, these ornaments make exceptional gifts:
- Hostess Gift: A thoughtful and unique token of appreciation for a dinner party host.
- Gift Basket Addition: Incorporate it into a wine-themed gift basket along with a favorite bottle, gourmet crackers, and cheese.
- Wedding or Anniversary Favor: For wine-loving couples, these could serve as charming and memorable party favors.
- Housewarming Present: A lovely way to help new homeowners personalize their space.
- Teacher or Colleague Gift: A small, personal, and much-appreciated gesture.
Embrace the Joy of DIY Holiday Decor
There’s immense satisfaction in creating something beautiful with your own hands, especially during the festive season. This DIY wine cork grape ornament is more than just a craft; it’s a small piece of art that embodies creativity, sustainability, and thoughtful gifting. It’s an opportunity to unwind, get creative, and add a personal touch to your surroundings or to show someone special how much you care. We encourage you to gather your supplies, put on some festive music, and enjoy the process of crafting these charming grape clusters. We’d love to see your creations!
Thank you so much for taking the time to visit and explore this fun and easy DIY project. We hope it inspires you to get crafty and add a unique sparkle to your holiday season and beyond. Have a wonderful and creative day!
Explore More Creative DIY Ideas
If you enjoyed crafting your wine cork grape ornament, you’re in for a treat! We have a plethora of other easy and fun DIY projects perfect for adding a personal touch to your home or for thoughtful gift-giving. Dive into these popular crafts and keep your creative spirit flowing:
Craft a Whimsical Lego Snowman Ornament
Unleash your inner child and transform colorful Lego bricks into an adorable snowman ornament! This project is fantastic for kids and adults alike, offering a playful twist on traditional holiday decorations. It’s a great way to use up those extra Lego pieces and create a keepsake that will be cherished for years.
Simple & Fun DIY Kids’ Ornaments
Get the whole family involved in the festive fun with these super easy ornaments designed especially for kids! From filling clear bulbs with colorful loom bands to other simple yet engaging projects, these crafts are perfect for little hands to create memorable decorations for the tree. Foster creativity and enjoy quality time together with these delightful DIYs.
Sharing At:
Inspiration Monday