
Crafting Adorable American Girl Doll Tote Bags: Your Guide to DIY Doll Accessories for Summer Fun!
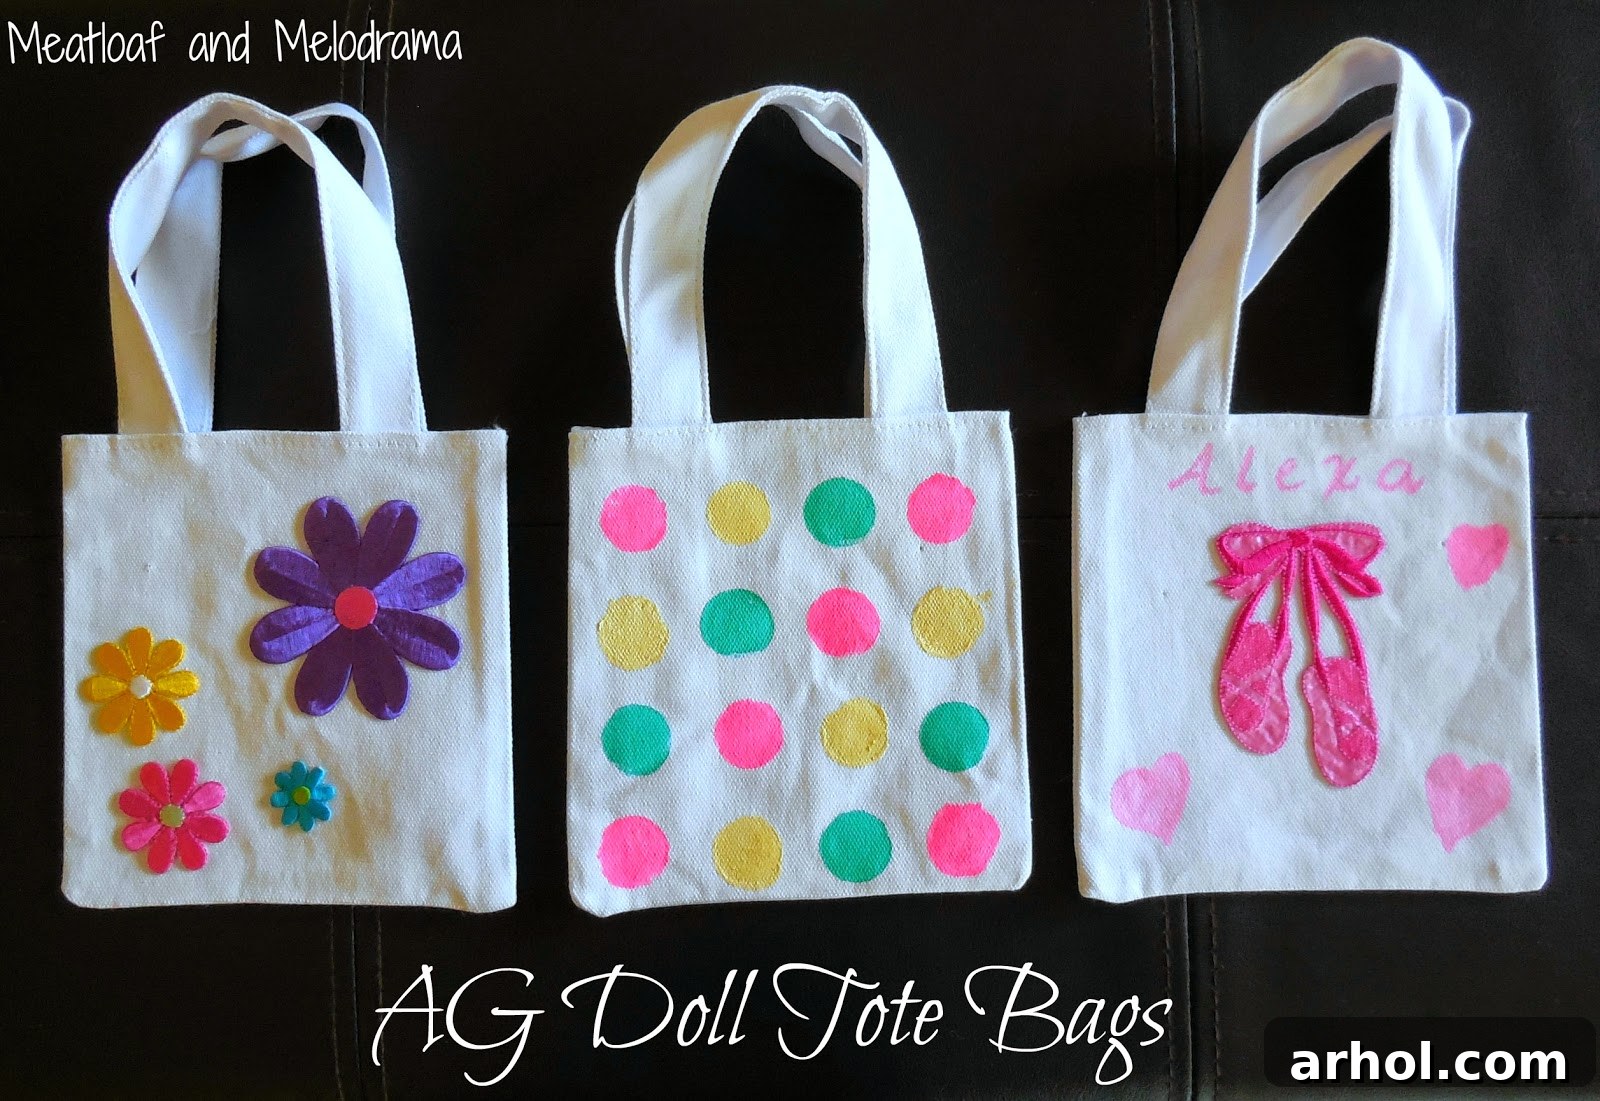
Hello fellow craft enthusiasts and American Girl Doll lovers! Get ready to infuse a touch of creativity and personalized charm into your doll’s wardrobe. Over a delightful weekend, my little diva and I embarked on a fun and rewarding crafting adventure, designing and decorating a collection of cute tote bags specifically for her cherished American Girl Dolls. As summer approaches, bringing with it dreams of beach days, park picnics, and exciting adventures, we knew these 18-inch dolls would absolutely adore having stylish and practical totes to carry all their miniature summer essentials. After all, a girl—or a doll—can never have too many bags!
Why DIY Doll Totes? Unleashing Creativity and Personalization
There’s something incredibly special about creating custom accessories for American Girl Dolls. Beyond the simple joy of making something with your hands, DIY doll totes offer a myriad of benefits. They provide an excellent opportunity for kids to express their creativity, develop fine motor skills, and learn basic crafting techniques. Custom-made items also ensure that your doll’s accessories are unique, reflecting individual personalities and styles. Plus, it’s a fantastic bonding activity for parents and children, fostering teamwork and shared memories. These small canvas bags are perfectly sized for any 18-inch doll, making them an ideal blank canvas for imagination.
Gathering Your Crafting Essentials
Before diving into the fun part, it’s essential to gather your materials. For our project, we started with a pack of plain, small canvas tote bags purchased from a craft store like Michael’s. These are inexpensive and versatile, ready to be transformed. Here’s a general list of supplies you might need, depending on your chosen designs:
- Small canvas tote bags (18-inch doll size)
- Fabric paints in various colors
- Paint pens (for details and personalization)
- Iron-on appliques (ballet slippers, flowers, etc.)
- Wine cork (for stamping polka dots)
- Small paintbrushes or sponges
- Fabric glue (optional, for securing appliques without ironing)
- Protective surface cover (newspaper, plastic sheet)
- Old clothes or apron
- Iron and ironing board (if using iron-on appliques)
Crafting Our Doll Totes: A Step-by-Step Guide to Three Unique Designs
Let’s walk through the creation of each of our adorable doll tote bags. These ideas are easy to replicate and can inspire countless other designs!
1. The Playful Polka Dot Tote
Who doesn’t love polka dots? They’re cheerful, timeless, and add a pop of fun to any accessory. For our first bag, we aimed for a vibrant, energetic look. We decided to stamp bright neon-colored dots onto one of the plain canvas bags. The secret to perfectly round polka dots? A wine cork! Its circular base makes an excellent, readily available stamp.
How we made it:
- Choose your fabric paint colors. We went with neon shades for a summery vibe.
- Pour a small amount of each paint color onto separate paper plates or a palette.
- Dip the flat end of a wine cork into the fabric paint, ensuring an even coating.
- Press the cork firmly onto the canvas bag, lifting it straight up to create a clean dot.
- Repeat the process, varying the spacing and colors to create a playful, random pattern across the bag. Allow each color to dry slightly before adding adjacent dots to prevent smudging.
- Once satisfied with the design, let the paint dry completely, following the fabric paint manufacturer’s instructions for curing (often 24-72 hours) to ensure durability.
2. Alexa’s Personalized Ballet Bag
Every ballerina doll needs a special bag for her dance essentials! Our American Girl Doll, Alexa, was in dire need of a personalized tote to carry her tiny ballet shoes to class. This project combined a charming applique with hand-painted details, making it truly one-of-a-kind.
How we made it:
- We found an adorable iron-on applique shaped like ballet slippers at the craft store. These come in various styles and are usually quite easy to apply.
- Carefully position the ballet slipper applique in the center of the canvas tote bag.
- Following the applique’s instructions, use an iron to securely attach it to the fabric. Ensure the heat setting is appropriate for canvas and applique material.
- Once the applique was firmly in place, it was time for personalization! We used a pink fabric paint pen to carefully write “Alexa” above the ballet slippers.
- To add an extra touch of sweetness, we drew small, delicate hearts around her name and the applique using the same pink paint pen.
- Allow all paint and applique adhesives to dry completely before handling extensively.
Now, Alexa has a perfectly charming and functional bag for her dance shoes, making her the envy of all the other dolls at the dance studio! This ballet bag complements her dance life beautifully, especially since we crafted a miniature ballet barre for her a couple of months ago. The dolls are genuinely enjoying their new dance setup!
3. The Flower Power Summer Tote
For our third tote, we embraced a cheerful, summer-ready aesthetic using cute flower appliques. This bag was designed to perfectly complement a new summer outfit we also created for the dolls. Consistency in design elements truly makes an outfit pop!
How we made it:
- Select a variety of flower appliques. We chose a mix of colors and sizes to create a vibrant cluster.
- Arrange the appliques on the canvas bag to visualize the design. Consider creating a focal point or a scattered pattern.
- Secure the appliques using either an iron (if they are iron-on) or fabric glue. For glue, apply a thin layer to the back of each applique and press firmly onto the bag. Allow ample drying time.
- To complete the look, we created a matching summer outfit for the doll. The tube top was ingeniously fashioned from an athletic sock, and we added small matching flower appliques to both the top and the capris. This coordinated ensemble truly showcases the tote bag! (Stay tuned for a future post detailing how to make the tube top!).
There’s definitely a delightful retro vibe going on with this look, isn’t there? So much “flower power” and summery charm!
Tips for Your Doll Tote Bag Crafting Journey
To ensure your crafting experience is as smooth and enjoyable as possible, here are a few extra tips:
- Prepare Your Workspace: Lay down newspaper or a plastic sheet to protect your table from paint spills.
- Pre-wash Canvas Bags: If you’re concerned about fabric shrinkage or sizing, pre-wash and dry your canvas bags before decorating.
- Test Paints: Always test fabric paints or markers on a scrap piece of canvas or an inconspicuous area of the bag first, especially if you’re unsure about the color or consistency.
- Drying Time is Key: Be patient! Allow adequate drying time between layers of paint or before handling the decorated bags to prevent smudges and ensure the designs are fully cured and durable.
- Kid-Friendly Materials: When crafting with children, opt for non-toxic, washable fabric paints and glues. Supervise closely during ironing or when using sharp tools.
- Seal for Durability: Some fabric paints require heat setting (ironing) after drying to become permanent and washable. Always check the product instructions.
- Get Creative with Tools: Don’t limit yourself to paintbrushes! Sponges, cotton swabs, and even fingerprints can create interesting textures and patterns.
Beyond the Totes: More Doll Accessory Ideas
The world of DIY American Girl Doll accessories is vast and exciting! Once you’ve mastered these cute tote bags, consider exploring other simple projects. You could create miniature hats, scarves, headbands, or even tiny jewelry pieces. Fabric markers can be used for intricate designs, stencils offer uniform patterns, and glitter glue adds a touch of sparkle. Think about different themes: a beach tote with seashell appliques, a school bag with tiny pencils drawn on, or a holiday-themed bag for festive occasions. The possibilities are truly endless, limited only by your imagination and the supplies you have on hand.
Share Your Creations!
These American Girl Doll tote bags were incredibly fun to make, and we’re already brainstorming ideas for more! I’m sure the other dolls in Alexa’s dance class would all love to have their own personalized accessories. Which one of these three designs is your favorite? We’d love to hear your thoughts and see your own doll crafting projects!
Thank you for taking the time to explore our latest craft project. Your visits and engagement mean a lot to us. We hope this guide inspires you to unleash your inner crafter and create some wonderful memories with your loved ones and their American Girl Dolls. Have an awesome, creative day!