
Hi there, fellow parents and craft enthusiasts!
If you’re reading this, chances are you’re familiar with the tiny, colorful, yet surprisingly sharp world of LEGOs. In our household, LEGOs aren’t just toys; they’re a way of life. My children, both boys and girls, are completely captivated by these iconic bricks, and their collection seems to multiply faster than we can keep track. With new sets arriving for birthdays and holidays, our biggest challenge isn’t building the intricate models, but rather managing the ever-growing army of bricks and minifigures threatening to take over every corner of the house. And let’s be honest, we’ve all experienced the agonizing pain of stepping on a rogue LEGO brick in the middle of the night. It’s truly a rite of passage for any parent!
The LEGO Lover’s Dilemma: Conquering Toy Clutter with Creative Solutions
The sheer volume of LEGO pieces can be overwhelming. While there are countless storage solutions available on the market, from simple bins to elaborate sorting systems, the real hurdle often lies in encouraging our kids to actually use them. I’ve invested in those smaller, official LEGO head containers, hoping they’d inspire organization, especially for keeping minifigures separate. While they are cute, they often prove too small for a substantial collection and can be quite pricey for their limited capacity. This sparked an idea: what if I could create a larger, more engaging, and incredibly budget-friendly storage solution myself?
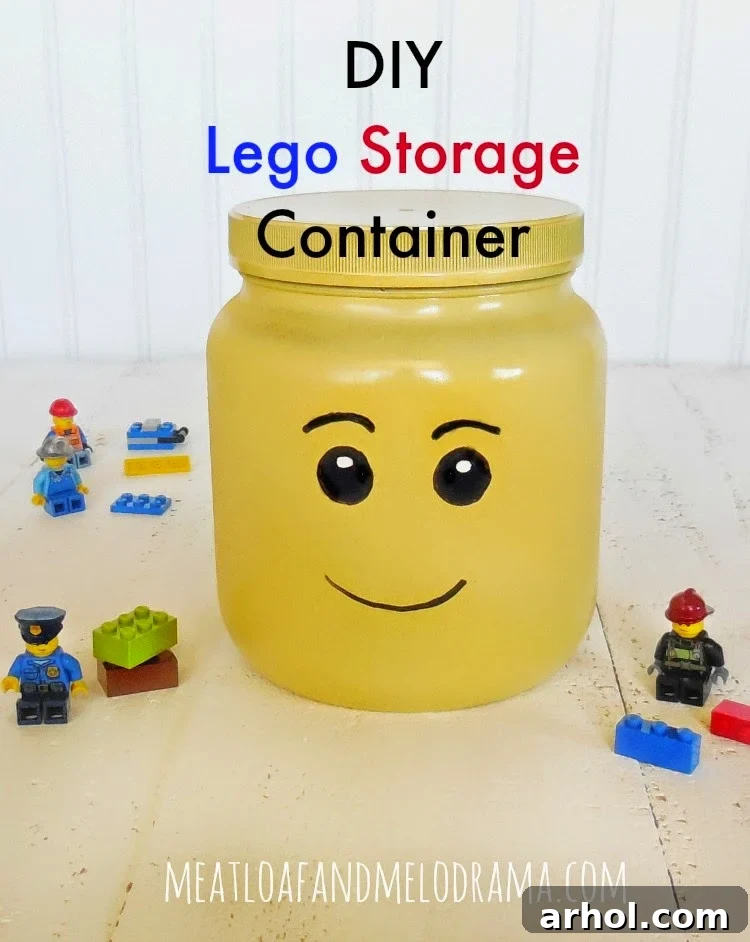
My gaze fell upon a large, empty plastic jar, previously home to a snack mix. Its shape, vaguely rounded and cylindrical, instantly reminded me of a LEGO minifigure head. A lightbulb went off! If I could transform this mundane jar into an iconic LEGO head, perhaps my kids would be more inclined to use it, especially for their beloved minifigures or smaller brick assortments. The challenge was set: to craft an adorable and functional DIY LEGO Head Storage Container, turning household waste into a cherished organization tool.
Why DIY LEGO Storage? The Benefits of Repurposing and Creativity
Choosing to DIY your LEGO storage comes with a multitude of advantages. Firstly, it’s incredibly cost-effective. Instead of spending a significant amount on specialized toy organizers, you can repurpose items you likely already have, like plastic jars or containers. Secondly, it allows for customization. You’re not limited to mass-produced designs; you can choose colors, facial expressions, and sizes that perfectly fit your child’s preferences and your home’s aesthetic. This personal touch often makes kids more invested in using the storage they helped create or that was made especially for them.
Furthermore, it’s an excellent way to teach children about sustainability and recycling. By transforming an item destined for the bin into something useful and fun, you’re demonstrating the value of repurposing. Plus, the process itself can be a fantastic creative outlet. Whether you involve your children in the painting and decorating or surprise them with the finished product, it adds a unique, handcrafted element to their play space that store-bought items simply can’t match. It’s about more than just storage; it’s about inspiring creativity and a sense of ownership over their belongings.
Step-by-Step Guide: Crafting Your Iconic LEGO Head Container
Ready to embark on this fun and rewarding DIY project? Here’s what you’ll need and how to bring your LEGO head storage to life. This project is straightforward, requires minimal supplies, and yields maximum satisfaction!
Gathering Your Supplies:
- A large, empty plastic jar (e.g., from snack mix, pretzels, or peanuts). The rounder and smoother, the better!
- Yellow spray paint (Rust-Oleum or a similar brand known for good adhesion to plastic works well). Consider a primer+paint combo for best results.
- Black permanent paint pens (oil-based or acrylic, fine-tip and medium-tip).
- Cleaning supplies (dish soap, water, a rag).
- For stubborn labels: Peanut butter and baking soda (or a commercial adhesive remover like Goo Gone).
- Drop cloth or old newspapers to protect your work surface.
- Optional: Disposable gloves and a face mask for spray painting in a well-ventilated area.
- A LEGO minifigure head as a guide for drawing the face.
1. Prepping Your Jar: The Label Removal Challenge (and Solution!)
The first and sometimes most challenging step is to completely remove any labels and residue from your plastic jar. A clean, smooth surface is crucial for an even paint finish. Initially, I tried my usual trick of just using dish soap and hot water, but this particular label proved to be a formidable opponent. It simply wouldn’t budge! Don’t be discouraged if you encounter a stubborn label; there’s a simple, household solution.
For truly persistent adhesives, I highly recommend a mixture of peanut butter and baking soda. The oils in the peanut butter work wonders at breaking down the adhesive, while the baking soda acts as a gentle abrasive, helping to scrub away the residue without scratching the plastic. Simply apply a generous layer of peanut butter to the sticky area, sprinkle some baking soda on top, and let it sit for about 15-30 minutes. Then, with a sturdy cloth or a plastic scraper, gently rub the mixture, and watch as the label and residue magically come off! Finish by washing the jar thoroughly with warm, soapy water and allow it to dry completely. A clean, grease-free surface ensures your paint adheres perfectly.
2. Bringing Color to Life: Spray Painting Your Base
With your jar sparkling clean and dry, it’s time to add that iconic LEGO yellow! Find a well-ventilated area, preferably outdoors or in a garage with open doors, and lay down your drop cloth or old newspapers to protect your surroundings. For best results, I’ve found it effective to turn the jar upside down. This allows you to easily coat the entire surface, including the base, and minimizes the risk of drips or uneven patches.
Apply several light, even coats of yellow spray paint, allowing adequate drying time between each coat as per the product instructions. Rushing this step can lead to drips or an inconsistent finish. Two to three thin coats usually achieve a vibrant, opaque color. Ensure the paint is completely dry to the touch, which can take several hours, before moving on to the next step. You’ll be amazed at how quickly the plain plastic jar transforms into a cheerful, bright canvas!
3. Adding Personality: Drawing the Iconic Face
Now for the fun part – giving your LEGO head its personality! Grab one of your son’s (or daughter’s!) LEGO minifigure heads to use as a guide for the facial features. Observe the simple yet recognizable design: two distinct black circles for eyes and a curved line for the mouth. This minimalism is key to its charm.
Using your black permanent paint pens, carefully draw the face onto the dry yellow jar. Start with the eyes. You can freehand them or use a small circular template (like a coin or the end of a marker cap) for perfect circles. Don’t worry if they aren’t absolutely flawless; a little handmade charm adds to the character! Once the eyes are dry, draw the mouth with a medium-tip pen, mimicking the classic LEGO smile or even a surprised or neutral expression if you prefer. Let the paint pen ink dry completely, which usually takes much less time than the spray paint.
Beyond the Build: Encouraging Organization and Play
The best part about this project is seeing the kids’ reactions. When I finished this first LEGO head container, I had to playfully explain to my kiddos that I wasn’t just “playing with LEGOs all day” but actually working on a fun project for them! Their excitement was immediate. They loved how cute it looked, and if they love it, I love it even more because it means they’ll actually use it! This simple, engaging design acts as an irresistible invitation for them to put their LEGOs away, turning a chore into a part of their play.
Now, the plan is to stock up on more snack mix (a win-win situation!) and transform those empty jars into an entire collection of LEGO head storage containers. Imagine a whole row of these cheerful faces, each perhaps holding a different type of brick – one for minifigures, one for green bricks, another for wheels, and so on. This makes sorting and finding specific pieces much easier, fostering independent play and reducing the dreaded “LEGO explosion” that often accompanies creative building sessions.
An organized play space isn’t just about aesthetics; it’s about reducing stress for both parents and children. When toys have a designated home, cleanup becomes quicker, frustration over lost pieces diminishes, and the overall environment feels calmer and more conducive to creative exploration. This DIY project is a perfect example of how a little creativity can go a long way in tackling common household challenges.
Join the Conversation: Share Your Clutter-Conquering Tips!
Conquering clutter, especially toy clutter, is an ongoing battle for many parents. What are your tried-and-true strategies for keeping your home tidy and organized? Do you have any brilliant DIY toy storage ideas, clever sorting hacks, or tips for encouraging kids to participate in cleanup? I’d absolutely love to hear them! Sharing our experiences and solutions helps all of us create more functional and joyful living spaces. Drop a comment below and let’s exchange ideas!
Thank you so much for stopping by and taking the time to explore this fun and practical DIY project. I hope it inspires you to look at your recycling bin with fresh eyes and turn everyday items into something extraordinary. Have a super day, and happy crafting!
Explore More Fun DIY & LEGO Craft Ideas!
If you enjoyed this project and are looking for more creative ways to incorporate LEGOs into your crafting or gift-giving, you might also like these similar posts: