
Transform Your Home with Charming DIY Snowman Jars: A Festive Upcycling Guide
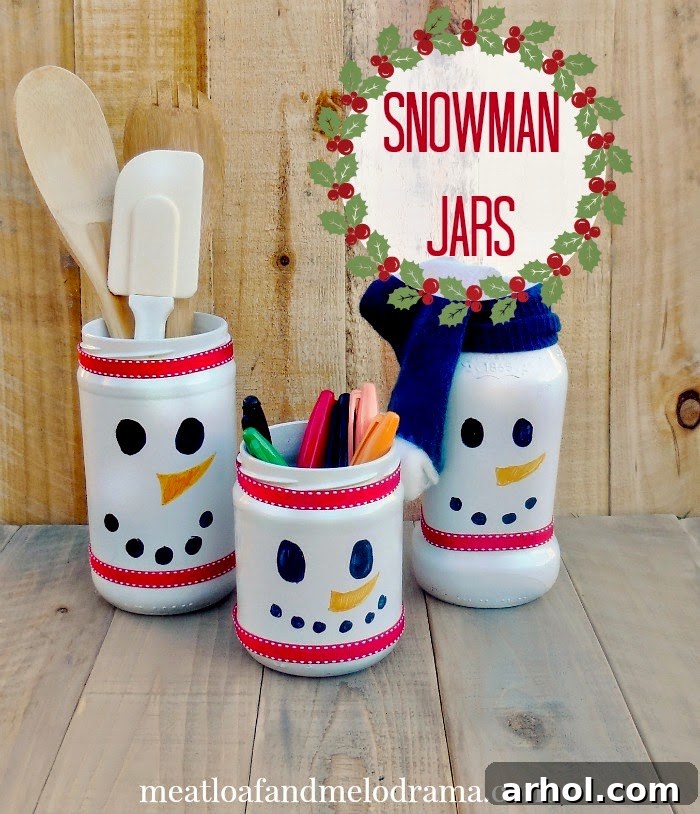
Hello fellow craft enthusiasts! If you’ve been following along, you know my passion for repurposing everyday items into delightful home decor. There’s something incredibly satisfying about transforming humble objects, like old glass jars, into something beautiful and functional. This time, my kids and I embarked on a festive project that not only adds a touch of winter wonderland to our home but also serves a practical purpose long after the holiday season has passed. Inspired by our beloved painted pumpkin jars from Halloween – which, I must admit, were so charming they stayed out almost until Christmas – we decided to create an equally enchanting set of DIY snowman jars.
Why Embrace DIY Jar Crafts for Your Holiday Decor?
Creating your own holiday decorations, especially through upcycling, offers a multitude of benefits. It’s an incredibly budget-friendly way to refresh your home decor, often costing next to nothing if you already have basic craft supplies on hand. More importantly, it provides a wonderful opportunity for family bonding. Kids love getting involved in creative projects, and seeing their ideas come to life instills a sense of pride and accomplishment. Beyond the immediate joy, upcycling glass jars contributes to a more sustainable lifestyle by giving new life to items that would otherwise be discarded. These charming snowman jars are a testament to how simple materials can be transformed into cherished pieces, perfect for brightening up any corner of your house during the chilly winter months.
Gather Your Supplies: What You’ll Need for Your Snowman Jars
The beauty of this project lies in its simplicity and the readily available materials. You likely have most of these items around your home already! Here’s a detailed list to get started on your own repurposed snowman jar craft:
- Empty Glass Jars: Collect various sizes and shapes. Pasta sauce, salsa, pickle, or even jam jars work perfectly. We used one pasta sauce jar and two salsa jars, each offering a slightly different silhouette for our snowmen. Ensure they are thoroughly cleaned and dry.
- White Spray Paint: A high-quality, all-purpose white spray paint is ideal for an even, durable finish. I prefer Rust-Oleum for its excellent coverage and quick drying time, but any reputable brand will do.
- Black Permanent Marker (Sharpie): Essential for drawing the eyes and mouth of your snowman. A fine-tip marker allows for more detail.
- Orange Permanent Marker (Sharpie): For crafting that classic carrot nose.
- Ribbon: Red ribbon is a traditional choice for snowman scarves, adding a pop of festive color. Experiment with different widths and textures to create unique looks.
- Hot Glue Gun and Glue Sticks: For securely attaching the ribbon and any additional embellishments.
- Optional Embellishments: An old sock (for a hat), cotton balls, buttons, small twigs for arms, or glitter for a snowy effect.
- Newspaper or Drop Cloth: To protect your work surface during spray painting.
- Gloves and Face Mask: For safety when using spray paint.
Step-by-Step Guide: Crafting Your Adorable Snowman Jars
Step 1: Preparing and Painting Your Jars
The foundation of your snowman jars starts with a pristine white base. This step requires a little patience but is crucial for a professional-looking finish.
- Clean Your Jars: Begin by thoroughly washing your empty glass jars with soap and water. Remove any labels and sticky residue. Allow them to air dry completely, ensuring there’s no moisture left inside or out.
- Prepare Your Workspace: Lay down newspaper or a drop cloth in a well-ventilated area, preferably outdoors or in a garage with open doors. Put on your gloves and face mask for safety.
- Apply the First Coat: Shake your white spray paint can vigorously for about a minute. Hold the can approximately 8-10 inches away from the jar and apply a light, even coat, using steady, sweeping motions. Avoid applying too much paint at once to prevent drips.
- Allow to Dry: Let the first coat dry completely, which usually takes 15-30 minutes depending on the paint and humidity.
- Apply a Second Coat: Once the first coat is dry, apply a second thin, even coat. For some jars, a third coat might be necessary to achieve full opacity and a smooth finish. Ensure each coat dries fully before applying the next.
- Final Drying Time: Allow the jars to cure for several hours, or even overnight, to ensure the paint is fully hardened and less prone to scratching.
Step 2: Bringing Your Snowmen to Life with Faces
This is where the real fun begins, especially for younger helpers! Drawing the faces adds personality and charm to your snowman jars. The simplicity of Sharpie markers makes this step easy and forgiving.
- Draw the Eyes: Using a black permanent marker, draw two round or oval eyes on the upper half of each painted jar. You can experiment with different expressions – wide-eyed, sleepy, or cheerful – to give each snowman a unique character.
- Create the Mouth: Below the eyes, draw a series of small black dots or a curved line to form the mouth. A classic snowman mouth often consists of several small charcoal-like dots arranged in a smile.
- Add the Carrot Nose: With an orange permanent marker, draw a triangular or carrot-shaped nose in the center of the face, pointing slightly upwards or straight out. This vibrant splash of orange really makes the snowman pop!
Encourage your children to be creative during this step. There’s no right or wrong way to draw a snowman’s face, and their unique touches will make each jar even more special.
Step 3: Accessorizing with Festive Ribbons (Scarves)
A snowman isn’t complete without a cozy scarf! Ribbon is a perfect, easy way to add this iconic accessory.
- Cut Your Ribbon: Measure and cut pieces of red ribbon long enough to wrap around the neck of each jar, with a little extra length for tying a knot or bow, or for creating a draped effect. We also added some around the bottom for an extra touch of warmth.
- Attach the Scarves: Apply a small dab of hot glue to the back of the jar’s neck. Press one end of the ribbon onto the glue, then wrap the ribbon around the neck. Secure the other end with another dab of hot glue, or tie a simple knot or bow at the front or side. For a more elaborate scarf, you can crisscross the ribbon or let the ends hang down.
Consider using different colors or patterns of ribbon to add variety to your collection of snowmen. Plaid, striped, or glittery ribbons can all create distinct looks.
Step 4: Adding Unique Details and Hats
While two of our snowman jars are perfect for holding everyday items, we decided one, the narrower pasta sauce jar, would become a purely decorative piece. This is where you can let your creativity truly shine!
For our decorative snowman, we fashioned a charming hat from an old kid’s sock. Simply cut the foot off an old sock, and roll the cuff up to create a brim. Place it on top of the jar, and glue it in place if desired. We then glued two fluffy cotton balls onto the toe area of the sock for a cute pom-pom effect. You could also:
- Felt Hats: Cut circles and strips of felt to create miniature top hats or beanies.
- Earmuffs: Use pipe cleaners and cotton balls to craft adorable earmuffs.
- Twigs for Arms: Hot glue small twigs to the sides of the jars to mimic snowman arms.
- Faux Snow: Apply a thin layer of decoupage glue and sprinkle with glitter or faux snow for an extra magical touch.
And just like that – with a little paint, a few markers, and some simple embellishments – you have a delightful set of snowman jars!
Creative Uses for Your Finished Snowman Jars
These versatile snowman jars aren’t just pretty faces; they’re incredibly practical too! Here are some ideas for how you can incorporate them into your home decor and everyday life:
- Office Organizer: Use them to hold pens, pencils, scissors, and other office supplies, adding a cheerful touch to your desk.
- Kitchen Utensil Holder: Perfect for organizing wooden spoons, spatulas, and whisks on your kitchen counter.
- Bathroom Storage: Keep toothbrushes, cotton swabs, or makeup brushes tidy and accessible.
- Festive Centerpiece: Arrange a cluster of snowman jars on your dining table or mantelpiece. You can even place battery-operated LED votive candles inside for a warm, safe glow.
- Gift Jars: Fill them with homemade cookies, candies, hot cocoa mix, or small trinkets to create personalized holiday gifts for friends and family.
- Vase for Winter Greens: Display small sprigs of pine, holly, or artificial berries for a simple yet elegant winter arrangement.
- Party Favors: Create smaller versions for party favors at a winter-themed gathering.
The best part is that their winter theme allows them to remain part of your decor well beyond Christmas, bringing joy throughout the colder months.
Tips for Crafting Success
To ensure your snowman jar project goes smoothly and yields the best results, consider these helpful tips:
- Patience with Paint: Rushing the drying process between spray paint coats can lead to a tacky finish or peeling. Give each coat ample time to dry.
- Ventilation is Key: Always spray paint in a well-ventilated area to avoid inhaling fumes.
- Steady Hand for Faces: If you’re nervous about drawing directly on the jars, you can lightly sketch the features with a pencil first, then trace over them with the markers. Practice on a piece of paper beforehand.
- Hot Glue Safety: If kids are involved, supervise them closely when using a hot glue gun or handle this step yourself.
- Embrace Imperfections: Handmade crafts have character. Don’t strive for absolute perfection; the slight variations make each snowman unique and charming.
Beyond Snowmen: Exploring Other Upcycled Jar Ideas
This project is just the tip of the iceberg when it comes to upcycling jars! Once you master the basic technique of painting and decorating, the possibilities are endless. Remember our pumpkin jars? They were made with a similar method, simply using orange paint and different facial features. You could adapt this concept for:
- Spring Jars: Paint them pastel colors and add floral designs or bunny faces.
- Summer Jars: Bright colors, nautical themes, or even fruit designs.
- Seasonal Themes: Transform them into patriotic flag jars for national holidays, spooky monster jars for Halloween, or even elegant glitter jars for New Year’s Eve.
- Storage Solutions: Simply paint them solid colors to match your decor for chic and discreet storage in any room.
The act of upcycling not only sparks creativity but also provides a sense of accomplishment and contributes to a more mindful approach to consumption. It’s a fantastic way to personalize your living space with items that reflect your style and effort.
Bring Holiday Cheer Home Today!
This project truly is an easy, thrifty, and incredibly fun way to infuse some festive holiday cheer into your home. For me, it was a zero-cost endeavor because I already had all the necessary supplies on hand. More importantly, it was an enjoyable activity for the kids, fostering their creativity and giving them a tangible result to be proud of.
Have you started making any Christmas or winter decorations yet? I’d absolutely love to hear about your projects and see your creations! Share your ideas and inspiration in the comments below.
Thank you so much for stopping by and taking the time to read. Wishing you a wonderful and crafty day!