
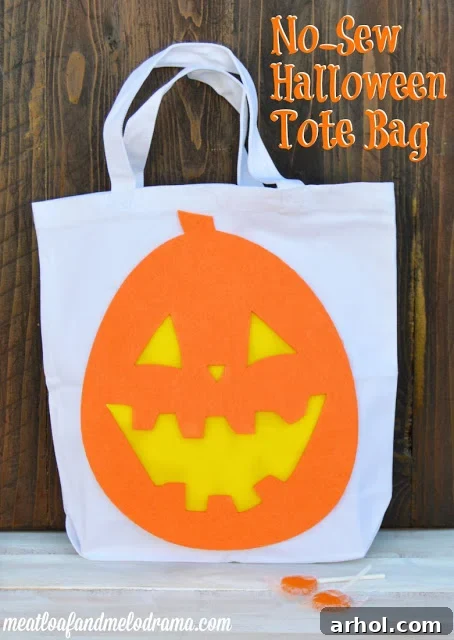
Hi there, fellow Halloween enthusiasts and creative spirits! As parents, we’ve all been there: Halloween night arrives, the kids are buzzing with excitement, and their trusty plastic pumpkins quickly overflow with a generous haul of treats. My own children faced this dilemma year after year. Those charming little plastic pumpkins that once seemed perfectly adequate for a small collection of sweets now barely hold a fraction of the candy our wonderful neighbors bestow upon them. Last Halloween, we even had to make an emergency trip back home to unload before continuing our trick-or-treating adventure!
That delightful, albeit overwhelming, problem sparked a creative solution. I decided it was time to upgrade our candy-carrying game with something more spacious, durable, and, most importantly, super easy to make. The result? This fantastic **easy no-sew Halloween tote bag** that’s absolutely perfect for handling even the most bountiful candy collections. It’s a simple, cost-effective project that adds a personal touch to your kids’ Halloween experience, ensuring they can focus on the fun without worrying about where to stash their next handful of treats.
Why No-Sew Crafting is My Go-To for Quick Halloween Projects
As much as I adore the idea of crafting and diving into DIY projects, I must confess: sewing is simply not my forte. And honestly, no offense to all you incredibly talented seamstresses out there—it truly is an impressive skill! However, for someone like me, who prefers quick results and minimal fuss, traditional sewing machines and intricate patterns can feel quite daunting. That’s precisely why I gravitate towards “no-sew” projects whenever possible. They offer the joy of handmade creations without the need for specialized equipment or advanced techniques, making crafting accessible to everyone, regardless of their sewing abilities (or lack thereof!).
No-sew projects are fantastic because they:
- **Save Time:** You can often complete them in under an hour, perfect for busy schedules.
- **Are Beginner-Friendly:** No prior experience with needles or thread is required.
- **Require Minimal Supplies:** Usually just fabric, glue, and scissors.
- **Are Budget-Friendly:** Often utilizing inexpensive materials.
- **Offer Instant Gratification:** You see your creation come to life very quickly!
This Halloween tote bag project perfectly embodies all these benefits, proving that you don’t need a sewing machine to create something wonderful and practical.
The Inspiration Behind the Spooky Pumpkin Tote Bag
The idea for this particular Halloween tote bag struck me during a recent visit to my favorite craft store. Wandering through the seasonal aisle, my eyes landed on these utterly adorable felt pumpkins. They were vibrant, perfectly shaped, and just begging to be turned into something festive. My initial thought was to use one or two for a Halloween-themed decorative pillow. However, knowing my energetic household, most decorative pillows tend to migrate from the couch to the floor within minutes of being placed, rendering them less practical for long-term enjoyment.
Then, a lightbulb moment! I remembered the annual trick-or-treating dilemma and the kids’ ever-growing need for more robust candy containers. Why not transform these charming felt pumpkins into the focal point of a new, spacious trick-or-treat bag? It was the perfect solution: a practical item that would be used extensively on Halloween night, combining fun design with much-needed capacity. Plus, the bright colors would add an element of visibility, which is always a bonus when kids are out and about after dark.
I quickly gathered my supplies: a pack of plain, medium-sized canvas tote bags – sturdy enough to hold pounds of candy, the delightful felt pumpkins, and some complementary yellow felt. To my pleasant surprise, with a handy coupon, the entire project cost me less than $10! Not only was it affordable, but it also promised to be a super quick endeavor, taking just a few minutes per bag. Talk about a win-win situation for any busy parent or crafter!
Crafting Your Ultimate Halloween Haul Bag: A Step-by-Step Guide
Ready to create a custom Halloween tote that will make your trick-or-treater the envy of the neighborhood? This no-sew project is incredibly straightforward and yields fantastic results. Let’s gather our materials and get started!
Supplies You’ll Need:
- **Medium Canvas Tote Bag:** Opt for a durable, plain canvas bag. Natural or light-colored canvas provides an excellent blank slate for your spooky design. Ensure it’s sturdy enough to handle a generous load of Halloween candy.
- **Medium Felt Pumpkin:** These pre-cut felt shapes are the star of our show. Look for ones that are well-made and fit proportionally on your chosen tote bag. If you can’t find pre-cut pumpkins, you can easily cut your own from orange felt!
- **Yellow Felt:** This will serve as the glowing “backlight” for our jack-o’-lantern face. A vibrant yellow or even a light orange will work perfectly.
- **Strong Fabric Glue or Hot Glue Gun with Glue Sticks:** For secure adhesion without sewing. A hot glue gun is quick and effective, but a strong fabric adhesive also works well, just allowing more drying time.
- **Sharp Scissors:** Essential for precise cutting of the felt pieces.
- **Cardboard:** A piece of scrap cardboard is crucial to place inside the tote bag to prevent glue from seeping through to the other side of the fabric.
Detailed Step-by-Step Instructions:
Step 1: Sizing Your Felt Pumpkin for the Tote
Before you commit to gluing, it’s vital to ensure your felt pumpkin fits your canvas tote bag appropriately. Place the felt pumpkin on the front of your bag to check its placement and size. In my case, the stem of the felt pumpkin was a little too tall for the bag’s dimensions, so I simply snipped off the top portion of the stem to make it fit perfectly. This quick adjustment allows the pumpkin to sit nicely without extending awkwardly over the bag’s handles or edges.
Keep in mind that felt pumpkins come in various sizes and designs. While I found mine at a craft store, I also spotted some at a dollar store. However, those were often larger, which might be ideal if you’re using an even bigger tote bag to accommodate truly monumental candy hauls! Always dry-fit your main felt piece first to prevent any missteps.
Step 2: Adding the Festive Glow with the Yellow Felt Base
Once your pumpkin is sized, it’s time to create that classic jack-o’-lantern glow! Take your yellow felt and carefully trim it to fit just underneath the cut-out spaces for the pumpkin’s eyes, nose, and mouth. The goal here is for the yellow felt to peek through these openings, giving the illusion of a lit-up pumpkin. Don’t worry too much about making your cuts perfectly neat on the yellow felt; remember, this piece will be entirely covered by the larger felt pumpkin, so no one will see the edges!
This step adds depth and character to your design. You could experiment with other colors too—perhaps a white felt for a ghostly glow, or a bright orange for an extra fiery look. For this classic jack-o’-lantern, yellow is the perfect choice.
Step 3: Securing Your Spooky Design – Gluing the Pumpkin
Now for the main attachment! Carefully position the felt pumpkin over the yellow felt pieces, ensuring that the yellow felt is perfectly aligned to show through the eyes, nose, and mouth openings. Once you’re happy with the placement, it’s time to apply the glue. Before you do, make sure to insert a piece of cardboard inside your canvas tote bag. This is a crucial step to prevent the glue from seeping through the canvas fabric and accidentally gluing the front and back of your bag together.
I used hot glue for this step as it provides a strong, fast-drying bond. Apply a thin, even layer of glue to the back of the felt pumpkin, especially around the edges and central areas. Then, carefully press the pumpkin firmly onto the canvas bag. If you’re using fabric glue, ensure you apply enough for a secure hold and allow ample drying time, which might be several hours or even overnight, depending on the product instructions. Even pressure across the entire pumpkin helps ensure a smooth, lasting adhesion.
Step 4: The Finishing Touch – A Polished Look
With the pumpkin securely glued in place, you’re almost done! If you used hot glue, you might notice some thin, wispy glue strings. Take a moment to gently trim these away with your scissors or carefully pull them off. This step ensures your completed tote bag looks clean, professional, and ready for its big night out. A neat finish always makes a handmade item even more special.
And there you have it – a wonderfully easy, no-sew Halloween tote bag! This project is not only simple but also incredibly satisfying. Your kids will love having a personalized bag, and you’ll love knowing they have a sturdy, spacious container for their Halloween treasures. Remember to let any glue completely cure before heavy use, especially if you opted for fabric adhesive. Hot glue will be ready almost instantly, but a little patience ensures longevity.
Benefits of Your DIY Halloween Tote
Beyond the simple satisfaction of a successful craft project, this no-sew Halloween tote bag offers numerous practical and delightful advantages:
- **Superior Capacity & Durability:** Unlike flimsy plastic pumpkins that crack or overflow, a canvas tote provides ample space and strength for even the most generous candy hauls. No more mid-route trips home to empty bags!
- **Enhanced Safety:** The bright colors of the felt pumpkin against the canvas bag make it more visible, especially if your trick-or-treaters are out after dusk. You can even consider adding glow-in-the-dark fabric paint or reflective tape for extra safety.
- **Personalization & Uniqueness:** Each bag can be a unique reflection of your child’s (or your own!) style. This DIY approach means no two bags will be exactly alike, standing out from the store-bought options.
- **Budget-Friendly Fun:** Crafting your own bags is often significantly cheaper than purchasing pre-made, themed trick-or-treat bags from specialty stores. Plus, you get the added value of a fun activity!
- **Eco-Friendly & Reusable:** This canvas tote isn’t a single-use item. It can be stored and reused year after year, reducing waste and becoming a cherished part of your family’s Halloween traditions.
- **Memory-Making Experience:** Involving your children in the crafting process creates wonderful memories and fosters their creativity. They’ll be proud to carry a bag they helped design.
My little Jedi, for instance, immediately loved his new bag, contemplating whether to claim it for himself or generously offer it to his sister. Luckily, with this being such an easy and quick craft, whipping up another Halloween tote is absolutely no trouble at all. I can easily customize each bag to suit their preferences, ensuring everyone has their perfect candy carrier.
Customization Ideas for Your No-Sew Halloween Tote
While the felt pumpkin is undeniably charming, the beauty of a DIY project lies in its endless possibilities for customization. Don’t limit yourself to just pumpkins! Here are a few ideas to spark your imagination and create truly unique trick-or-treat bags:
- **Beyond Pumpkins:**
- **Ghosts & Ghouls:** Cut out white felt in ghost shapes and use black felt for eyes and mouths.
- **Spooky Bats:** Black felt bats flying across the bag can be incredibly effective.
- **Creepy Spiders & Webs:** Use black felt for spiders and white yarn or glitter glue for webs.
- **Witches’ Hats & Cauldron:** Green or purple felt for hats, black felt for cauldrons.
- **Candy Corn:** Layers of white, orange, and yellow felt can create a fun candy corn design.
- **Material Play:**
- **Glitter Felt:** Add some sparkle by using glitter felt for your cut-outs.
- **Patterned Fabric:** If you’re comfortable with fabric adhesive, you could use patterned cotton fabric for your shapes (just ensure the edges won’t fray easily).
- **Glow-in-the-Dark Elements:** Incorporate glow-in-the-dark felt or fabric paint for an extra spooky effect when the sun sets.
- **Additional Embellishments:**
- **Fabric Markers:** Let older kids draw spooky scenes or write their names.
- **Fabric Paint:** Use stencils and fabric paint to add intricate designs or borders.
- **Ribbons & Trims:** Glue decorative ribbons around the top edge or handles for a fancier look.
- **Buttons & Rhinestones:** Add some sparkle or texture with securely glued buttons or craft rhinestones.
- **Themed Bags:** Create bags that match your child’s Halloween costume, making their ensemble even more cohesive and fun!
Caring for Your Handmade Halloween Tote
To ensure your no-sew Halloween tote bag lasts for many trick-or-treating seasons to come, proper care is essential. Since glue is the primary adhesive, avoid harsh washing methods. Spot cleaning with a damp cloth and mild soap is usually best for any small marks or spills. If the entire bag needs freshening up, hand washing gently in cool water with a mild detergent and then air-drying flat is recommended. Avoid machine washing or using a dryer, as high heat and agitation can weaken the glue bond and potentially damage the felt decorations.
When Halloween is over, simply empty any remaining candy (if there is any!), shake out crumbs, and fold your bag neatly. Store it in a dry, cool place with your other Halloween decorations. This way, it will be fresh and ready for action next year, ready to collect another bounty of treats!
Frequently Asked Questions About No-Sew Halloween Totes
- What kind of glue is best for this project?
- A hot glue gun is excellent for quick results and a strong bond. If you prefer not to use hot glue, a strong fabric adhesive or craft glue suitable for fabric (like E6000 or a specialized felt glue) will also work well, just allow for longer drying times.
- Can kids help make these no-sew bags?
- Absolutely! This is a fantastic project for kids. Younger children can help place the felt pieces (under supervision for glue), while older children can handle cutting (with appropriate safety scissors) and glue application. It’s a great way to involve them in the Halloween preparations.
- How long does it typically take to make one bag?
- Using hot glue, you can typically complete one bag from start to finish in about 15-30 minutes, not including extensive customization. With fabric glue, the active crafting time is similar, but you’ll need to account for several hours of drying time.
- Can I use other materials instead of felt?
- Yes, you can! Other non-fraying fabrics like fleece or even some types of non-woven decorative craft fabrics could work. If you choose a woven fabric like cotton, you might need to use a fray-check liquid on the edges or cut it with pinking shears to prevent fraying.
- Is a canvas tote bag durable enough for heavy candy?
- Definitely! Canvas is a very strong and durable fabric, making it ideal for carrying heavy loads of candy. The handles are typically sewn securely, ensuring they won’t break under pressure, unlike some lighter plastic options.
Thank you SO much for stopping by and taking the time to explore this fun and practical Halloween craft! I hope this detailed guide inspires you to create your own collection of durable, delightful no-sew Halloween tote bags. Happy crafting and even happier trick-or-treating!
You Might Also Like: More Spooktacular DIY Ideas!
If you enjoyed crafting this easy no-sew Halloween tote bag, you’ll love these other creative and simple DIY projects perfect for adding a touch of handmade charm to your home or your little ones’ playtime. Dive into more fun and budget-friendly ideas below:
DIY Candy Corn Vases
Transform ordinary glass bottles into charming and festive Halloween decor with this simple DIY project. Perfect for centerpieces or mantel decorations, these candy corn vases add a sweet touch to any autumnal display.
No-Sew American Girl Doll Outfit
Keep the no-sew fun going with this adorable project to create a stylish outfit for American Girl dolls (or similar sized dolls) without a single stitch! It’s a fantastic way to engage kids in crafting and expand their doll’s wardrobe easily and affordably.