
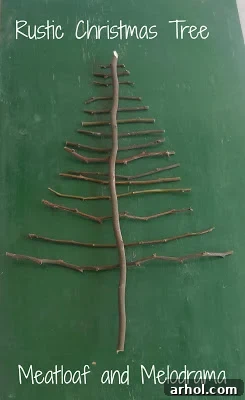
Craft Your Own Rustic Twig Christmas Tree: A Sustainable DIY Guide
Hello fellow crafters and home decor enthusiasts! Have you been captivated by the charm of rustic wood trees making their rounds across various blogs and social media platforms? I certainly have, and the moment I saw them, I knew I had to create my very own unique version. Thanks to my husband’s recent yard work, I was fortunate enough to receive a generous collection of mesquite branches – what a fantastic score! Right then and there, I realized I had the ideal natural materials for constructing a beautiful, one-of-a-kind twig Christmas tree.
This project is not only incredibly easy to undertake but also remarkably frugal, requiring nothing more than an assortment of twigs and a reliable adhesive. It’s a truly swift craft; once the glue has thoroughly dried, you’ll have a stunning rustic tree ready to adorn your home, bringing a touch of natural elegance to your seasonal decor.
Why Embrace a DIY Rustic Twig Tree This Christmas?
In a world increasingly focused on sustainability and unique, personalized decor, a DIY rustic twig Christmas tree stands out as a perfect choice. Beyond its undeniable aesthetic appeal, crafting your own tree offers a multitude of benefits:
- Eco-Friendly and Sustainable: Utilizing fallen branches or pruned limbs means you’re repurposing natural materials that might otherwise go to waste. It’s a wonderful way to connect with nature and minimize your environmental footprint during the holiday season.
- Cost-Effective Decor: Forget expensive artificial trees or store-bought decorations. With materials often found in your own backyard or local park, this project is incredibly budget-friendly, allowing you to create high-impact decor without breaking the bank.
- Unique and Personalized: No two twig trees will ever be exactly alike. Each branch tells its own story, contributing to a truly distinctive piece of decor that reflects your personal style and creativity. It’s a guaranteed conversation starter!
- Simple Craftsmanship: You don’t need to be an expert artisan to create a beautiful twig tree. The process is straightforward and forgiving, making it an accessible project for crafters of all skill levels, including families with children.
- Connection to Nature: Bringing natural elements indoors creates a calming and grounding atmosphere. The organic textures and earthy tones of the twigs provide a serene contrast to the usual festive sparkle, fostering a cozy and inviting environment.
- Versatile Styling: A rustic twig tree can complement a wide range of interior design styles, from farmhouse and bohemian to minimalist and modern. Its natural beauty provides a neutral canvas for various embellishments and themes.
Gathering Your Materials: Nature’s Bounty Awaits
The beauty of this project lies in its simplicity and reliance on natural elements. Here’s what you’ll need to gather:
- Branches/Twigs: The star of your project! Look for a variety of sizes – small, medium, and large – to create a full, dimensional tree shape. Hardwoods like mesquite (as I used), oak, maple, or even sturdy evergreen branches work wonderfully. Ensure they are dry and free of insects or rot. For safety, always obtain permission before collecting branches from public or private property.
- One Thick Branch or Dowel: This will serve as the sturdy trunk for your tree. It should be strong enough to support the other branches and ideally have a relatively flat end for stability.
- Strong Adhesive: I initially opted for Tacky Glue, anticipating it would be less messy than hot glue. While Tacky Glue offers a clean application and strong bond over time, I did find that for some of the larger, heavier branches, a dab of hot glue provided quicker initial adhesion. A combination of both can be very effective: Tacky Glue for enduring strength and hot glue for immediate hold.
- Pruning Shears or Hand Saw: Essential for cutting your branches to the desired lengths.
- Optional: A base (basket, pot, bucket), filler material (pinecones, pebbles, sand), and small ornaments for decoration.
When selecting your branches, look for those with interesting shapes and textures. Don’t be afraid of slight imperfections; these will only add to the rustic charm of your finished tree. Remember, sustainability is key, so only take what you need and be mindful of your surroundings.
Step-by-Step Guide to Crafting Your Twig Tree
Let’s dive into the creative process! This project is wonderfully forgiving, allowing for a lot of personal expression.
1. Prepare Your Branches
Begin by cutting your collected branches. You’ll want a good assortment of lengths to mimic the tapering shape of a natural tree. Start with longer pieces for the base, gradually shortening them as you work your way up. Don’t forget to select one sturdy, thicker branch to serve as your central trunk. Once cut, lay out your branches on a flat surface. This pre-arrangement step is crucial as it allows you to visualize the final shape and make any necessary adjustments before committing to the glue. Experiment with different arrangements until you achieve the desired aesthetic. Some prefer a symmetrical, classic Christmas tree silhouette, while others might lean towards a more organic, free-form design. There’s no wrong way to do it!
2. Assembling Your Tree: The Gluing Process
Once you’ve settled on your ideal arrangement, it’s time to start gluing the individual branches to the main trunk. I found it easiest to work from the bottom up, attaching the longest branches first and progressively adding shorter ones. As mentioned, I initially opted for Tacky Glue, as I believed it would offer a cleaner application with less mess compared to hot glue. However, for the larger, heavier branches that needed to adhere more quickly and securely, I did go back and use a few strategic dabs of hot glue. This combination proved to be very effective, leveraging the instant hold of hot glue with the long-lasting bond of Tacky Glue. My little helper absolutely loved assisting with this part of the project, demonstrating just how kid-friendly this craft can be!
3. Drying and Reinforcement
After all the branches are firmly attached, patience is key. Allow ample time for the glue to dry completely and cure. This step is vital for ensuring the stability and longevity of your rustic tree. Depending on the type of glue used and the thickness of the branches, this could take several hours or even overnight. Once dry, gently test the stability of each branch. If any feel loose, don’t hesitate to add a bit more glue for reinforcement. You want your beautiful creation to stand strong throughout the holiday season and beyond.
Styling Your Rustic Twig Tree: A Touch of Enchantment
Once your twig tree is fully assembled and dry, the fun truly begins: decorating and styling! The raw, natural beauty of the branches provides a perfect canvas for creative expression. I initially considered using mine as a wall hanging, envisioning its minimalist charm against a plain backdrop. However, I soon realized how magnificent it would look positioned next to our fireplace, adding warmth and organic texture to the living space.
To establish its base, I carefully placed the trunk into a festive red basket. For added stability and aesthetic appeal, I filled the basket with natural pinecones, which perfectly complemented the rustic theme. Then, I began to adorn the branches with a selection of small, delicate ornaments. The beauty of this tree is its versatility; you can go as minimalist or as festive as you desire!
Placement Ideas:
- By the Fireplace: As I discovered, this is a prime spot. The natural wood tones beautifully contrast with a stone or brick fireplace, creating a cozy focal point.
- Entryway or Foyer: Welcome guests with a unique, handmade statement piece that immediately conveys a sense of warmth and natural charm.
- Console Table or Sideboard: A smaller version of the tree can be an elegant centerpiece on any flat surface, adding height and interest to your display.
- Wall Hanging: For a truly minimalist approach, attach a hanger to the back of the trunk and display it flat against a wall. This is a great space-saving option.
- Outdoor Patios or Porches: If your tree is well-sealed or made from very durable wood, it can bring rustic charm to covered outdoor spaces.
Base and Embellishment Ideas:
- Rustic Bases: Beyond baskets, consider galvanized metal buckets, terracotta pots, wooden crates, or even a simple piece of wood with a drilled hole for the trunk. Fillers like pebbles, sand, moss, or burlap fabric can secure the trunk and add visual interest.
- Natural Embellishments: Continue the organic theme with dried citrus slices, cinnamon sticks, small bundles of evergreen sprigs, berries, or handmade twine bows.
- Minimalist Ornaments: Small, understated ornaments in muted tones, metallic accents, or even simple glass balls can enhance the tree without overpowering its natural beauty. Think tiny bells, wooden beads, or small felt figures.
- Fairy Lights: A string of warm white fairy lights delicately woven through the branches will create a magical, ethereal glow, perfect for evenings.
- Themed Decor: Envision it against a raw wooden fence or an upcycled pallet for a truly authentic farmhouse or woodland aesthetic. Imagine tiny handcrafted birds perched on its branches, or perhaps a garland of cranberries draped elegantly. The possibilities are truly endless!
While I don’t currently have a wooden fence or pallet to set it against, I firmly believe the tree looks absolutely charming by our fireplace. It seamlessly integrates with the rustic aesthetic of our room, adding a layer of warmth and handcrafted authenticity that makes the space feel even more inviting.
Beyond Christmas: Year-Round Natural Decor
The beauty of a rustic twig tree extends far beyond the Christmas season. Once the holidays are over, you don’t have to pack it away. Consider it a piece of natural art that can grace your home year-round. You can remove the Christmas-specific ornaments and instead decorate it with fairy lights for a subtle ambient glow, hang small air plants for a botanical touch, or simply leave it unadorned to appreciate its inherent sculptural quality. It can serve as a striking focal point in a minimalist setting or blend seamlessly into a farmhouse or nature-inspired decor scheme. This makes your DIY project a sustainable investment in your home’s aesthetic, providing beauty and charm through all seasons.
I’m currently putting the final touches on our fireplace mantel, and I’m incredibly excited to share the full reveal with you all very soon! Are you still immersed in your Christmas decorating endeavors, or have you largely completed your festive transformations?
Thank you so much for taking the time to join me on this crafting journey. I hope this guide inspires you to create your own rustic masterpiece. Have a truly wonderful and creative day!
Dee 🙂
