
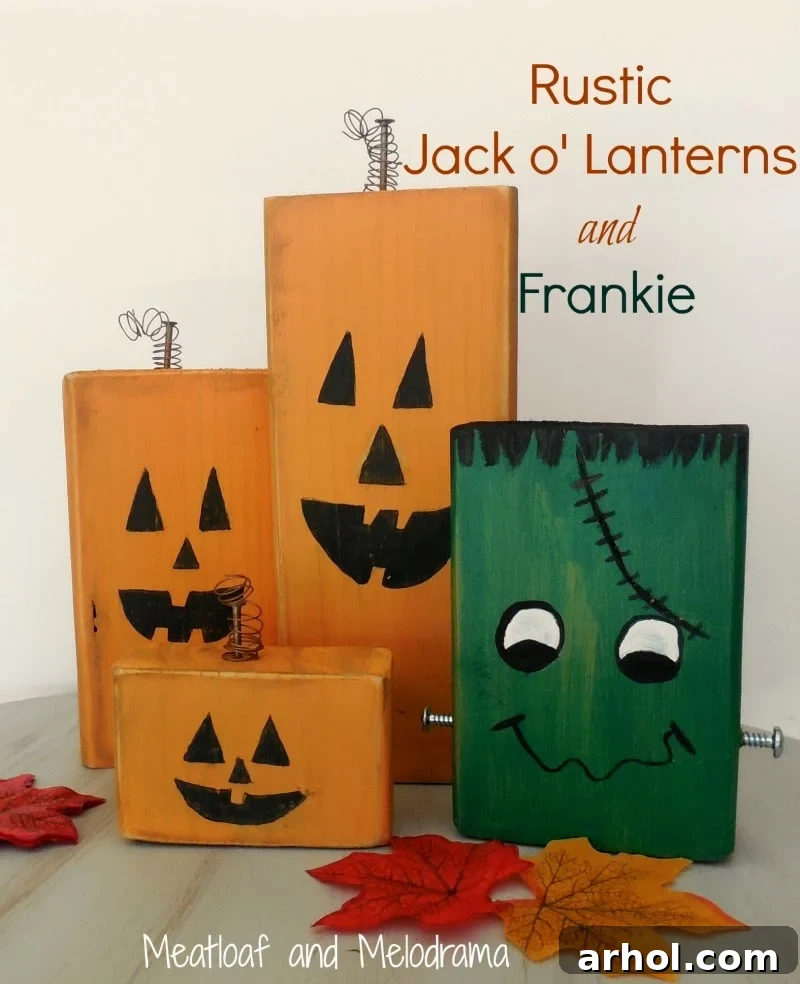
DIY Rustic Wood Block Pumpkins & Frankie: Easy & Charming Halloween Decor
Hello, fellow craft enthusiasts! If you’re anything like me, you probably have a soft spot for anything rustic, especially when it comes to holiday decorations. There’s something inherently charming and effortlessly stylish about the rustic aesthetic – perhaps it’s the forgiving nature of the style, where imperfections only add to its appeal. For ages, I’ve harbored a desire to create my own unique wood pumpkins, and this past weekend, that wish finally came to fruition! With some leftover lumber and a little help from my wonderful husband, we embarked on a fun, creative journey that transformed simple wood blocks into a whimsical family of rustic Jack o’ lanterns and their friendly monster companion, Frankie. It’s amazing how quickly raw materials can be reimagined into delightful pieces that bring so much character to your home.
Crafting Your Spooky Creations: A Step-by-Step Guide
While the transformation of these wood blocks might seem like magic, I assure you, it was simply a delightful and straightforward DIY project that anyone can tackle. With just a few basic tools and some paint, you can bring your own rustic Halloween characters to life. Let’s dive into how we made these adorable decorations.
Materials You’ll Need:
- Wood: A 2×4 piece of lumber (or similar scrap wood blocks). The beauty of this project is its flexibility with wood sizes and types.
- Saw: To cut your wood blocks to desired lengths. A hand saw, miter saw, or even having your local hardware store cut them for you works!
- Sandpaper or Sander: To smooth edges and prepare surfaces for painting.
- Craft Paints: Orange, dark brown, green, and black (acrylic craft paints work perfectly).
- Small Paintbrushes: For detail work and applying base coats.
- Small Bolts: Two small bolts for Frankie’s neck (optional, but adds character).
- Nails: Medium-sized nails for pumpkin stems.
- Craft Wire: Flexible wire for creating coiled stems.
- Metallic Spray Paint: Copper or bronze color to achieve a rusty look for nails and wire.
- Hammer: To attach nail stems.
- Optional: Screwdriver for bolts (if not self-tapping).
Step 1: Preparing Your Wood Blocks
The foundation of this project starts with simple wood blocks. We began with a standard 2×4 piece of wood. My husband, ever so helpful, cut this into four different sized blocks. The variation in height and width adds visual interest and allows for a diverse “family” of pumpkins. Once cut, each block was meticulously sanded down. This step is crucial for two reasons: it prevents splinters, making the blocks safe to handle, and it creates a smooth surface for the paint to adhere to evenly. Don’t worry too much about achieving perfectly smooth surfaces; a little texture can enhance the rustic feel.
Step 2: Painting Your Pumpkins (The Base Coat)
With our blocks prepped, it was time to bring in the color. My initial vision was a charming pumpkin family, so the natural choice for three of the blocks was a vibrant orange. After applying a base coat of orange, I added depth and character by shading the edges with dark brown paint. This technique gives the pumpkins a more aged, earthy, and rustic appearance, making them look like they’ve been lovingly weathered over time. It’s a simple trick that makes a big difference in achieving that desired rustic charm.
Step 3: Transforming a Pumpkin into Frankie (Optional Fun!)
As I was painting, I noticed one of the blocks had a particularly deep cut or gouge. While it was perfectly fine for a pumpkin, the more I looked at it, the more I couldn’t shake the feeling that it resembled a scar. And just like that, an idea sparked! Why not turn one of our pumpkins into a friendly monster? So, I playfully became Dr. Frankenstein for a moment, flipping that particular block upside down. I then painted it a classic monster green, adding some charming details including a carefully stitched scar right where that natural imperfection was. To complete Frankie’s look, I screwed two small bolts into the sides of his “neck” – a signature touch. A very light distressing technique was applied to him as well, giving him that perfectly imperfect, aged monster vibe. He truly became a cute monster, and a wonderful addition to our spooky family!
Step 4: Adding Personality: Painting Faces & Distressing
This is where the real fun begins – giving each character its own unique personality! I used black paint to carefully craft distinct faces onto each of the pumpkin blocks. You can go for traditional spooky grins, cute and friendly expressions, or even abstract geometric designs. There are no rules here, so let your creativity flow. After the faces were dry, I distressed the pumpkins further using sandpaper. This creates a weathered, worn look, allowing some of the underlying wood or previous paint layers to peek through, enhancing the rustic feel. It’s an easy way to add character and depth to your creations.
Step 5: Crafting Rustic Stems
To complete the rustic industrial vibe I was aiming for, I decided to make unique stems out of nails and wire. The process was quite simple but incredibly effective. First, I took some craft wire and coiled it tightly until it resembled small springs. These would sit atop the nails. Next, I took the nails and the coiled wire and gave them a coat of copper-colored metallic spray paint. This instantly transformed them, giving them a beautiful, rusty, aged appearance – perfect for our rustic theme. I must admit, it was my first time spray painting nails, but the results were fantastic! Once the paint was dry, I carefully hammered a nail into the top center of each pumpkin. Then, I simply placed the wire springs over the nails, creating charming, industrial-inspired stems.
Meet the Family!
And there you have it – the delightful rustic Jack o’ lantern family! Each one with its own unique size and personality, ready to bring autumnal charm to any corner of your home.
And here’s the full crew, the pumpkin family proudly posing alongside their newest friend, Frankie! Don’t they look absolutely sweet together? Their diverse shapes, colors, and textures create a cohesive yet dynamic display that truly captures the spirit of the season.
Tips for Display & Customization
While I love the industrial touch that the nails provide as stems, you could absolutely opt to leave them off for a simpler look. Perhaps you could use small twigs or even decorative buttons for a different kind of stem. Remember, these charming decorations are not toys, so please keep them out of reach of small children, especially due to the small parts and sharp nails.
One of the best parts about this DIY project is its incredible cost-effectiveness. Since I had most of the materials on hand – scrap wood, leftover paint, and miscellaneous hardware – I essentially created four brand-new, unique Halloween decorations for free! You really can’t beat that kind of value, especially when you’re looking to refresh your seasonal decor without breaking the bank.
These rustic wood block pumpkins and Frankie are incredibly versatile. They would look fantastic displayed on a mantelpiece, nestled among fall foliage on a dining table, greeting guests on your porch, or adding a festive touch to an entryway console table. Group them together for a cohesive look, or scatter them throughout your home to spread the Halloween cheer.
Feel free to experiment with different paint colors – perhaps muted pastels for a softer fall look, or glitter and glow-in-the-dark paint for a more whimsical touch. You could also try different distressing techniques, like dry brushing or crackle paint, to achieve varying aged effects. For Frankie, consider adding googly eyes or yarn hair for even more personality! The possibilities for customization are endless, making each creation truly your own.
Final Thoughts
This project truly embodies the spirit of DIY – taking simple, often discarded materials and transforming them into something beautiful and meaningful. It’s a wonderful way to express your creativity, add a personal touch to your holiday decor, and enjoy a rewarding crafting experience. The rustic charm of these wood block characters makes them a timeless addition to your Halloween and fall decorations for years to come.
Thank you so much for stopping by and joining me on this creative journey! I hope you feel inspired to gather some scrap wood and create your own adorable Halloween family. Have a wonderful and crafty day!
Warmly,
Dee 🙂
Sharing this fun project at:
Tip Me Tuesday