
Are your kids begging for a fun, temporary hair color this summer? Or perhaps they want to make a vibrant statement before heading back to school? If you’re looking for a creative, budget-friendly, and surprisingly effective way to add a splash of color to their locks without the commitment of permanent dyes, you’ve come to the right place! We recently embarked on a colorful hair dyeing adventure using none other than kitchen staple: Kool-Aid. After experimenting with this popular DIY method, I’m excited to share our tips and tricks for achieving fantastic, temporary results.
Last year, my daughter, whom I affectionately call my little diva, first expressed her desire for fun, temporary hair. We tried food coloring, which worked in a pinch, but the color faded almost instantly. This year, armed with her enthusiastic reminders, we decided to elevate our game and try Kool-Aid. The results were not only vibrant but also lasted much longer, much to her delight and my relief. If you’re curious about how to dye hair with Kool-Aid, this comprehensive guide will walk you through everything you need to know.
Why Choose Kool-Aid for Temporary Hair Color?
Before diving into the “how-to,” let’s explore why Kool-Aid is an excellent choice for a temporary hair dye, especially for kids or anyone looking for a low-commitment color change. Unlike traditional hair dyes, Kool-Aid is non-toxic and contains no harsh chemicals that can damage hair. It’s readily available, incredibly affordable, and comes in a wide array of vibrant colors, making it perfect for creative expression.
- Safety First: Being a food product, Kool-Aid is safe to use on hair, reducing concerns about allergic reactions or chemical damage.
- Budget-Friendly: A single packet costs less than a dollar, making it a very economical way to experiment with hair color.
- Temporary Fun: The color typically washes out over several shampoos, offering a commitment-free way to try out bold shades. This is a huge plus for school-age children who might need to return to their natural hair color quickly.
- Vibrant Results: Kool-Aid’s strong pigments create surprisingly bright and noticeable colors, particularly on lighter hair. Even on darker hair, you can achieve beautiful tints or highlights.
- Less Mess (Compared to Some): While it can still be messy, it generally doesn’t stain skin or surfaces as aggressively as chemical dyes, though precautions are still necessary.
Our previous experience with food coloring, while fun, proved to be far too fleeting. The colors were vibrant initially, but they vanished with the first wash, turning into a daily reapplication chore. My daughter was right; Kool-Aid promised a more gradual fade, which meant more days of showing off her colorful mane at summer dance class without constant touch-ups. This longevity factor alone makes Kool-Aid a superior choice for temporary hair fun.
Gathering Your Supplies: What You’ll Need
Before you start your Kool-Aid hair dyeing adventure, make sure you have all your materials ready. Preparation is key to a smooth and successful process!
- Kool-Aid Packets: Choose your desired colors. Unsweetened packets work best. We used Cherry for a bold red and Grape for a subtle purple. Consider how many packets you’ll need based on the length and thickness of the hair you’re dyeing. For just tips, one packet per color is usually sufficient.
- Water: Tap water is fine.
- Heat-Safe Bowls/Containers: You’ll need one for each color you’re mixing. Glass or ceramic bowls are ideal, especially if you plan to boil water. Plastic containers work well for cool-water mixtures.
- Spoons or Whisk: For mixing the Kool-Aid powder.
- Old Towels: Essential for protecting shoulders, clothing, and surfaces from potential stains.
- Gloves: To protect your hands from staining.
- Newspaper or Plastic Sheets: To cover your work area and prevent spills.
- Hair Clips/Ties: To section hair.
- Blow Dryer: To help set the color.
- Paper Towels: For blotting excess liquid.
- Optional: Vaseline or petroleum jelly to protect skin around the hairline, though usually not necessary for dip-dyeing tips.
The Dyeing Process: Step-by-Step Instructions
We experimented with two different mixing methods, and my daughter’s insights proved valuable in achieving distinct results. Here’s a detailed breakdown of our process:
Step 1: Prepare Your Kool-Aid Mixtures
The method you choose for mixing your Kool-Aid can significantly impact the final color intensity. We tried both a boiled water method and a cool water method.
Method 1: For Richer, More Vibrant Color (Boiled Water)
- Boil Water: Bring about two cups of water to a rolling boil.
- Add Kool-Aid: Carefully pour the hot water into a heat-safe glass or ceramic bowl. Immediately stir in your desired Kool-Aid packets (e.g., Cherry flavor). Stir until the powder is completely dissolved and the water is a deep, uniform color. The more packets you use, the more concentrated and intense the color will be. For our bold red tips, one Cherry packet was enough for about two cups of water.
- Cool Down: Allow the mixture to cool significantly before using it. You want it warm, not scalding, to avoid discomfort and potential burns when applying to hair. This cooling period also allows the dye to fully hydrate and deepen.
My daughter had heard that boiling the water helps create a richer, more saturated color, and our experiment certainly supported this. The heat seems to help the pigment penetrate the hair shaft more effectively.
Method 2: For Lighter, Softer Tints (Cool Water)
- Mix with Cool Water: In a separate container (we used an empty plastic one), mix your Kool-Aid powder with about two cups of cool tap water. For our lighter purple, we used one packet of Grape flavor.
- Stir Well: Stir thoroughly until the powder is fully dissolved. You’ll notice the color is less intense than the boiled version, which is perfect if you’re aiming for a subtle hue.
This method is quicker as there’s no waiting for water to boil or cool, and it’s ideal if you prefer a less dramatic color payoff, especially on lighter hair.
Step 2: Prepare the Hair and Work Area
Before applying the dye, take these crucial steps to ensure a clean and controlled process:
- Protect Surfaces: Lay down old newspapers, plastic sheets, or old towels over your counter or floor where you’ll be working. Kool-Aid can stain!
- Protect Clothing: Drape an old towel around the shoulders of the person getting their hair dyed. Make sure they are wearing old clothes that you don’t mind getting stained.
- Protect Skin: While less critical for dip-dyeing tips, if you’re applying closer to the scalp, consider applying a thin layer of Vaseline or petroleum jelly to the forehead, ears, and neck to prevent skin staining.
- Comb Hair: Ensure the hair is clean, dry, and thoroughly combed to remove any tangles. This allows for even dye absorption.
Step 3: Apply the Kool-Aid Dye
Now for the fun part – applying the color!
- Section Hair (Optional): If you’re doing more than just the very ends or working with thick hair, use clips to section the hair you want to color.
- Dip the Hair: Carefully dip the ends of the hair into the chosen Kool-Aid mixture. For my daughter’s hair, we dipped the sides ourselves, and I helped with the back. Ensure the hair is fully submerged in the liquid for even coating.
- Soak Time: The longer the hair soaks, the deeper and more intense the color will be. For a subtle tint, a few minutes might suffice. For a bold, vibrant color like our red tips, we left it in for about five minutes. For our purple, which we wanted softer, it was slightly less. Monitor the color development and adjust soaking time to your preference.
Step 4: Dry and Set the Color
This step is crucial for “locking in” the color and preventing it from washing out too quickly.
- Blot Excess: Once you’re happy with the color, carefully lift the hair out of the bowl. Gently blot the excess liquid with paper towels. Be careful not to rub aggressively, which could smudge the color or create unevenness.
- Blow Dry: Use a blow dryer on a medium setting to thoroughly dry the dyed sections of hair. The heat from the blow dryer helps to set the color, allowing it to last longer. Ensure the hair is completely dry before moving on or letting it touch other clothes/surfaces.
The Colorful Results!
The anticipation is part of the fun, and seeing the final results is truly rewarding! We were thrilled with how both colors turned out.
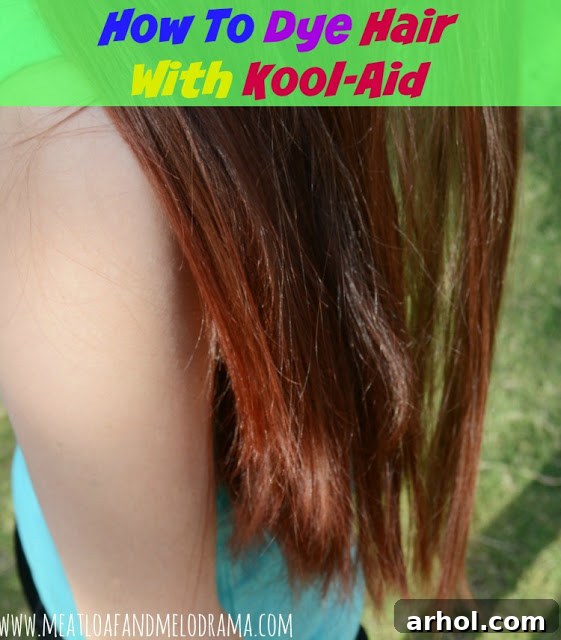
My older daughter’s brown hair absorbed the cherry red beautifully, resulting in bright, eye-catching red tips. The ends of hair naturally tend to be more porous and absorb color more readily, which contributed to this vivid outcome. She absolutely loved her fiery new look!
My other daughter, with her blonde hair, opted for the grape flavor mixed with cool water. As expected, and as she had predicted, not boiling the water resulted in a softer, almost pastel-like shade. On her blonde hair, the purple translated into a very soft, delicate pinkish-purple hue. It was noticeable but gentle, providing a charming, ethereal effect that she adored.
Tips for Best Kool-Aid Hair Dye Results
To maximize your success and get the most out of your Kool-Aid hair dyeing experience, consider these additional tips:
- Hair Color Matters: Kool-Aid shows up best on lighter hair (blonde, light brown, bleached). On darker hair, expect more of a tint or a subtle sheen of color, especially with lighter Kool-Aid shades. Reds and very dark purples tend to show up better on darker hair.
- Concentration is Key: For bolder colors, use less water or more Kool-Aid packets. For pastel shades, use more water or fewer packets.
- Vinegar Rinse (Optional): Some people swear by a quick vinegar rinse (a mix of 1 part white vinegar to 2 parts water) after dyeing and blotting, but before blow-drying. This is believed to help seal the hair cuticle and lock in the color. Rinse thoroughly after the vinegar, then blow dry.
- Patch Test: If you’re concerned about how a color will look or react, try a small, inconspicuous strand of hair first.
- Consider Hair Condition: Damaged or very porous hair tends to absorb color more intensely and may hold it longer. This can be a good thing for vibrant results but also means it might take longer to fade completely.
- Experiment with Application: Besides dip-dyeing, you can try painting streaks with a brush or even full head application (though this is much messier and requires more dye).
Longevity and Aftercare
One of the best aspects of using Kool-Aid is its temporary nature. The color doesn’t wash out instantly, but it doesn’t last forever either, making it perfect for summer breaks or special events.
- How Long Does it Last? The Kool-Aid dye typically lasts anywhere from a few days to a couple of weeks, gradually fading with each shampoo. Factors like hair porosity, initial color intensity, and how often you wash your hair will affect its longevity. We were pleased that my daughter’s red tips lasted even after a swimming session and a shower!
- Maintaining the Color: To make the color last longer, wash hair less frequently, use cool water, and sulfate-free shampoos.
- Removing the Color: If you want to speed up the fading process, wash hair with a clarifying shampoo, use hot water, or try a baking soda paste (baking soda mixed with water).
Safety and Cleanup Reminders
While Kool-Aid is safe, it’s still a dye and can stain. Always keep these points in mind:
- Work in a Designated Area: Use an area that’s easy to clean or well-protected.
- Wear Old Clothes: Both the “dyer” and the “dyee” should wear clothes they don’t mind getting stained.
- Gloves are Your Friend: Protect your hands to avoid colorful fingertips.
- Immediate Cleanup: If any Kool-Aid mixture spills on counters, floors, or skin, wipe it up immediately with a damp cloth and soap. The longer it sits, the harder it is to remove.
Conclusion: A Fun, Memorable Summer Activity
Dyeing hair with Kool-Aid was not just a successful beauty experiment; it was a fantastic bonding activity and a highlight of our summer vacation. My daughter was absolutely thrilled to show off her vibrant red tips at dance class the next day, and I was happy to cross another fun item off our summer bucket list! It’s a simple, creative, and safe way to add a pop of color and personality, offering temporary fun without the permanent commitment.
Whether you’re looking for a quick splash of color for a party, a summer adventure, or just a little bit of vibrant self-expression, Kool-Aid hair dye is a wonderful option. It’s proof that sometimes, the simplest solutions can yield the most delightful results. So, grab some Kool-Aid packets, gather your supplies, and get ready to unleash some colorful creativity!
Thanks so much for stopping by and reading about our colorful escapade. We hope this guide inspires you to try this fun DIY project with your own family!