
Craft a Charming DIY Heart Plate for Valentine’s Day: An Inexpensive & Easy Decor Project
Hello, fellow crafters and home decor enthusiasts! As Valentine’s Day approaches, our thoughts often turn to finding ways to infuse our homes with warmth, love, and a touch of festive charm. While store-bought decorations can be beautiful, there’s something uniquely satisfying about creating your own holiday accents. Today, I’m thrilled to share an incredibly inexpensive and super easy Valentine’s Day craft that promises to add a heartfelt touch to your space without breaking the bank or requiring any specialized skills. If you can write a simple word and draw a basic shape, you possess all the talent needed to bring this delightful project to life!
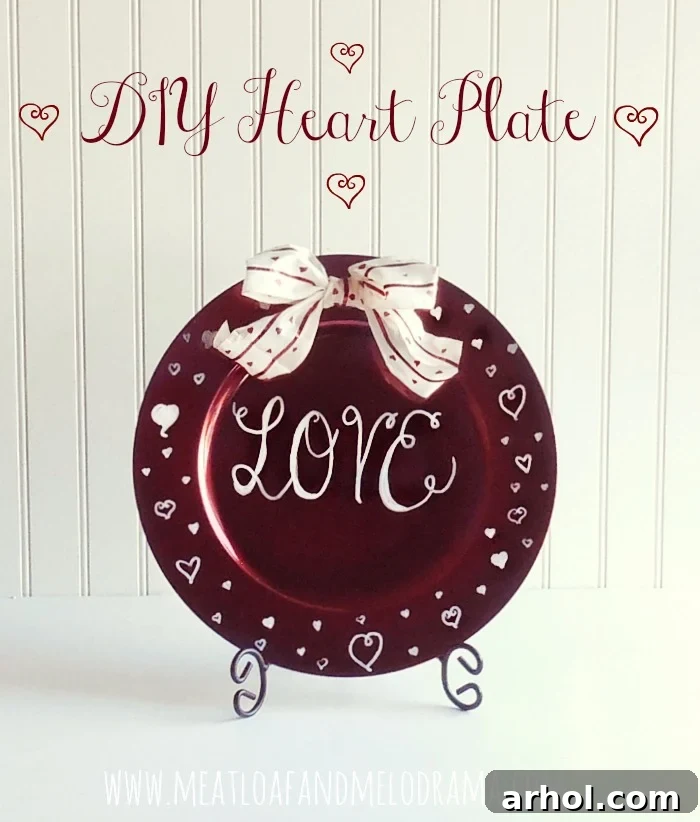
I’ve always found decorative charger plates to be a versatile canvas for seasonal home decor. Typically, I transform them into charming chalkboard plates, adorned with handwritten messages reflecting the current holiday or season. However, for this year’s romantic celebration, I decided to venture down an even simpler path, resulting in this stunning DIY Heart Plate. The beauty of this project lies in its simplicity: a white paint pen is virtually the only tool you’ll need to create intricate, loving designs that truly pop against a vibrant background. This easy Valentine’s Day craft is perfect for anyone looking to add a personal touch to their holiday decorations, creating a unique piece that expresses love and creativity.
The Allure of Charger Plates: A Versatile Decor Base
While my affection for chalkboard plates remains strong, I felt it was time for a fresh approach, especially with Valentine’s Day on the horizon. Charger plates are truly unsung heroes of home decor. Their expansive, smooth surface offers endless possibilities for customization, making them ideal for creating unique, seasonal accents. They can instantly elevate a dining table centerpiece, add a pop of color to a console table, or even serve as charming wall art. The best part? They are incredibly affordable, often found at craft stores, dollar stores, or on clearance after major holidays.
For this particular project, serendipity struck! I had acquired several chargers on clearance after Christmas, among which was a beautiful red one that seemed destined for a Valentine’s Day transformation. There’s a special joy in realizing you can embark on a fun, creative endeavor without needing to spend a single extra penny. This not only makes the craft economical but also environmentally friendly, giving new life to items you already own. This DIY Valentine’s decor project is a testament to how simple supplies can yield impressive results, making it an ideal choice for anyone seeking an easy craft idea.
Why Choose This DIY Heart Plate Project?
Beyond its aesthetic appeal, crafting your own Valentine’s Day decorations, like this DIY Heart Plate, offers numerous benefits. Firstly, it’s a wonderfully creative outlet. In a world saturated with mass-produced items, a handmade piece brings a unique, personal touch to your home that no store-bought item can replicate. Secondly, it’s incredibly cost-effective. Utilizing clearance finds or dollar store items significantly reduces the overall expense, proving that beautiful decor doesn’t have to come with a hefty price tag.
Furthermore, this project is designed for everyone, regardless of their crafting experience. Whether you’re a seasoned DIYer or just starting, the straightforward steps ensure a successful and rewarding outcome. It’s a fantastic way to spend a relaxing afternoon, creating something beautiful and meaningful for yourself or a loved one. Imagine the delight of displaying a piece that you’ve personally brought to life, especially one so perfectly suited for the season of love. This easy craft is not just about making a plate; it’s about crafting memories and adding genuine warmth to your home’s ambiance.
Gathering Your Essential Supplies for Your Heart Plate
One of the most appealing aspects of this project is the minimal and readily available supply list. You likely have some of these items already, making this an even more inexpensive Valentine’s Day craft. Here’s a detailed breakdown of what you’ll need to create your very own decorative heart plate:
- Large Red Charger Plate: The foundation of our project. A red charger immediately sets the romantic tone for Valentine’s Day. These are typically available at craft stores, dollar stores, or in the party supply section of larger retailers. If you can’t find a red one, don’t worry! You can easily spray paint any color charger plate with a vibrant red, ensuring it’s completely dry before proceeding.
- White Paint Pen: This is your primary artistic tool. A fine-tipped or medium-tipped oil-based paint pen works best for clear, crisp lines and opaque coverage on the charger’s surface. Make sure it’s suitable for non-porous surfaces. Brands like Sharpie oil-based paint markers or Posca pens are excellent choices for their smooth flow and durability.
- Red and White Ribbon: This adds a lovely finishing touch. Look for a ribbon that complements your plate – a simple red and white striped or patterned ribbon from the dollar store is perfect. The specific design doesn’t have to scream “Valentine’s” initially, as we’ll customize it.
- Red Sharpie (or other permanent marker): Essential for embellishing your ribbon and adding subtle Valentine’s Day flair. A standard fine-point red Sharpie will work wonderfully for drawing small hearts or dots.
- Hot Glue Gun and Glue Sticks: For securely attaching the ribbon to your charger plate. A hot glue gun offers quick drying and a strong bond, making the final step effortless.
Step-by-Step Guide: Crafting Your DIY Heart Plate
Now that you have all your supplies, let’s dive into the fun part: creating your personalized Valentine’s Day charger plate. Remember, the beauty of DIY lies in its imperfections, so don’t strive for absolute perfection; embrace the handmade charm!
Step 1: Preparing Your Charger Plate
Start by ensuring your red charger plate is clean and dry. Wipe away any dust or smudges with a soft cloth. If you opted to spray paint a charger, allow ample time for the paint to cure completely, usually 24-48 hours, to prevent smudging when you begin drawing. A clean surface is crucial for the paint pen to adhere smoothly and create crisp designs.
Step 2: Designing Your Central Message (Calligraphy Style)
I’ve always admired the elegant flow of calligraphy, and this project provided the perfect opportunity to experiment. Don’t be intimidated if you’re new to it! A simple word like “Love,” “XOXO,” or “Be Mine” works beautifully. To get started, I recommend practicing your chosen word on a piece of scrap paper first. You can also use online tools like PicMonkey (or other free font preview websites) to play around with different calligraphy fonts. Once you find a style you like, use it as a visual guide.
Carefully write your chosen word in the center of the charger plate with your white paint pen. Start lightly, and you can always go over the lines to thicken them if desired. Don’t worry if the lettering isn’t absolutely flawless; the slight variations add character and authenticity to your hand-painted plate. Let the paint dry completely before moving on to prevent smudges.
Step 3: Adding Charming Heart Embellishments
Once your central message is dry, it’s time to fill the space around it with an abundance of hearts! Using your white paint pen, draw various sizes of hearts around the perimeter of your central word. You can create solid hearts, outline hearts, or even combine both for visual interest. Scatter them randomly, or create a more uniform pattern – the choice is yours. This step allows for immense creativity. Think about adding tiny dots, swirls, or other small romantic motifs to complement the hearts. Allow these to dry thoroughly as well.
Step 4: Customizing Your Ribbon
My ribbon was a leftover from Christmas, but with a little ingenuity, it was perfect for Valentine’s Day. If your chosen ribbon doesn’t quite fit the Valentine’s theme, grab your red Sharpie! I simply drew small red hearts along the length of my red and white ribbon. This simple trick instantly transforms an ordinary ribbon into a festive accessory for your decorative charger. You could also write tiny ‘XOXO’s or draw small dots. This personalization ensures that every element of your DIY project is uniquely yours.
Step 5: Final Assembly
With your plate design complete and your ribbon customized, it’s time for the final touch. Measure and cut a length of ribbon that will drape nicely over the top edge of your charger plate, forming a charming loop or bow. Use your hot glue gun to securely attach the ribbon to the top back edge of the plate. Hold it in place for a few seconds until the glue sets. And just like that, your beautiful, custom-made DIY Heart Plate is complete!
Pro Tips for a Flawless DIY Heart Plate
To ensure your Valentine’s Day charger plate turns out as stunning as possible, here are a few extra tips:
- Practice Makes Perfect (or at least better!): If you’re unsure about your drawing skills, grab some scrap paper or even the back of a paper plate to practice your lettering and heart shapes before drawing on your charger. This builds confidence and helps you refine your technique.
- Allow for Drying Time: Patience is key. Rushing the process can lead to smudges. Allow each layer of paint to dry thoroughly before adding more details or handling the plate excessively.
- Consider a Sealer: For added durability, especially if you plan to clean the plate occasionally (with a damp cloth only, never submerged), consider applying a clear, non-toxic acrylic sealer spray. Ensure it’s suitable for the paint pen you used.
- Alternative Colors: While red is classic for Valentine’s, don’t limit yourself! A pink charger with white or gold details, or even a white charger with red and pink designs, could be equally beautiful. Experiment with colors that match your existing decor.
Creative Variations & Personalization Ideas
The beauty of this easy Valentine’s craft is how adaptable it is. Here are a few ideas to inspire further creativity:
- Different Holidays: This concept isn’t just for Valentine’s Day! Imagine a pastel-colored charger with Easter eggs for spring, an orange one with fall leaves for Thanksgiving, or a green one with holly berries for Christmas.
- Personalized Gifts: Instead of “Love,” write a couple’s initials, an anniversary date, or a sweet message for a unique and heartfelt wedding or anniversary gift.
- Stenciled Designs: If freehand drawing isn’t your forte, use stencils! Painter’s tape can help you create clean lines for geometric patterns or specific words.
- Add Embellishments: Beyond ribbon, consider attaching small faux flowers, glitter, or even tiny adhesive gems for extra sparkle.
- Theme Sets: Create a set of two or three smaller plates with complementary designs to create a cohesive display.
Embrace the Joy of Hand-Crafted Decor
This DIY Heart Plate project truly embodies what I love about crafting: it’s accessible, affordable, and results in a unique piece that genuinely brightens your home. The deep red hue of the charger, perhaps appearing darker in some photos, is in reality a gorgeous, rich shade that perfectly conveys the warmth of Valentine’s Day. Remember, if a red charger isn’t available, a quick coat of spray paint can easily transform any plain charger into the perfect base.
I hope this tutorial inspires you to unleash your inner artist and create a beautiful, personalized piece for the season of love. There’s immense satisfaction in seeing your vision come to life with just a few simple materials and a little bit of creativity. Thank you so much for stopping by and taking the time out of your busy day to explore this delightful Valentine’s Day craft idea. Happy crafting, and happy Valentine’s Day!