
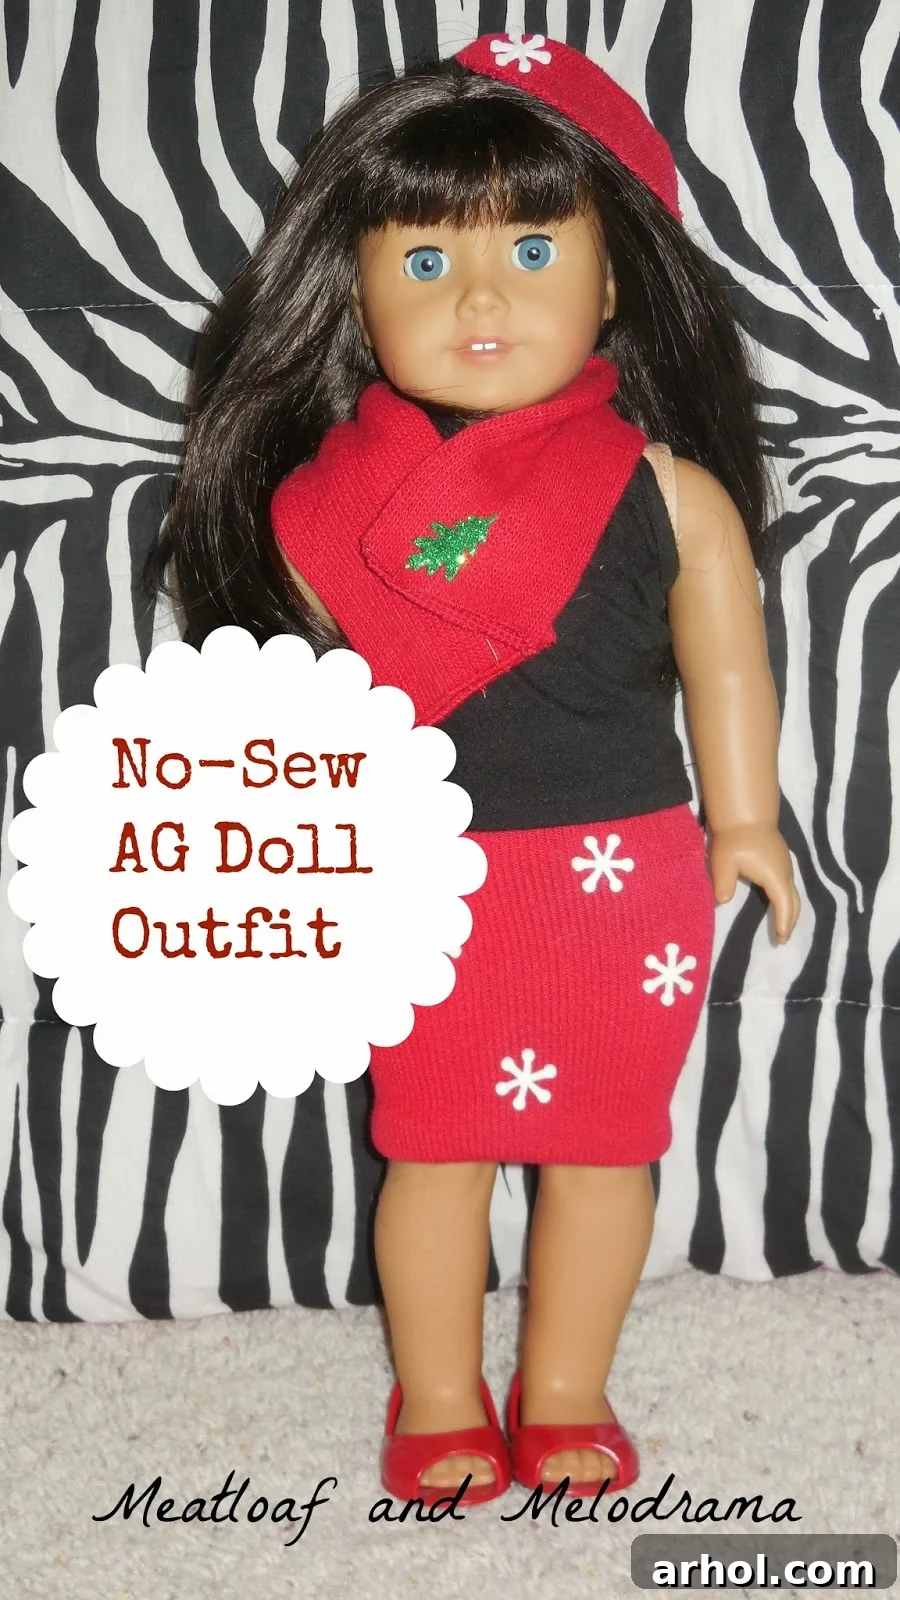
DIY No-Sew American Girl Doll Clothes: Transform a Sock into a Chic Outfit!
Hello fellow crafters and doll enthusiasts! Can you believe the holiday season is already upon us? It’s a time for warmth, joy, and often, a little bit of creative magic. Today, I’m absolutely thrilled to share an incredibly charming and budget-friendly project that’s perfect for the festive spirit, or any time of year. While I suggested some guidance, the real credit for this ingenious creation goes entirely to my imaginative little “Diva,” who poured her heart into making this adorable American Girl Doll outfit!
Like many children, my daughter adores her American Girl Dolls. However, as any parent knows, accumulating all those delightful accessories and outfits can quickly add up, turning a fun hobby into a significant expense. It was my Diva who, with a flash of inspiration, came up with the brilliant idea to craft a complete American Girl Doll outfit using nothing more than an old sock. Naturally, she didn’t want to sacrifice any of her own precious socks, so her incredibly generous older sister stepped in and donated a pair of her retired soccer socks to the cause. And just look at the result – isn’t it simply charming?
Why Choose No-Sew Doll Clothes? The Benefits of DIY Creativity
Beyond the undeniable cuteness factor, embarking on a DIY doll clothes project, especially one that requires no sewing, offers a wealth of benefits for both children and adults. In a world increasingly focused on consumption, upcycling old items like socks teaches valuable lessons in sustainability and resourcefulness. Instead of discarding an item, we’re giving it a new life and purpose.
- Cost-Effective: Doll outfits and accessories can be surprisingly expensive. This no-sew method transforms something you likely already have (an old sock!) into a brand-new ensemble, making it completely free.
- Sparks Creativity: Projects like this encourage imaginative thinking and problem-solving. Children learn to look at everyday objects with a fresh perspective, envisioning new possibilities.
- Develops Fine Motor Skills: Cutting, positioning, and decorating are excellent activities for enhancing dexterity and hand-eye coordination in younger crafters.
- Promotes Independence: A project simple enough for children to largely complete themselves fosters a sense of accomplishment and self-reliance.
- Screen-Free Fun: In an age dominated by digital devices, hands-on crafting offers a wonderful alternative for engaging entertainment and family bonding.
- Unique Creations: Each outfit will be one-of-a-kind, reflecting the personality and artistic choices of its creator. Forget mass-produced items; these doll clothes carry a special handmade charm.
- Fits Various Dolls: While designed with American Girl Dolls in mind, the adaptable nature of this project means these outfits can often fit other similarly sized dolls, broadening the fun!
What You’ll Need: Gathering Your Materials for This Easy Craft
The beauty of this project lies in its simplicity and minimal material requirements. You won’t need a sewing machine, needles, thread, or any complex tools. Just a few basic items are all it takes to get started on your doll’s new wardrobe.
Essential Supplies:
- One Junior-Sized Long Athletic Sock: The ideal choice here is a longer, athletic-style sock. These socks tend to have good elasticity and hold their shape well, which is crucial for a no-sew project. The “junior-sized” recommendation ensures it’s appropriately scaled for an 18-inch doll like an American Girl Doll. Don’t worry about the color or pattern too much right now – any sock will do, and solid colors provide a blank canvas for decoration, while patterned socks offer instant flair!
- A Pair of Sharp Scissors: Good quality scissors will make clean cuts and ensure an easier crafting experience. Supervise younger children or assist them with this step.
- Fancy Foam Stickers (or other embellishments): These are your secret weapon for jazzing up the outfit without any sewing. Foam stickers come in countless shapes, colors, and themes, making customization super easy and fun.
Optional Enhancements:
- Fabric Markers: If you want to add intricate designs or personalized messages, fabric markers are a fantastic no-sew alternative to stickers.
- Glitter Glue: For a touch of sparkle and glamour, glitter glue can be applied to add accents.
- Small Self-Adhesive Gems or Pearls: These can elevate the outfit’s sophistication and add a bit of bling.
- Hem Tape (Iron-On or Self-Adhesive): While not strictly necessary due to the sock’s nature, if you desire a perfectly crisp hemline for the skirt, a small piece of hem tape can secure it. However, we embraced the natural roll of the sock for a more relaxed look!
How incredibly easy is that? With just these few items, you’re ready to create a delightful, custom-made ensemble for your beloved doll.
Step-by-Step Guide: Crafting Your Doll’s New Wardrobe
Now for the fun part – the transformation! Follow these simple steps to turn a humble sock into a fashionable three-piece outfit for your doll. Remember, the goal here is creativity and enjoyment, not absolute perfection. Embrace any slight imperfections; they add character to your handmade items!
Step 1: Preparing Your Sock for Transformation – The First Cut
Begin by laying your chosen athletic sock flat. The very first cut you’ll make is to remove the toe end. Look for the natural stitching that forms the very tip of the sock, where your toes would normally be. Use this stitching as your guide to make a straight cut across. Do NOT worry if your cut isn’t perfectly straight or if the line is a little wavy. This part will form the waist of the skirt, and any minor irregularities will be easily hidden once the skirt is on the doll. Plus, your doll definitely won’t mind!
This neatly cut end will become the top edge of your doll’s new skirt, serving as its waist. The elasticity of the sock ensures a snug and comfortable fit around the doll’s waist.
Step 2: Defining the Skirt’s Hem and Unveiling the Scarf – The Second Cut
Next, you’ll make a second cut to separate the “foot” portion of the sock from the “leg” portion. This cut should be made roughly where the heel of the sock would begin, or where the main body of the foot transitions into the ankle and leg. Again, don’t stress over a perfect straight line. This end of what will be the skirt piece will serve as the hem, and you have the option to simply roll it up for a finished look. This cut will leave you with three distinct pieces, each destined to become a part of your doll’s stylish new outfit.
Step 3: Assembling the Ensemble – Skirt, Scarf, and Beret
Congratulations, you now have three distinct pieces, each ready for its role in the doll’s new outfit! Let’s identify them:
- The Foot Part: This shorter, wider section, with the toe cut off, becomes the chic skirt. The part where you made the first cut (the toe end) will be the waist.
- The Long Leg Part: This longer, tube-like section is perfectly shaped to become a cozy scarf for your doll.
- The Tiny Toe Part: The very tip of the sock you initially cut off might seem small, but it’s just the right size and shape to transform into an adorable beret!
To prepare the skirt, take the widest part (the original top cuff of the sock) and roll it down. This rolled edge will sit comfortably over the doll’s waist, creating a neat and finished top for the skirt. The natural elasticity of the athletic sock material ensures that it will stay in place without needing any elastic or sewing.
When you dress your doll in the new skirt, simply roll up the raw hem (the edge from your second cut) to create a neat finish. Athletic socks are fantastic for this project because they hold their shape remarkably well, minimizing fraying. While you could use hem tape for a super crisp edge, we decided against it. My little Diva was having so much fun creating, and I truly believe it’s more important for her to learn to be creative and enjoy the process before she starts worrying about every little detail being absolutely perfect. This philosophy encourages experimentation and boosts confidence in young crafters.
Step 4: Adding Personal Touches with Embellishments
Once your doll is dressed in her brand-new skirt, scarf, and beret, it’s time for the ultimate creative step: decoration! This is where personal style truly shines. Miss Diva meticulously added her chosen stickers to complete the ensemble. For the skirt and the cute beret, she selected delicate snowflakes, perfectly capturing a cozy winter or holiday theme. For the scarf, she chose a cheerful Christmas tree, adding another festive touch.
Because we had all the materials readily available at home, this entire project was completely, wonderfully free! Our American Girl Doll model effortlessly completes her stylish look with her own black tank top and very chic red shoes, proving that even simple handmade items can be incredibly fashionable. The possibilities for customization are truly endless!
Unleashing Creativity: Customization and Beyond
The beauty of this no-sew doll outfit lies in its adaptability. While a solid colored sock provides a great canvas, imagine the potential with patterned socks! Stripes, polka dots, animal prints, or even themed holiday socks can instantly give your doll a unique look. The possibilities for creative expression are truly boundless:
- Seasonal Themes: Use orange socks and pumpkin stickers for fall, red and green for Christmas, pastels for Easter, or bright florals for spring.
- Character Outfits: With the right sock color and a few clever cuts (still no-sew!), you could even attempt to mimic outfits for different characters or professions.
- Adding Layers: Use a second sock to create a matching top or a longer dress, adding more versatility to your doll’s wardrobe.
- Fabric Paint or Markers: Instead of stickers, use fabric paint or markers to draw intricate designs, add monograms, or create abstract patterns. Just ensure they are safe for children and dolls.
- Ribbons and Lace: Small lengths of self-adhesive ribbon or lace can be added as trim to the skirt or hat for an extra touch of elegance.
- Miniature Buttons or Beads: With a dab of strong fabric glue, you can attach small decorative buttons or beads (ensure they are securely attached and supervise young children due to choking hazards).
Personally, I am absolutely smitten with the beret – it’s tres chic! And the entire ensemble just radiates charm. I must admit, I wouldn’t mind an outfit this stylish for myself!
The Joy of Upcycling and Inspiring Young Minds
What truly makes me crazy happy about projects like this is witnessing my children embrace creativity and resourcefulness. It’s wonderful to see them transform everyday items into something new and exciting. Perhaps my inherent thriftiness is rubbing off on them, teaching them the value of making do and creating beauty from what’s already at hand!
While this particular outfit was crafted with an American Girl Doll in mind, its flexible design means it can easily fit other similar-sized dolls. So, if you have a collection of various dolls, this project offers a versatile solution for expanding their wardrobes without breaking the bank. It’s a fantastic way to encourage open-ended play and imaginative storytelling.
Conclusion: Your Doll’s New Look Awaits!
Thank you for visiting today and taking the time to explore our delightful little no-sew doll outfit project. We hope this tutorial inspires you and your family to dive into the world of DIY crafting. It’s a fantastic way to spend quality time together, unleash creativity, and create cherished memories – all while making adorable new clothes for your favorite dolls!
Gather your old socks, grab your scissors, and let your imagination soar. We can’t wait to see what stylish ensembles you come up with!
Have an awesome day!
Dee 🙂