
DIY Temporary Hair Color: How to Dye Your Hair with Food Dye for Fun & Frugal Style
Hello creative spirits and frugal fashionistas!
Have you ever found yourself or your little ones longing for a splash of vibrant, temporary hair color without the commitment, the harsh chemicals, or the hefty price tag? Perhaps you’ve been intrigued by the playful trends of rainbow hair or subtle pastel streaks, but hesitated to try commercial temporary dyes due to their messy application, underwhelming color payoff, or simply their cost. If this sounds familiar, you’re in for a delightful discovery! Today, we’re diving into a wonderfully simple, incredibly affordable, and surprisingly effective method to add a pop of color to your locks using something you likely already have in your kitchen: food dye.
My own journey into the world of DIY temporary hair color began much like many of yours might – with persistent requests from my daughters for fun, fleeting hair transformations. As summer arrived, bringing with it an air of experimentation and carefree style, it seemed like the perfect time to explore options beyond the chalky, barely-there colors or sticky spray-on dyes that had disappointed us in the past. My philosophy has always leaned towards creative, budget-friendly solutions, so spending a fortune on specialty dyes was out of the question. After a quick online search confirmed that others had successfully ventured into this unconventional territory, we decided to give food coloring a try, and the results were an absolute joy! This method proved to be not only non-toxic and easy to wash out but also remarkably vibrant and wonderfully fragrant. Say goodbye to dull, expensive temporary dyes and hello to a spectrum of possibilities with a simple bottle of food coloring.
Why Choose Food Dye for Temporary Hair Color?
Before we jump into the how-to, let’s explore why food coloring stands out as an excellent choice for a temporary hair dye:
- Frugal & Accessible: Food coloring is incredibly inexpensive, especially compared to commercial temporary hair dyes. Chances are, you already have a box or bottles of it tucked away in your pantry, making this a truly zero-cost project for many.
- Non-Toxic & Kid-Friendly: As a food-grade product, food coloring is generally safe and non-toxic. This makes it an ideal option for children or anyone with sensitivities to the chemicals often found in traditional hair dyes. It’s peace of mind in a bottle!
- Truly Temporary: Unlike some semi-permanent dyes that can linger longer than expected, food coloring is designed to wash out easily with a shampoo. This means you can experiment with wild colors for a day, a weekend, or a special event without any long-term commitment. No more worrying about pink pillowcases or lingering tints once the fun is over.
- Vibrant & Fun: Don’t let its gentle nature fool you – food coloring can deliver surprisingly vibrant hues, especially on lighter hair. From bold blues and fiery reds to playful pinks and purples, the color possibilities are endless when you start mixing.
- Minimal Mess (with precautions): While any hair dyeing process can be a little messy, food dye paired with conditioner or gel creates a manageable consistency that’s easier to control than powders or sprays.
- Smells Great: Unlike some chemical dyes, food coloring has a neutral or even pleasant scent, especially when mixed with your favorite conditioner.
Gathering Your Essential Supplies
One of the best aspects of this DIY method is that you likely possess all the necessary items already. Here’s what you’ll need to transform your hair with food dye:
- Food Coloring: Choose your desired colors. Liquid food coloring is common, but gel food coloring tends to be more concentrated and can yield richer, more vibrant results. Consider having a few primary colors on hand to mix custom shades!
- Hair Gel or Conditioner: A clear or white hair gel works wonderfully for setting the color and providing a firm hold, while a white conditioner (preferably unscented) acts as a fantastic carrier, helping the color adhere to the hair and providing nourishment. The clearer/whiter your base, the truer the color will appear.
- Small Paint Brush or Plastic Fork: A small, clean paintbrush is excellent for precise application, allowing you to paint individual strands or create defined streaks. A plastic fork, on the other hand, is perfect for a streaked, more blended, or chunky highlight effect.
- Plastic Gloves or Plastic Bags: To protect your hands from staining. Trust me, you don’t want to sport colorful fingers after your hair styling session!
- Mixing Bowls: Small, disposable bowls or ramekins for mixing different colors.
- Old Towels and Clothes: To protect your surfaces and clothing from accidental drips or splatters.
- Hair Dryer (Optional but Recommended): For drying and helping to set the color, which can minimize transfer.
Step-by-Step Guide: Dyeing Your Hair with Food Coloring
Now, let’s get to the fun part! Here’s a detailed guide to achieving your desired temporary hair color:
Step 1: Preparation is Paramount
Before you begin, ensure your workspace is protected. Lay down old towels on your bathroom counter or floor, and drape an old towel or wear an old t-shirt over your shoulders to protect your clothes. Consider working in an area with good lighting and access to a mirror. For best results, start with clean, dry hair. While some find applying to slightly damp hair helps with absorption, dry hair generally allows for more intense color payoff.
Step 2: Mixing Your Custom Shade
This is where your creativity comes alive! In a small mixing bowl, dispense a small amount of your chosen hair gel or conditioner. Start with about a tablespoon – you can always mix more if needed. Next, add drops of food coloring, a few at a time, and mix thoroughly with your brush or fork. Keep adding drops until you achieve your desired shade. Remember, the color will likely appear darker in the bowl than it will on your hair, especially if your hair is dark. For lighter hair, the color will be more true to the mix. If you’re experimenting with color blending (e.g., red + blue for purple), mix thoroughly until uniform.
Step 3: Application Techniques
Don your plastic gloves before you start applying! The method of application depends on the look you’re going for:
- For Streaks or Highlights: Use a small paintbrush for precision. Isolate a thin strand of hair, apply the food dye mixture evenly from root to tip (or wherever you want the color to begin), ensuring full saturation.
- For Ombré Ends or Dip-Dye: This is especially popular and easy! Simply gather the ends of your hair (or the section you wish to color) and apply the mixture generously using your gloved hands or a brush. Work the color thoroughly into the hair strands.
- For Chunky Highlights or Broad Sections: A plastic fork can be great for a more natural, streaked effect. Scoop some mixture onto the fork tines and comb it through sections of your hair. You can also use your gloved fingers to massage the color into larger sections, like a ponytail or the entire underside of your hair.
Remember to work the color well into the hair. We often found that applying it thoroughly ensured the best vibrancy, even on darker hair where the effect might be more subtle.
Step 4: Setting the Color
Once you’ve applied the food dye mixture to your hair, it’s time to let it set. The longer you leave it in, the more intense the color tends to be. We found that using a hairdryer to dry the hair after application not only helped “set” the color (meaning it dried onto the hair rather than transferring easily) but also made the color pop more vividly. Gently blow-dry the colored sections until they are completely dry to the touch. This step is crucial for minimizing transfer onto clothes or furniture once your colorful creation is complete.
Witnessing the Transformation: Results and Inspirations
The beauty of food dye hair color lies in its versatility and the fun surprises it brings. Here’s what you can expect and some inspiration:
On Lighter Hair (Blonde, Light Brown, Bleached):
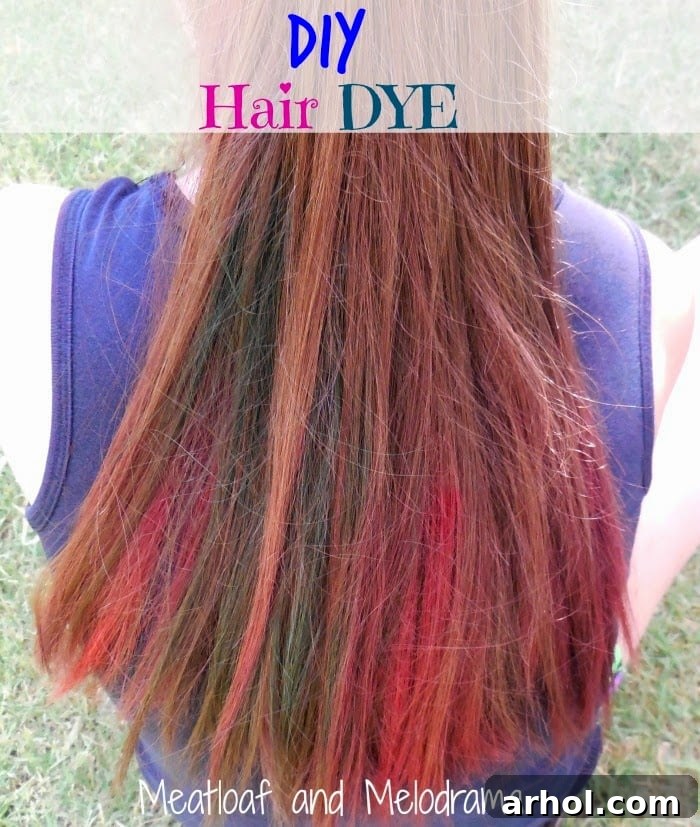
On lighter hair tones, food coloring tends to show up exceptionally well, often appearing quite true to the color you mixed. A dark pink, for instance, can look almost red, giving a bold, playful statement. Our blonde testers sported lovely pink ends and subtle hints of color that were perfectly visible and absolutely adorable. For anyone with light hair, the sky’s the limit for vibrant, eye-catching results!
On Darker Hair (Brown, Black):
While food coloring won’t create the same vivid, neon effects on dark hair as it does on lighter shades, it can still deliver noticeable and fun results. On brown hair, colors like deep reds, blues, and purples can create a beautiful tint, especially when light hits it. For a bolder statement on darker hair, you might try applying the color more heavily or focusing it on a specific section, like a ponytail or underlayer. Our “little Diva” wanted something truly adventurous, so we applied a mix of red and blue to her entire ponytail. The colors might not have been as dazzling as on blonde hair, but they were definitely there, adding a cool, subtle dimension that she loved.
Post-Dye Care and Easy Removal
After all the fun of coloring, you’ll be happy to know that removing the food dye is remarkably straightforward. A good shampooing will typically wash out the color completely. I was particularly pleased to find that our temporary hues washed out without a hitch, sparing my linen closet from a collection of pink pillowcases! If you find any lingering tint, a second wash or a clarifying shampoo should do the trick.
This temporary coloring method is absolutely fantastic for special occasions where you want a splash of color without the long-term commitment. Think school spirit days, sporting events, Halloween costumes, themed parties, or just a fun summer afternoon activity. It’s a game-changer that eliminates the frustration of ineffective hair chalk or disappointing spray-on colors. Plus, it’s incredibly cheap, making it accessible for everyone.
Tips for Best Results and Troubleshooting
Maximizing Vibrancy and Longevity (Temporarily!)
- Use Gel Food Coloring: For the most intense shades, especially on darker hair, gel food coloring often provides a more concentrated pigment than liquid drops.
- Start with Clean, Dry Hair: This allows the color to adhere better.
- Let it Sit: While immediate drying is good for setting, allowing the mixture to sit on the hair for 15-30 minutes before blow-drying can enhance color uptake.
- Blow Dry Thoroughly: Completely drying the colored sections helps prevent color transfer onto clothes, furniture, or skin.
Dealing with Accidental Stains
- Skin: If food dye gets on your skin, wash it immediately with soap and water. For stubborn spots, rubbing alcohol or a mixture of baking soda and a little lemon juice can help.
- Surfaces: Clean up spills on counters or floors quickly with an all-purpose cleaner. For porous surfaces, immediate action is key.
- Clothing: Treat any stained clothing promptly. A pre-treatment stain remover followed by a normal wash cycle should be effective.
Frequently Asked Questions About Food Dye Hair Color
Q: Will food dye permanently stain my hair?
A: Generally, no. Food coloring is designed to be temporary and washes out with shampoo. However, very porous hair (like chemically treated or heavily bleached hair) might hold a faint tint for a bit longer. If you have extremely porous hair, consider doing a strand test first.
Q: How long does food dye hair color last?
A: It typically lasts until your next shampoo. If you don’t wash your hair, it could last for a few days, gradually fading with environmental exposure and friction.
Q: Can I use this method on dark brown or black hair?
A: Yes, but the results will be more subtle than on lighter hair. Bright, concentrated colors like electric blue, magenta, or deep red tend to show up best as rich tints in direct light. Don’t expect neon vibrancy, but a cool, noticeable hue is definitely achievable.
Q: Is it safe for children?
A: Since food coloring is non-toxic and food-grade, it’s generally considered safe for children. However, always supervise young children during application, ensure they don’t ingest the mixture, and conduct a patch test on a small area of skin if you have any allergy concerns (though food dye allergies are rare).
Q: What if I don’t have hair gel or conditioner?
A: While gel or conditioner are ideal for application and consistency, some people have experimented with mixing food dye directly with water or a small amount of liquid hand soap. However, these methods may not provide the same ease of application, color intensity, or protection against hair drying out.
Trying out temporary hair color with food dye is a fantastic way to unleash your creativity, add a burst of fun to your day, or prepare for a special event without any fuss or expense. It’s safe, simple, and seriously satisfying to see the vibrant results. While I personally might stick to my natural brown for everyday, the joy and excitement this DIY project brought to my girls (and to me, watching them!) was priceless.
So, why not give it a try? Grab some food coloring, a dollop of conditioner, and let your imagination run wild. Share your colorful creations with us – we’d love to see what you come up with!
Have an awesome, colorful day!