
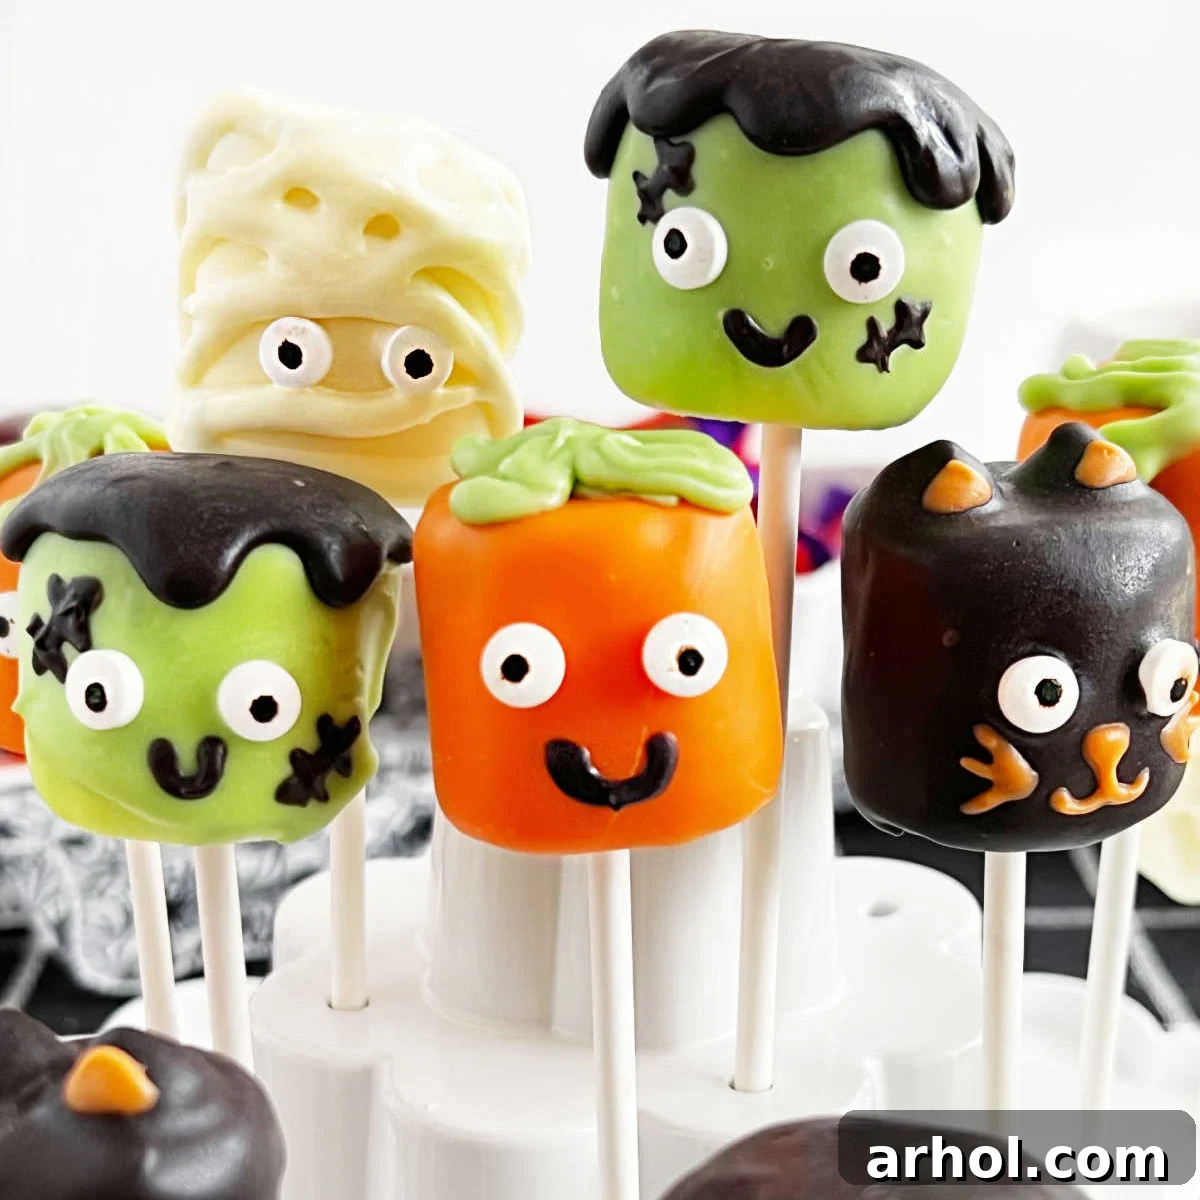
Get ready to enchant your taste buds and unleash your inner ghoulish decorator with these incredibly fun and utterly adorable Halloween Marshmallow Pops! Forget complicated Halloween baking; this easy-to-follow recipe transforms simple marshmallows into delightful, spooky characters, perfect for any festive gathering. Imagine plump, fluffy marshmallows expertly dipped in vibrant melted candy coating and then adorned with edible details to bring to life classic Halloween figures like mummies, pumpkins, black cats, and even Frankenstein’s monster. These charming treats are not just a dessert; they’re a delightful activity that brings smiles and a touch of Halloween magic to the kitchen. Far simpler than intricate Halloween cake pops but every bit as captivating, these marshmallow pops are an absolute must-make for the spooky season.
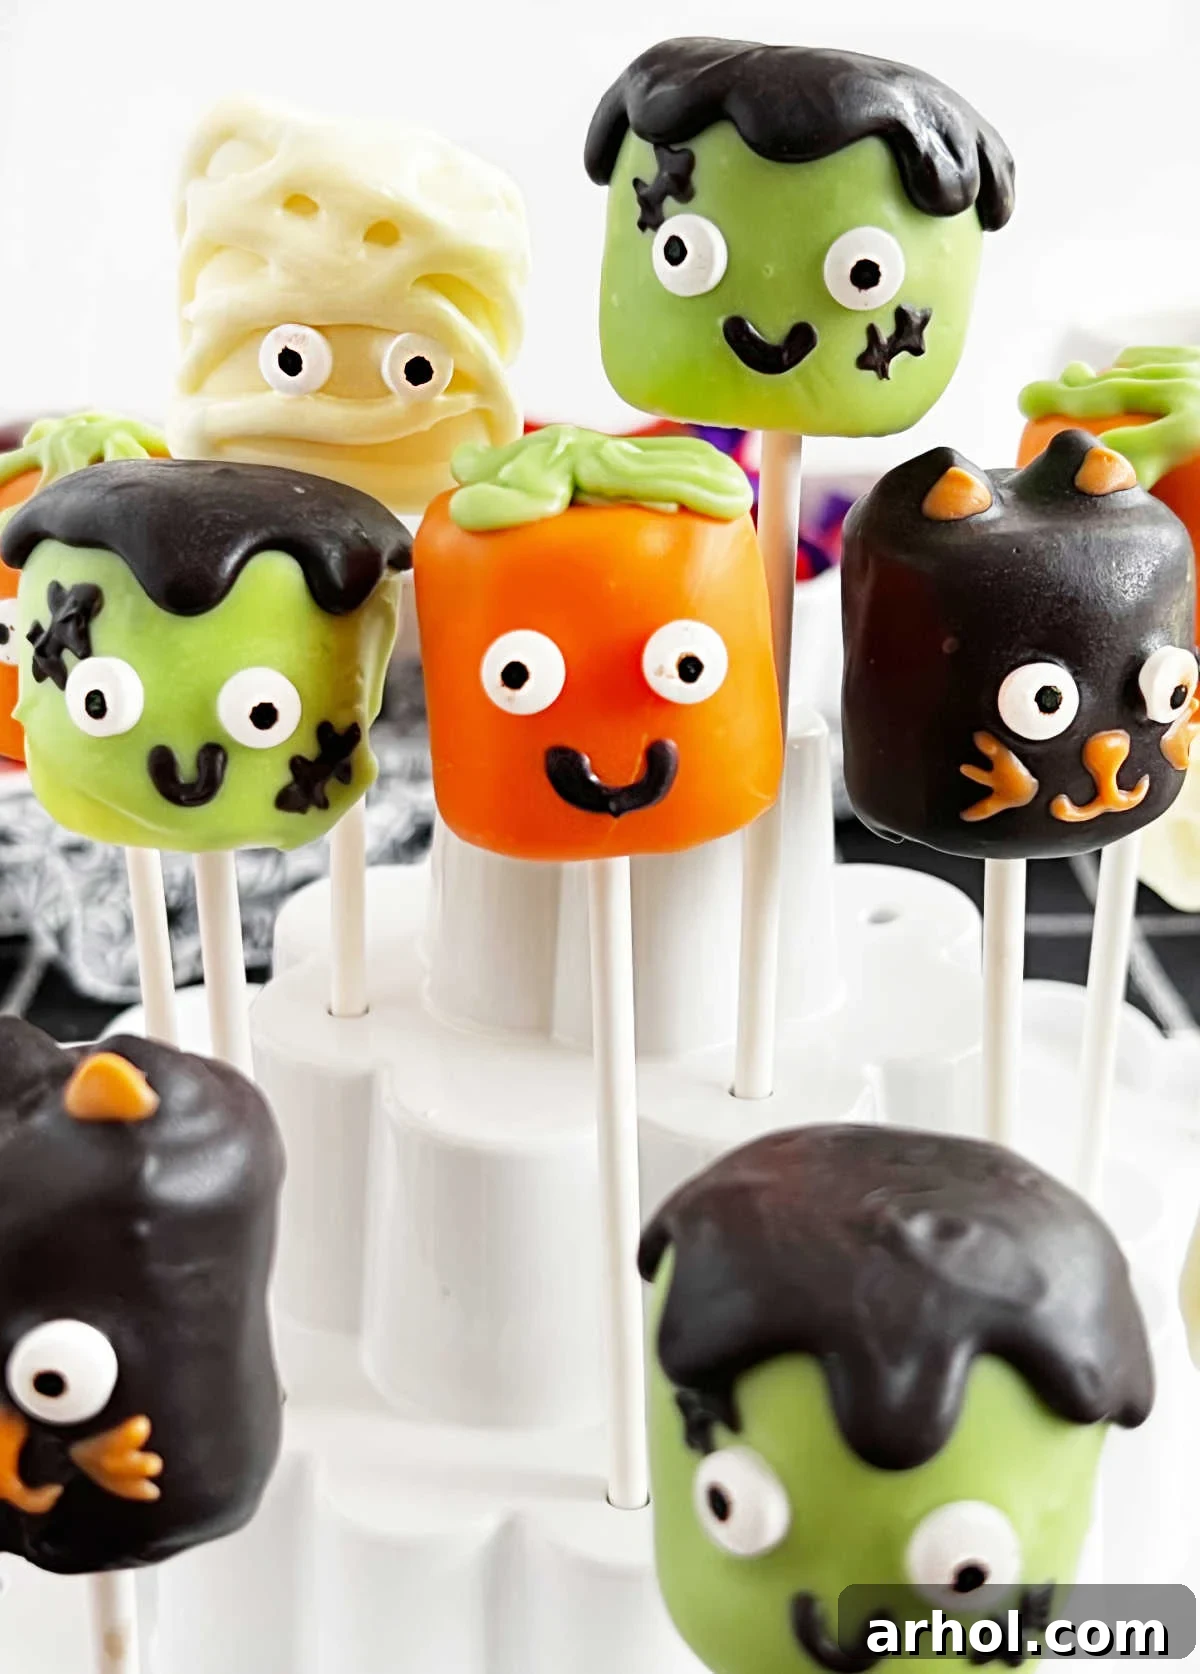
Why You’ll Love Making Halloween Marshmallow Pops
There’s something uniquely enchanting about Halloween, and these marshmallow pops capture that spirit perfectly. For years, my family and I have cherished the tradition of crafting these easy Halloween treats, and they never fail to be a hit. Here’s why these delightful confections are a fantastic addition to your autumn festivities:
- Effortlessly Fun: This recipe is designed for simplicity, making it a joy for bakers of all skill levels, from beginners to seasoned pros. The magic happens with minimal fuss.
- Kid-Friendly Activity: If you’re looking for a hands-on activity to engage children in the kitchen, this is it! Kids absolutely adore dipping marshmallows and bringing their favorite spooky characters to life. It’s a wonderful way to create lasting holiday memories.
- Versatile & Creative: The decorating possibilities are endless! From classic monsters to whimsical ghosts, you can let your imagination run wild. This versatility means every batch can be uniquely “spooktacular.”
- Deliciously Sweet: Beyond their charming appearance, these marshmallow pops are incredibly tasty. The soft, sweet marshmallow paired with a crisp, flavored candy coating creates a delightful texture and flavor combination that’s irresistible.
- Perfect for Any Occasion: Whether you’re hosting a grand Halloween party, a cozy family gathering, or just looking for a festive snack, these candy-coated marshmallows are the ideal treat. They’re also excellent for school parties or as homemade gifts.
- Easier Than Cake Pops: While both are delightful, marshmallow pops skip the baking, crumbling, and rolling required for cake pops, making them a much faster and less labor-intensive option for equally adorable results.
In addition to these fun marshmallow creations, be sure to explore other easy Halloween delights like my Halloween candy bark and the classic Halloween dirt cake, along with many more easy homemade Halloween treats to complete your holiday spread!
Essential Ingredients for Spooky Marshmallow Pops
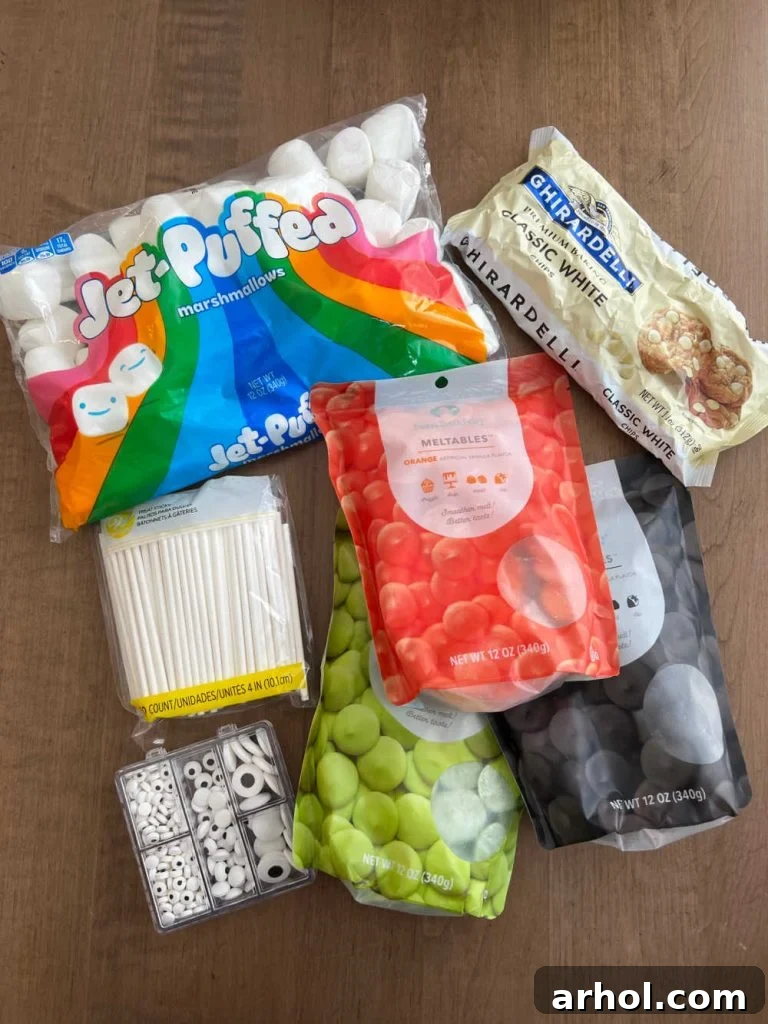
Creating these delightful Halloween treats requires only a handful of readily available ingredients. You can find everything you need at your local grocery store, craft store, or with a quick online order. The beauty of this recipe lies in its simplicity, allowing you to focus on the fun part: decorating!
- Marshmallows: The star of our show! Opt for regular large marshmallows. Jumbo marshmallows can be a bit heavy and harder to manage on sticks, while mini marshmallows might be too small for detailed decorating. Fresh marshmallows are key as they are softer and easier to skewer without tearing, ensuring a smooth coating.
- Candy Coating (Candy Melts): This is where the magic happens for vibrant colors. Candy melts come in a rainbow of hues perfect for Halloween (orange, black, green, white, purple).
- Substitution Tip: If you can’t find specific candy melt colors, you can use white chocolate chips or white candy melts and tint them with oil-based food coloring. Water-based food coloring will seize the chocolate, so avoid it. For chocolate-flavored pops, regular chocolate chips work wonderfully.
- Candy Eyeballs: These instantly bring your characters to life! They come in various sizes, so pick ones that best suit your monster creations.
- Sticks: Essential for holding your marshmallow pops.
- Lollipop or Cake Pop Sticks: These are ideal for their sturdy nature and classic look.
- Popsicle Sticks: A great alternative if you want a wider handle.
- Large Paper Straws: An eco-friendly and decorative option, just ensure they are sturdy enough.
- Pretzel Sticks: For an edible stick, pretzel sticks add a nice salty crunch and can be integrated into designs.
- Optional Decorations:
- Candy Sprinkles: Perfect for adding texture, color, or a festive touch. Think Halloween-themed sprinkles!
- Mini Chocolate Chips: Great for ears on cats, bolts on Frankenstein, or small facial features.
- Gel Icing or Edible Food Markers: Excellent for drawing fine details, expressions, or intricate designs.
You Will Also Need:
- Deep Microwave-Safe Bowls: For melting your candy coating efficiently and allowing for easy dipping.
- Utensils or Toothpicks: For stirring melted candy and for precise decorating.
- Piping Bags or Ziploc Bags: With a small hole cut in one corner, these are perfect for drizzling and creating fine lines for mummy bandages or spider webs.
- Drying Rack/Stand: A cake pop holder, a block of Styrofoam, or an empty cardboard box covered with foil or parchment paper with holes poked through are excellent for keeping your freshly dipped pops upright as they dry.
- Wax Paper or Parchment Paper: For lining your workspace and any plates or baking sheets to prevent sticking if you opt to lay the pops down to dry.
Step-by-Step Guide: Crafting Your Halloween Marshmallow Pops
Making these delightful Halloween Marshmallow Pops is a straightforward and enjoyable process. Follow these simple steps to create your own edible monsters!
1. Prepare Your Workspace
Before you begin, gather all your ingredients and tools. Lay down parchment or wax paper on your work surface to catch any drips and prevent sticking. Prepare your drying station—whether it’s a cake pop stand or a Styrofoam block with holes.
2. Melt the Candy Coating
Melt your candy coating (or chocolate chips) according to the package directions. The microwave method is usually the easiest: place candy melts in a deep, microwave-safe bowl and heat in short increments (typically 30 seconds at a time), stirring thoroughly after each interval. This prevents the candy from overheating and becoming clumpy or scorched. If the candy coating is a bit too thick, you can add a tiny bit of shortening or coconut oil (about 1/2 teaspoon per cup of melts) to thin it to a smoother consistency for dipping.
3. Skewer the Marshmallows
Carefully insert a lollipop stick, paper straw, or pretzel stick into the center of each marshmallow. Push the stick about halfway or two-thirds of the way into the marshmallow to ensure it’s secure enough to hold the weight of the coating and decorations.
4. Dip the Marshmallows
Hold the marshmallow by its stick and dip it into the melted candy coating. Gently twist and tilt the marshmallow to ensure it’s fully coated. Lift the marshmallow out and allow any excess coating to drip back into the bowl. This is crucial for a smooth, even finish and to prevent pooling at the base.
5. Initial Drying and Attaching Eyes
Place the dipped marshmallow pop upright in your prepared drying stand. Allow the coating to dry slightly – just enough for it to become tacky but not fully hardened. This semi-dry stage is perfect for attaching candy eyes. Press the candy eyes gently onto the still-tacky coating. If the coating dries completely, you can use a tiny dab of fresh melted candy coating as “glue” to affix the eyes.
6. Get Creative with Decorations!
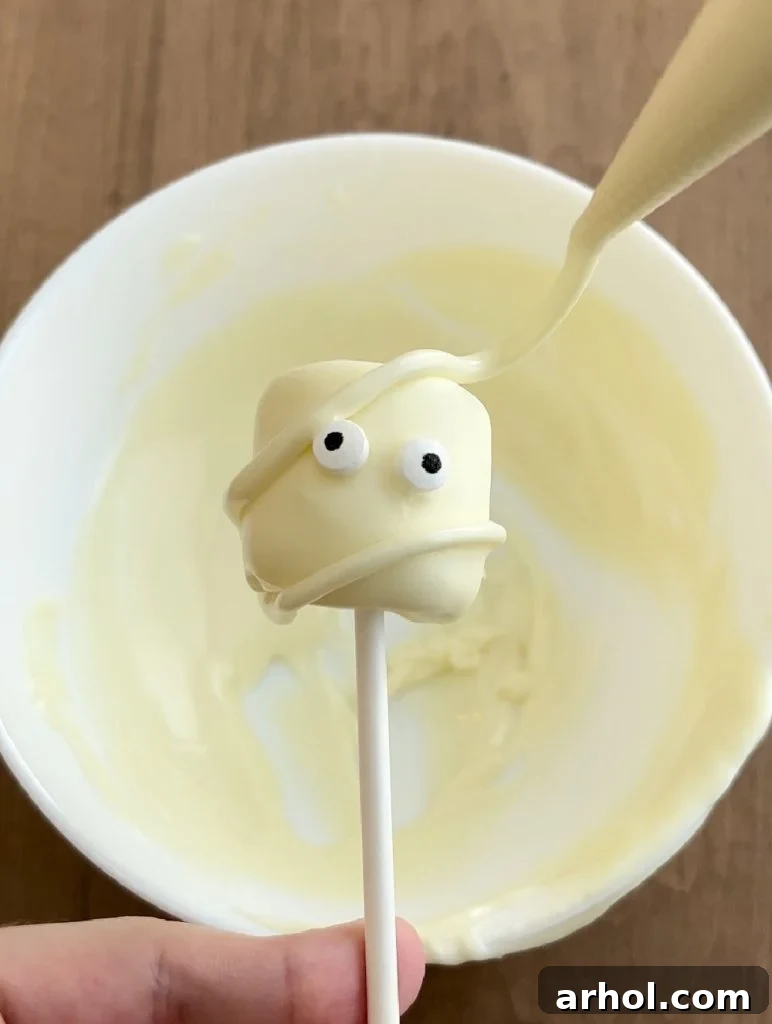
Once the candy coating is partially set, it’s time for the most exciting part: decorating your Halloween characters! For drizzling or fine lines, use a piping bag with a tiny hole snipped in the corner, or a ziploc bag with a corner cut off. A toothpick can also be incredibly useful for smaller details or spreading colors.
Mummy Marshmallow Pops
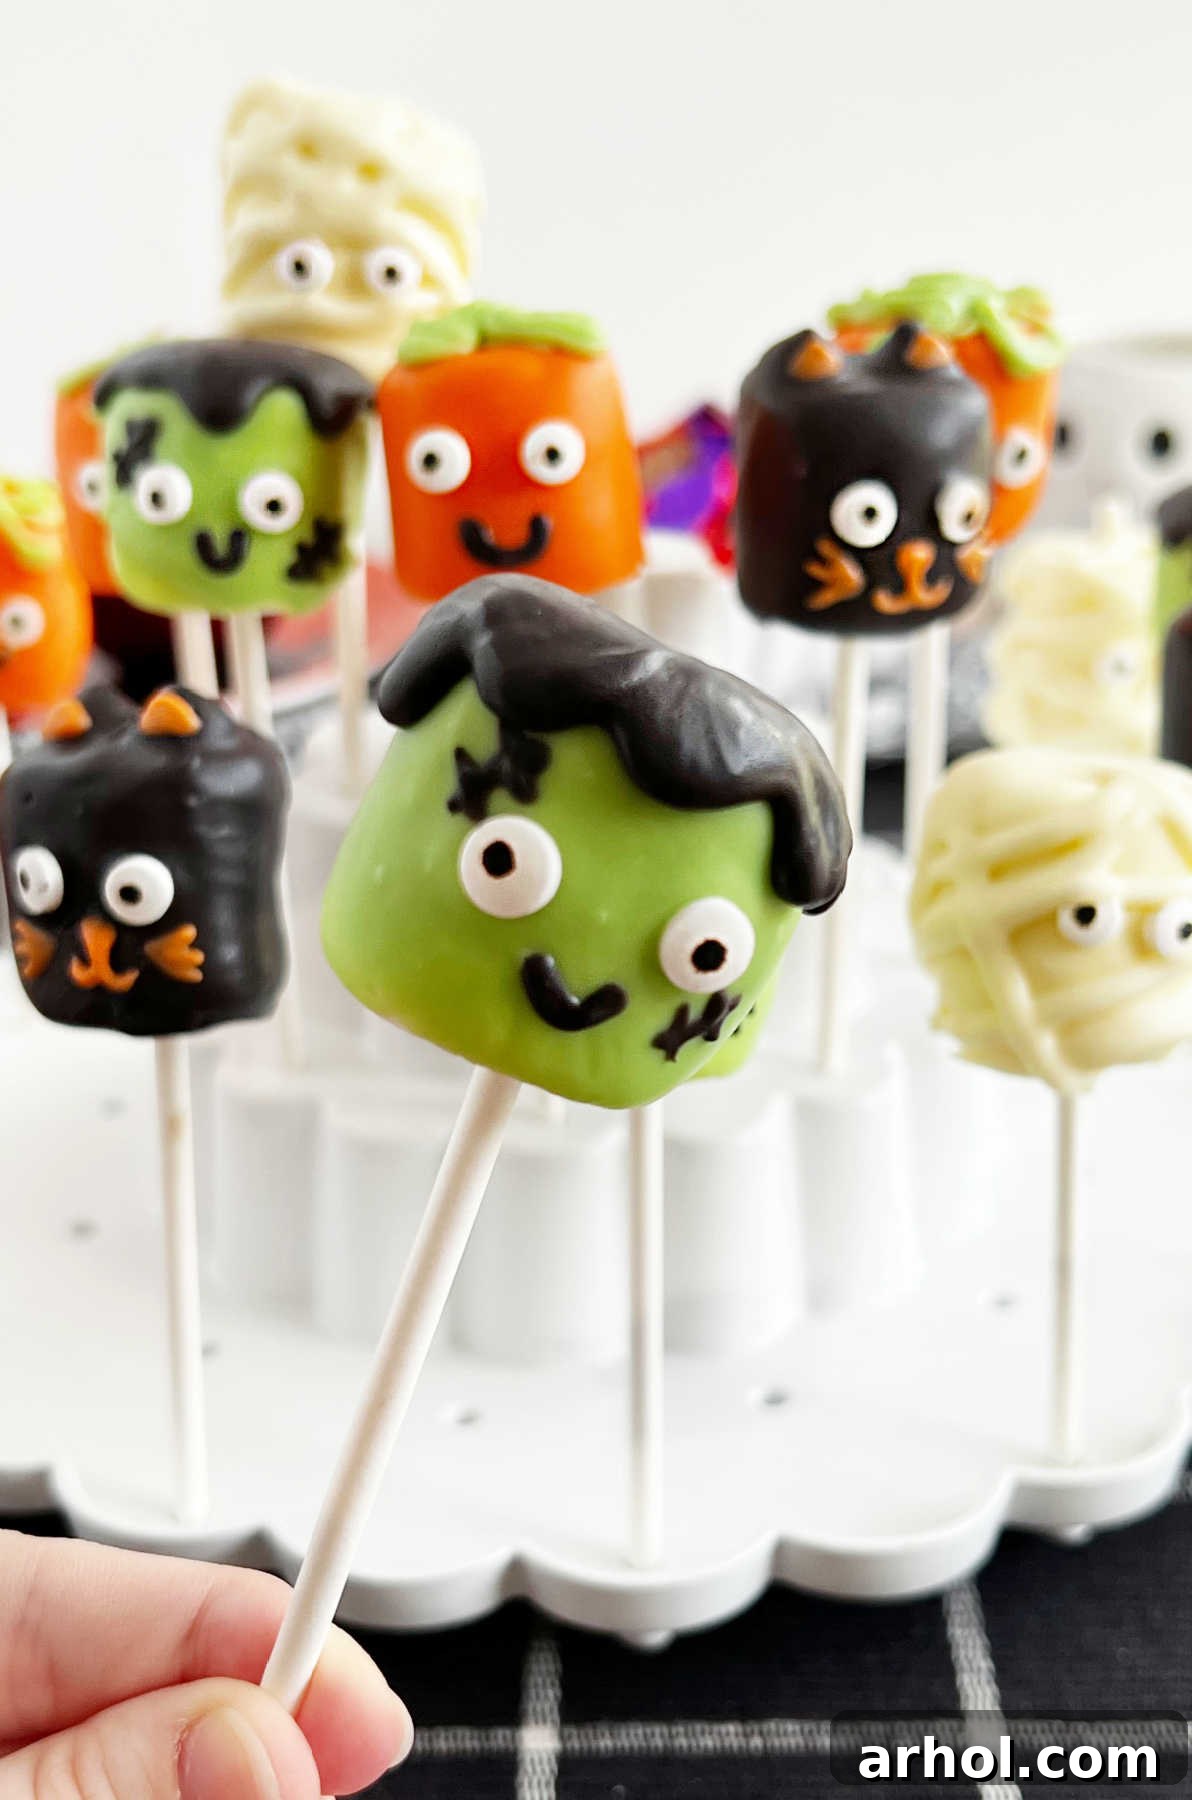
For these adorable mummies, dip marshmallows in white candy coating. After attaching the candy eyes and allowing the coating to slightly set, use a piping bag or a fork to drizzle additional melted white candy coating back and forth across the marshmallow. Create uneven lines to mimic gauze bandages, leaving gaps to reveal the “eyes.”
Pumpkin Marshmallow Pops
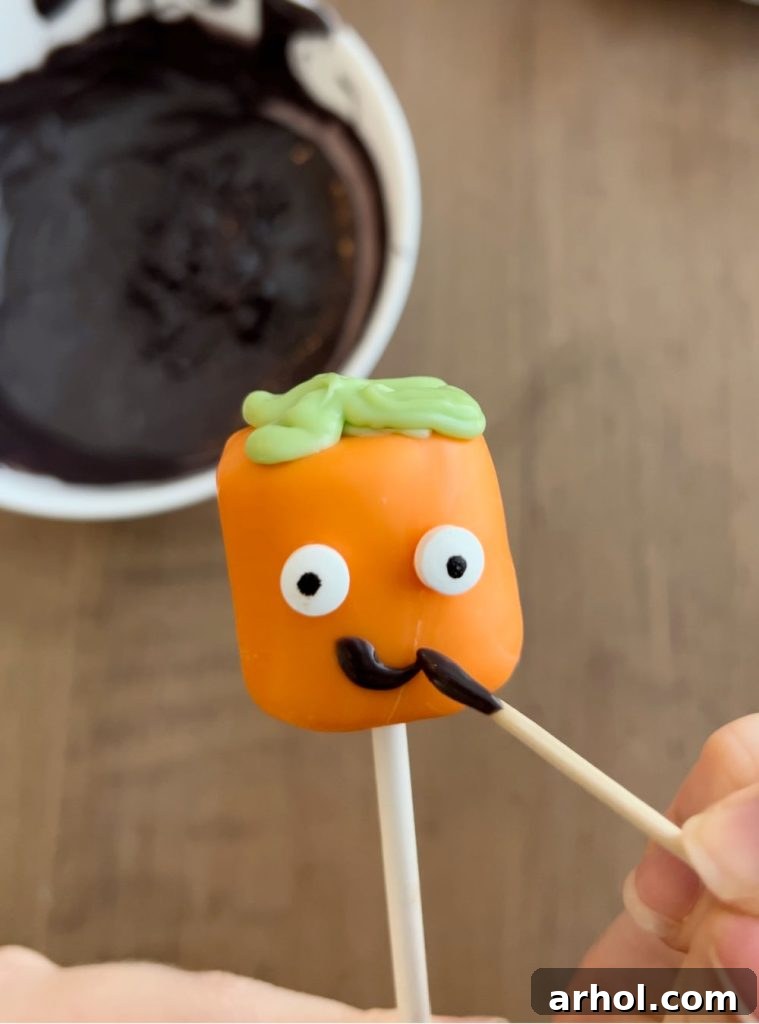
Dip marshmallows in orange candy coating. Once the coating is set and candy eyes are attached, use green candy coating (in a piping bag or with a toothpick) to create a small vine or stem at the top of the pumpkin. For the pumpkin’s mouth, you can use melted black candy coating applied with a toothpick, or draw it on with an edible food marker.
Black Cat Marshmallow Pops
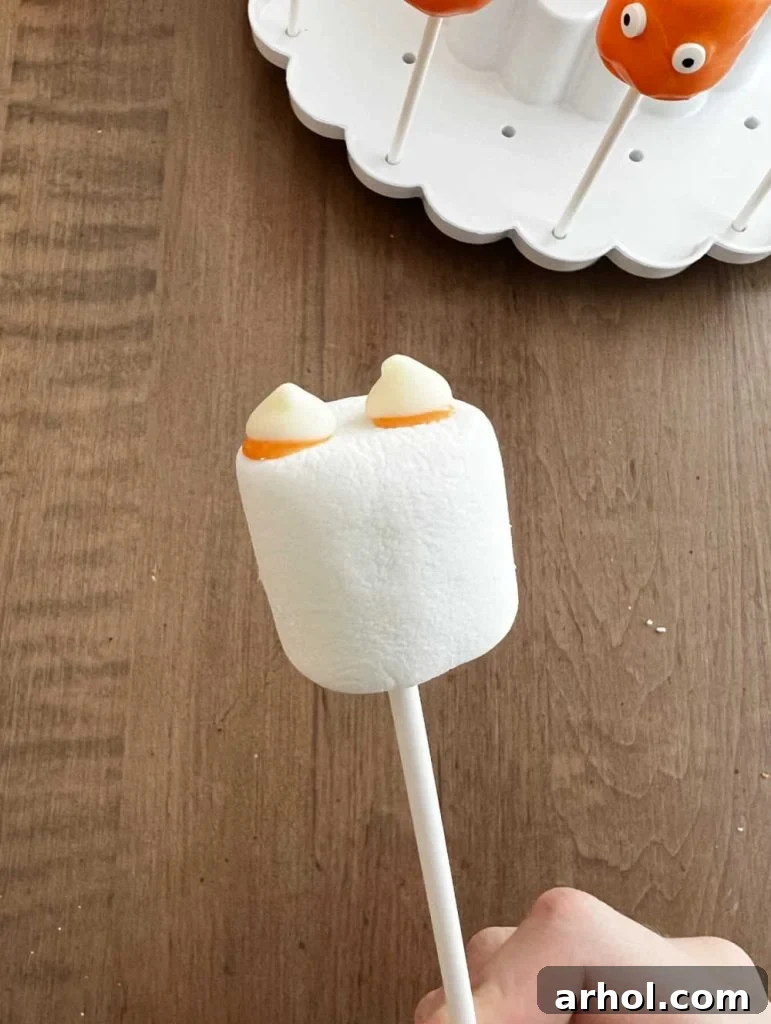
Begin by using a small dab of melted candy coating as “glue” to attach two mini chocolate chips to the base of the marshmallow, pointy side up, for the ears. Once these are firmly attached, dip the entire marshmallow (including the chocolate chip ears) into black candy coating. After allowing it to set, attach candy eyes. Use white or orange candy coating (applied with a toothpick or thin brush) to draw whiskers and the insides of the ears.
Frankenstein Marshmallow Pops
Dip marshmallows in green candy melts for Frankenstein’s face. Once set, use black candy melts to swirl or pipe hair onto the top of the pop. Attach candy eyes. For the iconic scars, use a toothpick dipped in black candy coating to draw jagged lines. Mini chocolate chips or small edible candy pieces can be attached with melted candy coating on the sides of the marshmallow for neck bolts.
Ghost Marshmallow Pops (Bonus Idea!)
Simply dip marshmallows in white candy coating. After they’ve set, use a black edible marker or a toothpick with melted black candy coating to draw two simple eyes and an oval mouth for a classic ghostly expression.
Spiderweb Marshmallow Pops (Bonus Idea!)
Dip marshmallows in a base color (e.g., orange, purple, green). While the coating is still wet, draw concentric circles on top using a contrasting color of melted candy coating (e.g., black on orange). Then, quickly drag a toothpick from the center outwards through the circles to create a spiderweb effect. Attach a plastic spider ring for extra flair!
Storage and Make-Ahead Tips
To keep your Halloween Marshmallow Pops fresh and delightful, store them in an airtight container at room temperature. They are best enjoyed within 3 days. Beyond this period, marshmallows tend to start drying out, which can alter their soft texture.
For best results, consider making these Halloween marshmallow treats a day ahead of time. This allows ample time for the candy coating to fully set and for any decorations to firmly adhere, making them perfect for your party or gathering. Avoid refrigerating the pops if possible, as the condensation can cause the candy coating to become sticky or dull.
Expert Tips for Perfect Halloween Marshmallow Pops
Achieving picture-perfect marshmallow pops is easy with a few simple tricks up your sleeve. These helpful tips will ensure your spooky treats are a hit:
- Melt with Care: Always microwave candy coating or chocolate in short increments (30 seconds at a time), stirring thoroughly after each. Never try to melt it all at once, as this can lead to burning, clumping, or an unusable consistency. Patience is key for smooth, dippable coating.
- Choose the Right Bowl: Use deeper, narrower bowls or mugs to hold your melted coating. This allows for easier, more complete dipping of the marshmallows without having to tilt the bowl excessively.
- Preparation is Key: Have all of your ingredients and decorating tools out and ready before you start dipping. This “mise en place” approach makes the process flow smoothly and much faster, especially since melted candy coating can start to set relatively quickly.
- Timing for Decorations: Attach candy eyes, sprinkles, or other small decorations when the candy coating is still tacky but not completely wet. If you wait too long and the coating is fully dry, your decorations won’t stick, and you’ll have to use extra melted coating as glue.
- Secure Drying: A proper drying setup is essential. Use a cake pop stand, a piece of Styrofoam, or an upside-down colander to keep the dipped marshmallows upright while they dry. This prevents flat spots or pooled candy coating, ensuring a neat, professional finish.
- Thinning Coating: If your candy melts seem too thick for smooth dipping, you can add a tiny amount (about 1/2 teaspoon per cup of melts) of shortening or coconut oil. Stir well until the desired consistency is achieved. Be careful not to add too much, or the coating won’t set properly.
- Keep Marshmallows Fresh: Use fresh marshmallows for the best texture and easiest skewer insertion. Stale marshmallows can be hard and tear easily.
- Simple Sprinkles: For a super easy yet festive treat, simply dip the marshmallows in a colorful coating and then immediately roll them in Halloween-themed sprinkles before the coating sets. No intricate drawing required!
Halloween Marshmallow Pops Recipe
Halloween Marshmallow Pops are marshmallows dipped in melted candy coating and decorated as your favorite Halloween characters. This easy recipe is a fun Halloween dessert!
Prep Time: 15 minutes
Cook Time: 5 minutes
Decorating Time: 20 minutes
Total Time: 40 minutes
Servings: 10 pieces
Ingredients:
- 10 large marshmallows
- Candy coating (various Halloween colors)
- Candy sprinkles (optional, for decoration)
- Small candy eyes
- Lollipop sticks or paper straws
Instructions:
- Melt the candy coating in individual microwave-safe bowls according to package directions, heating in short increments and stirring until smooth.
- Insert paper straws or cake pop sticks into one end of each marshmallow, ensuring they are securely placed.
- Dip each marshmallow into the melted coating, turning gently to ensure it is fully covered. Allow excess coating to drip back into the bowl.
- Place the sticks upright in a drying stand or Styrofoam block so that the candy coating can dry and set.
- While the coating is still slightly tacky, use additional melted coating as “glue” to affix candy eyes to the marshmallows.
- Using a piping bag (or a ziploc bag with a small corner snipped off) or a toothpick, add additional accents to create your desired Halloween characters (e.g., mummy bandages, pumpkin faces, cat whiskers, Frankenstein scars). Refer to the blog post above for specific character decoration ideas.
- Allow the marshmallow pops to dry completely before serving or storing.
Notes:
You can make as few or as many marshmallow pops as you need by adjusting the ingredient quantities.
See the blog post for additional tips, decoration ideas, and details.
Nutrition Information (Approximate per serving):
- Calories: 22kcal
- Carbohydrates: 6g
- Protein: 0.1g
- Fat: 0.01g
- Saturated Fat: 0.004g
- Polyunsaturated Fat: 0.003g
- Monounsaturated Fat: 0.01g
- Sodium: 6mg
- Potassium: 0.3mg
- Fiber: 0.01g
- Sugar: 4g
- Calcium: 0.2mg
- Iron: 0.02mg
Nutrition information is automatically calculated, so should only be used as an approximation.
Additional Information:
- Course: Dessert
- Cuisine: American
These Halloween Marshmallow Pops are more than just a sweet treat; they’re an experience waiting to happen! They offer a delightful blend of simplicity and creativity, making them a fantastic choice for anyone looking to add a homemade touch to their Halloween celebrations. Whether you’re a seasoned crafter or just starting your culinary adventures, these spooky characters are sure to bring joy and deliciousness to your festive table.
If you embark on the delightful journey of making these cute Halloween treats, please share your creations! Leave a star rating and/or comment below to let us know how they turned out. For more easy and inspiring dessert recipes, be sure to sign up for my weekly newsletter and follow me on social media. Happy Halloween crafting!
Recipe originally published in 2015 and comprehensively updated in 2023 for enhanced clarity and additional content.