
Transform Your Laminate Nesting Tables: DIY Weathered Industrial Style Makeover
Hello fellow DIY enthusiasts and home decor lovers! Have you ever admired those incredibly chic industrial-style tables that effortlessly blend ruggedness with modern elegance? They’re practically everywhere these days, gracing design magazines and trendy cafes alike. While the authentic, reclaimed pieces often come with a hefty price tag, and even good replicas can be expensive, achieving that coveted look on a budget is more attainable than you might think. Today, I’m thrilled to share how I gave a pair of outdated nesting tables a stunning industrial makeover, turning them into pieces that look like they’ve been lovingly weathered over time.
My journey began with a set of nesting tables I’ve owned for several years. They featured a sturdy metal base, which I loved, but their tops were a dull, dark laminate. While functional, these laminate surfaces were a constant magnet for dust and pet hair, requiring almost minute-by-minute cleaning. More importantly, they lacked the character and warmth I craved for my living space. The thought of replacing the tops with real wood crossed my mind, but since the tables were round, cutting and fitting new wooden tops would have been an intricate and challenging task, far beyond my DIY comfort zone.
Instead of giving up, I opted for the next best thing: painting the laminate tops to perfectly mimic the distressed, weathered industrial wood aesthetic I adored. It’s an incredibly satisfying project that proves the transformative power of paint, allowing you to breathe new life into old furniture without breaking the bank or requiring advanced carpentry skills. Join me as I walk you through each step of this budget-friendly furniture flip, proving that even a humble laminate surface can be turned into a stylish statement piece.
The Starting Point: Dated Laminate Tables
Before any transformation can begin, it’s crucial to acknowledge the “before.” Here’s how my nesting tables looked prior to their much-needed revamp. They were functional, yes, but far from inspiring. The dark laminate was a plain, uninteresting surface that offered little in terms of style or visual appeal. In fact, I was so eager to start spraying paint that I almost forgot to capture a ‘before’ shot! Luckily, I remembered just in time to tape off the metal base, which would remain its original dark finish, creating a striking contrast with the new tops.
Gathering Your DIY Makeover Essentials
One of the best aspects of this project is that you likely already have many of the supplies on hand, or they are readily available at any hardware store. Here’s what I used:
- Spray Primer: Essential for proper adhesion on slick laminate surfaces.
- White Latex Paint: Your base for the weathered wood look.
- Brown and Black Acrylic Paint: For tinting your latex paint and creating distressed details.
- Cheap Paint Brush: Crucial for mimicking wood grain and achieving a rustic texture.
- Painter’s Tape: To protect areas you don’t want painted (like the metal base).
- Drop Cloths or Old Newspapers: To protect your work area.
- Cleaning Supplies: Degreaser or mild soap and water for preparation.
My go-to paint brand is often Behr, especially their formulas that include primer. I find their coverage to be exceptional, saving time and ensuring a durable finish. However, any good quality latex paint will work wonders for this project.
Step-by-Step Guide to Your Industrial Table Transformation
1. Preparation is Key: Taping and Priming
The success of any paint project lies heavily in proper preparation. For laminate furniture, this step is non-negotiable. First, thoroughly clean the table tops to remove any dust, grime, or oils that might prevent the paint from adhering properly. A degreaser or just warm soapy water followed by a clean rinse and dry will do the trick. Next, carefully tape off any areas you don’t want painted, such as the metal base or sides. Precision here will save you a lot of touch-up work later.
Once your tables are clean and taped, it’s time for the primer. I began by spray painting the laminate tops with a high-quality primer. Laminate is notoriously slick, and without a good primer, your latex paint won’t stick effectively, leading to chipping and peeling down the line. A spray primer offers excellent, even coverage and dries quickly, allowing you to move to the next step sooner. Ensure you apply thin, even coats, following the manufacturer’s instructions for drying times between coats. This creates a strong foundation for your desired weathered finish.
2. Crafting the Base Coat: The Perfect Weathered Grey
To achieve that authentic faded, painted wood look, I needed a soft, muted base color. Instead of a stark white, I aimed for a subtle grey that would mimic wood that has been painted and then aged over time. I achieved this by mixing a small amount of brown and black acrylic paint into a larger quantity of white latex paint. Start with very small additions of the darker colors, mixing thoroughly and testing the shade on a scrap piece of cardboard or an inconspicuous area of the table. You want a soft, almost ‘greige’ color that isn’t too dark or too stark.
3. Achieving that Rustic Wood Grain Effect
With your custom grey mixed, it’s time to apply the first coat of latex paint. This is where the magic of the “cheapo brush” comes in. Instead of a fine, smooth finish, we want to emulate the texture of wood grain. Load your inexpensive brush with a modest amount of paint – not too much, as we’re aiming for a slightly dry-brush effect even in this initial coat. Apply the paint using long, somewhat inconsistent strokes. The key is not to over-smooth it. The slight imperfections and the way the brush drags the paint will naturally create subtle streaks and textures reminiscent of weathered wood. This technique prevents a flat, uniform appearance, which would detract from the industrial look we’re after.
4. Adding Depth: The Dry Brush Technique
Once your base coat is completely dry, it’s time to add the defining layers of character with the dry brush technique. This is where the ‘weathered’ aspect truly comes to life. Take a very small amount of dark brown acrylic paint (or a mix of brown and black for a richer tone) onto the very tip of your brush. Then, wipe almost all of it off on a paper towel or scrap piece of cardboard. The goal is to have the brush almost entirely dry, with just a hint of pigment remaining.
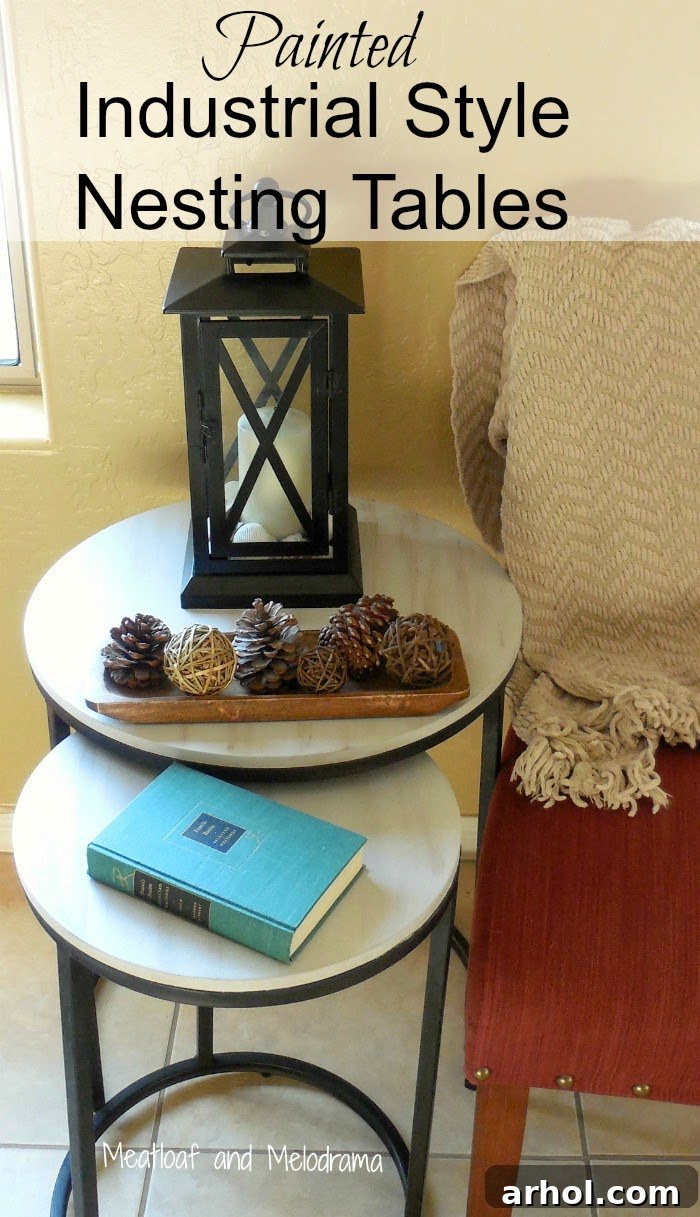
With your nearly dry brush, lightly drag and streak the brown paint over the grey base. Apply minimal pressure and use varied strokes – some longer, some shorter, following the general direction you would expect wood grain to run. The beauty of dry brushing is that it allows the underlying grey color to show through, creating depth and a naturally distressed appearance. If you accidentally apply too much paint, simply blend it out immediately with a cleaner, dry brush or a damp cloth to soften the effect. You want to build up subtle layers, allowing the colors to interact and create that authentic, aged wood texture. Look closely at the table in the picture; you can observe the rough, textured finish created by this method.
The pictures often make the finished table tops appear lighter than they are in person, but you can still clearly discern the subtle dark streaks created by the dry brushing. This layering creates a dynamic, authentic weathered look that is far more interesting than a single, flat color. The contrast between the newly lightened, textured tops and the original dark metal sides and legs is exactly the industrial aesthetic I envisioned. It’s a harmonious blend of rugged and refined, offering visual interest without being overwhelming.
Revealing the Industrial Chic Finish
And just like that, with a little paint and patience, these once-uninspired laminate nesting tables were completely transformed! The result is a pair of industrial-style tables that exude character and charm, looking as though they were salvaged from an old factory or a rustic workshop. The best part? This entire furniture makeover cost me absolutely nothing, as I already had all the necessary supplies on hand. It’s a powerful reminder of how much impact a simple coat of paint can have, turning forgotten items into treasured pieces for your home.
Beyond Aesthetics: Practical Benefits
While the aesthetic transformation is certainly rewarding, this makeover offered a significant practical benefit as well. The original dark laminate tops were notorious for attracting and showcasing every speck of dust and strand of dog hair. The new lighter, textured, and matte finish is far more forgiving. It’s considerably easier to keep clean, which, for anyone with pets or a busy household, is an absolute game-changer. An updated look that’s also more functional? That’s always a huge win in my book!
Tips for Your Own Furniture Flip Project
Inspired to tackle your own furniture makeover? Here are a few additional tips to help ensure your project is a success:
- Work in a Well-Ventilated Area: Especially when using spray primer, ensure good airflow to disperse fumes.
- Thin Coats are Best: Always apply multiple thin coats of paint rather than one thick one. This prevents drips and creates a smoother, more durable finish.
- Allow Ample Drying Time: Patience is crucial. Rushing between coats can lead to a less durable finish and messy results.
- Consider a Top Coat: For high-traffic surfaces, a clear matte or satin top coat (like a polycrylic) can add an extra layer of protection against wear and tear.
- Practice First: If you’re new to techniques like dry brushing, try practicing on a scrap piece of wood or cardboard to get a feel for it before applying it to your actual furniture.
- Embrace Imperfection: The beauty of a weathered or distressed look lies in its imperfections. Don’t strive for absolute uniformity; let the natural variations add to its charm.
Conclusion
In conclusion, transforming these humble laminate nesting tables into stylish, weathered industrial pieces was not only a fantastic way to update my home decor but also a testament to the power of creative DIY. It allowed me to achieve a high-end look without the associated cost, and the added benefit of easier maintenance has truly made them a joy to have in my home. If you have similar dated furniture pieces, I highly encourage you to consider giving them a second life with paint. You might be surprised at the stunning results you can achieve!
Thank you for stopping by and taking the time to explore this furniture transformation project. I hope this detailed guide inspires you to pick up a paintbrush and start your own creative journey. Have a wonderfully creative day!
Warmly,
Dee 🙂
Sharing This Project At:
Metamorphosis Monday,
Tweak It Tuesday,
Inspire Me Tuesday,
Teach Me Tuesday,
Take A Look Tuesday,
Twirl and Take a Bow,
Lou Lou Girls,
Show Me What Ya Got,
Wow Us Wednesdays,
Wonderful Wednesday,
Worthwhile Wednesdays,
Thursday Favorite Things,
Feathered Nest Friday,
Craft Frenzy Friday,
Weekend Retreat,
Pretty Pintastic,
I Heart Naptime,
Say G’Day,
DIY Sunday Showcase,
Inspiration Monday,
Monday Funday,
The Scoop,
Thrifty Decor Chick