
Transform Your School Supplies: Easy Washi Tape Decorating Ideas
As a new school year approaches, there’s always a mix of excitement and a touch of nervousness in the air, especially for our little ones. My daughter, whom I affectionately call my “Diva,” is no exception. She’s embarking on a new school journey this year, and while she’s brimming with anticipation, a mother’s intuition tells me there’s a swirl of butterflies in her stomach too. It’s an unspoken understanding between moms and their kids!
In her enthusiastic preparations, she stumbled upon an absolutely brilliant and incredibly simple method to infuse her personality into her everyday school items. Honestly, it’s one of those creative sparks I never would have thought of myself. When she unveiled her ingenious technique on how to decorate school supplies with washi tape, I was instantly captivated. It was the cutest, most charming craft I’d seen in ages, turning ordinary items into something truly special.
Naturally, such an adorable and practical DIY project simply had to be shared! Whether you’re a parent looking for a fun activity with your child, a student eager to express your unique style, or even an adult wanting to add a touch of whimsy to your office space, this washi tape craft is for you. It’s not just about aesthetics; it’s about making the school year feel a little more personal, a little more exciting, and a lot more ‘you’.
A Blast from the Past: Personalizing School Supplies Then vs. Now
Thinking back to my own school days, which feel like the “Dark Ages” in comparison, personalized school supplies were a foreign concept. We certainly didn’t have the luxury of washi tape or any other fancy embellishments to jazz up our educational tools. Our creative outlets were largely limited to fuzzy eraser toppers and the artistic expressions we scribbled all over our folders and notebooks. And somehow, against all odds, we miraculously managed to survive!
Yet, seeing the vibrant and unique creations possible with washi tape today, I can’t help but feel a pang of nostalgia and a desire for those pretty pencils. This craft is so utterly charming that it almost makes me want to rewind time and experience school again, just to enjoy the delight of such beautifully customized items. Almost, but not quite – I’ve been there, done that, and earned my stripes!
The beauty of washi tape lies in its incredible versatility and ease of use, making it perfect for both kids and adults. It’s a wonderful way to encourage creativity, add a splash of color, and make mundane objects feel special. This simple craft can significantly boost a child’s excitement for school, giving them a unique set of supplies that truly reflects their personality. It’s also a fantastic way to bond with your children, spending quality time together on a fun and productive activity before the hectic school season kicks in.
So, if you’re ready to dive into the delightful world of DIY personalization and transform your or your kids’ school supplies, grab your favorite washi tapes! I’ve put together a quick, straightforward, and super easy tutorial that will have you crafting stunning, one-of-a-kind items in no time. Get ready to unleash your inner artist and make back-to-school preparations a joyful, creative endeavor.
Why Washi Tape is Your Go-To for School Supply Personalization
Before we dive into the how-to, let’s explore why washi tape is the ultimate crafting companion for this project. Originating from Japan, washi tape is a decorative adhesive tape made from traditional Japanese paper (washi). Its unique properties make it ideal for countless DIY projects, especially when it comes to school supplies:
- Endless Variety: Washi tape comes in an astounding array of colors, patterns, widths, and textures. From subtle pastels to vibrant metallics, intricate floral designs to geometric patterns, there’s a washi tape for every taste and personality. This allows for truly unique creations that stand out from store-bought alternatives.
- Easy to Use & Repositionable: Unlike regular adhesive tapes, washi tape is incredibly user-friendly. It tears easily by hand, sticks well to various surfaces, and, perhaps best of all, is usually repositionable without leaving a sticky residue. This makes it forgiving for beginners and perfect for children who might need to adjust their placement.
- Durable Yet Gentle: While it adheres firmly, washi tape is gentle enough not to damage surfaces, making it great for rented items or temporary decorations. For school supplies that see daily wear and tear, it offers a decent level of durability, and you can even apply a clear sealant for extra protection if desired.
- Affordable Crafting: Washi tape is relatively inexpensive, especially considering the impact it can have on transforming ordinary items. You can collect a variety of rolls without breaking the bank, making it a budget-friendly way to refresh school supplies without buying new ones.
- Promotes Creativity: With its versatility, washi tape encourages experimentation. Kids can mix and match patterns, create stripes, polka dots, or even intricate designs, fostering their artistic skills and imagination.
Essential Supplies for Your Washi Tape Project
Gathering your materials is the first exciting step in any craft project. For this easy washi tape transformation, you’ll find most items are likely already in your home or readily available at any craft or stationery store. The beauty is in the simplicity, requiring minimal tools to achieve maximum impact. Here’s what you’ll need to get started:
Here are the supplies you’ll need:
- Washi tape or any patterned decorative tape (a variety of colors and patterns is highly recommended for diverse designs!)
- Pencils (wooden pencils work best, but plastic ones can also be decorated)
- Note cards (for creating custom bookmarks, sturdy cardstock also works)
- Binder clips (various sizes can add more decorative opportunities)
- Scissors (for neat cuts and trimming)
- Optional: A pencil sharpener (essential for neatly finishing decorated pencils)
- Optional: Craft knife or X-Acto blade (for precise trimming on flat surfaces like note cards)
- Optional: Clear sealant or Mod Podge (for added durability and water resistance)
Having a good selection of washi tape patterns is key to making each item truly unique. Consider tapes with vibrant colors, subtle pastels, bold geometrics, or even glitter finishes to cater to different tastes. The more variety you have, the more creative freedom you’ll enjoy!
Step-by-Step Washi Tape School Supply Tutorials
Now for the fun part! Let’s get hands-on and transform these ordinary school supplies into personalized masterpieces. Follow these simple steps to decorate your pencils, note card bookmarks, and binder clips. Remember, there’s no right or wrong way – let your imagination guide you!
Personalizing Pencils with Washi Tape
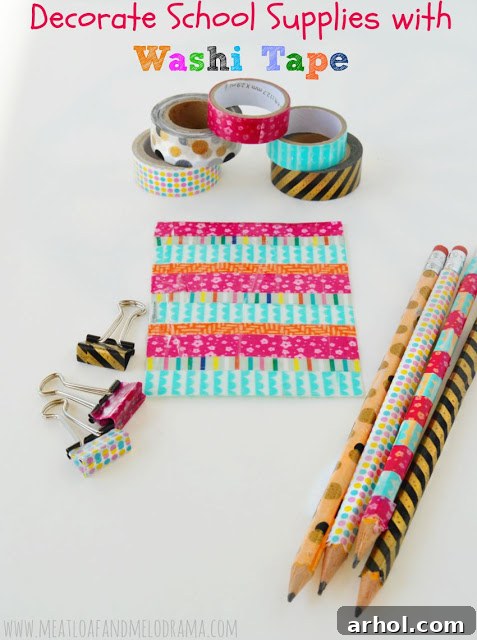
Decorating pencils is perhaps one of the most satisfying washi tape crafts, offering an immediate visual upgrade. My daughter demonstrated a couple of fantastic methods, both yielding delightful results.
- Method 1: Full Coverage Wrap. For a seamless and vibrant look, she took long strips of washi tape and carefully wrapped them around the entire pencil, starting from the eraser end and working her way down to the tip. The key here is to wrap the tape spirally, ensuring slight overlap with each turn to avoid gaps and create a smooth, continuous surface. Once the entire pencil body was covered, she used scissors to snip the tape neatly at both ends. To achieve a perfectly clean and sharp edge at the writing tip, a simple trick is to sharpen the pencil with a pencil sharpener after the tape is applied. This trims the tape precisely and seamlessly, making it look professionally finished.
- Method 2: Horizontal Stripe Design. On another pencil, she opted for a simpler yet equally charming design. Instead of a continuous wrap, she wound short strips of washi tape horizontally around the pencil. You can space these out evenly for a minimalist look, or overlap them slightly to create a layered, patterned effect. This method is great for using up smaller scraps of tape or for mixing different patterns and colors to create a truly unique striped pencil. The beauty of this technique is its flexibility – you can create thick bands, thin stripes, or even a rainbow effect with various tapes.
Crafting a Colorful Washi Tape Bookmark
Bookmarks are essential for any student, and a personalized one can make reading and studying even more enjoyable. My daughter transformed a plain note card into a vibrant, functional bookmark with ease.
- Step-by-Step Bookmark Creation. Start with a sturdy note card, or cut a piece of cardstock to your desired bookmark size. She then meticulously covered the entire surface of the note card with parallel strips of washi tape, slightly overlapping each strip to ensure full coverage. You can choose a single pattern for a cohesive look or mix and match different tapes for a patchwork effect. Once the card was completely covered, she carefully trimmed any excess tape around the edges using scissors or a craft knife for a clean finish. The result? A surprisingly durable bookmark that looks almost laminated, with a smooth, glossy finish. Its bright and distinct design means my daughter has no trouble spotting her place in any book, adding a touch of joy to her reading. For extra durability, especially if it’s going to be handled frequently, you can apply a thin coat of clear Mod Podge over the entire surface after the tape is applied and dried.
Giving Binder Clips a Washi Tape Makeover
Plain binder clips, while incredibly useful for organizing papers, can be quite uninspired. My little Diva found a clever way to add a pop of color and personality to these mundane office staples.
- Decorating Binder Clips. The process is wonderfully straightforward. She simply wrapped small strips of washi tape around the top flat surface of each binder clip. For the best result, measure and cut a piece of washi tape that fits perfectly across the width of the clip’s top. Carefully press it down, ensuring it adheres smoothly without bubbles. You can opt to cover just one side, or wrap the tape around both sides, trimming neatly at the edges. This small detail instantly transforms a boring metal clip into a cheerful accessory that can brighten up any stack of papers or study notes. It’s a subtle yet impactful way to bring personal style to even the smallest items in your school or office arsenal.
Beyond the Basics: More Washi Tape Decorating Ideas
The possibilities with washi tape extend far beyond pencils, bookmarks, and binder clips. While we started with these essentials, there are countless other school and office supplies that can benefit from a touch of washi tape magic. Imagination is your only limit!
- Notebooks and Journals: Give a plain notebook a complete overhaul by decorating its cover, spine, or even the edges of the pages. You can create geometric patterns, stripes, or a mosaic effect. Use wider tapes for bold statements or thin tapes for intricate details.
- Folders and Binders: Transform boring folders and binders by taping around the edges, creating custom labels, or designing a unique pattern on the front. This is particularly useful for differentiating subjects or simply adding a personal touch.
- Pencil Cases and Boxes: Adorn plastic or metal pencil cases with washi tape designs. You can cover entire panels, create stripes, or cut out shapes for a more artistic flair.
- Rulers: Just like pencils, rulers can be wrapped in washi tape. This is a quick and easy way to add color and make them less prone to getting lost.
- Scissors: Wrap the handles of plain scissors with washi tape to make them stand out and feel more personal.
- Water Bottles and Lunch Containers: While washi tape might not be completely waterproof, you can decorate plastic or metal water bottles and lunchboxes with it, especially if you apply a waterproof sealant over the tape for longevity.
- Calculators: Carefully tape around the frame of a calculator or even decorate individual buttons (being mindful not to cover the display or critical functions).
- Desk Organizers: Any small plastic or cardboard desk organizer can be given a facelift with washi tape, turning it into a stylish storage solution.
- Clipboards: Cover the entire surface or just the edges of a plain clipboard for a personalized touch.
Before diving into decorating too many items, my personal philosophy is to always wait and see what the teachers recommend or require. This pragmatic approach helps save a little money by avoiding unnecessary purchases – a strategy I wholeheartedly embrace, especially when dealing with back-to-school shopping for five kiddos! It’s all about smart planning and maximizing our creative efforts.
Tips for Durable and Beautiful Washi Tape Creations
To ensure your washi tape creations look their best and stand the test of time, consider these helpful tips:
- Clean Surfaces: Always start with clean, dry surfaces. Any dust or oils can prevent the tape from adhering properly.
- Smooth Application: When applying tape, press down firmly and smooth out any air bubbles with your fingers or a craft tool. This ensures better adhesion and a neater finish.
- Layering: Don’t be afraid to layer different widths and patterns of washi tape for unique effects. Just ensure each layer is pressed down firmly.
- Sealing for Durability: For items that will see a lot of handling or potential moisture (like water bottles or heavily used binders), consider applying a thin coat of clear sealant like Mod Podge (gloss or matte finish) over the washi tape. This will protect the tape from peeling, scuffs, and even make it water-resistant.
- Precision Cutting: Use sharp scissors or a craft knife for clean, precise cuts, especially when trimming edges or creating intricate designs.
- Involve the Kids: This is a fantastic family activity. Let your children choose their own tapes and get creative. It’s a wonderful way to foster their independence and artistic expression.
The Benefits of DIY School Supplies
Beyond the aesthetic appeal, decorating school supplies with washi tape offers several valuable benefits:
- Self-Expression and Identity: Personalized supplies allow children to express their individuality and sense of style, fostering a stronger connection to their belongings. This can be especially important in an environment where many items look the same.
- Increased Excitement for School: Having unique, custom-made supplies can make the prospect of returning to school more exciting and enjoyable, reducing any back-to-school jitters.
- Cost-Effective Customization: Instead of buying expensive designer school supplies, washi tape offers an affordable way to achieve a similar personalized look with a fraction of the cost.
- Sense of Ownership and Responsibility: When children invest their time and creativity into decorating their supplies, they tend to take better care of them, fostering a sense of ownership and responsibility.
- Eco-Friendly Option: This craft encourages the reuse of existing supplies or plain, less expensive items, reducing the need to buy brand new, often plastic-heavy, pre-decorated items.
- Improved Organization: Clearly distinguishable supplies mean fewer mix-ups at school, making it easier for children (and teachers!) to identify which items belong to whom.
Final Thoughts on Washi Tape School Supplies
Ultimately, this simple yet incredibly effective washi tape craft has been a huge hit in our household. At the very least, my daughter will have no trouble identifying which school supplies belong to her in a classroom full of similar items. And who knows, I might just take a page out of her book and decide to decorate some of my own office supplies with washi tape! A little bit of cheer can brighten up even the busiest of workdays.
This project is a testament to how small, creative touches can make a big difference. It turns a routine back-to-school task into a fun, engaging, and personalized experience. So go ahead, unleash your creativity with washi tape, and prepare for a school year filled with unique style!
As always, thanks so much for stopping by and sharing in our crafting adventures!
You Might Also Like: