
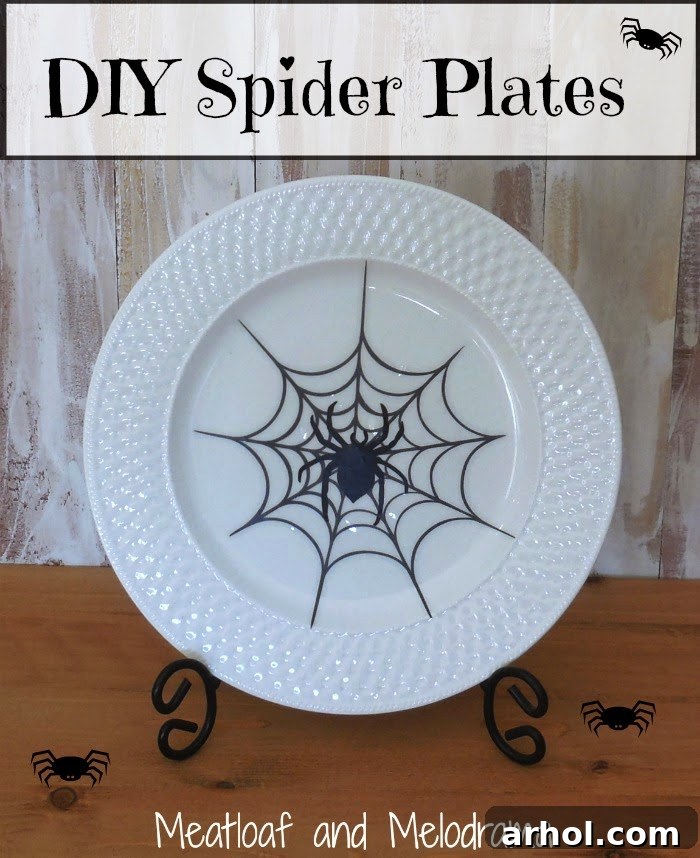
Hi everyone! As the crisp autumn air signals the arrival of Halloween, my mind overflows with exciting decorating ideas. Among them, this particular craft stands out as one of the simplest, yet most rewarding projects you’ll ever undertake! Seriously, creating these adorable DIY spider plates takes mere moments, delivering results that are undeniably cute and perfectly spooky for the season. For those who know me, my love for decorating with plates runs deep, and I felt a distinct void in my Halloween collection – a lack of charming, festive decorative plates. That all changed on a recent trip to Party City. The moment I spotted those versatile spider window clings, a brilliant idea sparked: they would be absolutely perfect for crafting my very own, budget-friendly spider-themed decorative plates!
Embrace the Spirit: Why DIY Halloween Decor is the Best!
Halloween is a magical time of year, filled with spooky delights, sweet treats, and the joy of transforming your home into a festive haven. While store-bought decorations are plentiful, there’s an undeniable charm and satisfaction that comes with DIY Halloween decor. Crafting your own decorations, like these easy spider plates, offers a multitude of benefits:
- Cost-Effectiveness: Save a significant amount of money by utilizing affordable materials or items you already own. Those 99-cent window clings? An absolute steal!
- Personalized Touch: Infuse your unique style and creativity into your decor, ensuring your home reflects your personal taste and vision for Halloween.
- Family Fun: DIY projects are fantastic opportunities to gather the family, especially kids, for an engaging and memorable crafting session. It’s a wonderful way to build excitement for the holiday.
- Uniqueness: Stand out from the crowd with custom decorations that no one else will have. Your spider plates will be truly one-of-a-kind!
- Sustainability: Repurpose old plates or find new life for items from thrift stores, contributing to a more sustainable decorating approach.
Your Essential Crafting Supplies for Spooky Spider Plates
One of the best aspects of this DIY project is its simplicity, requiring only a handful of readily available and incredibly affordable materials. You likely have some of these lying around your home already, making it even easier to get started.
- Plain White Plates: I used a set of white dinner plates that I’ve had for a few years. These were part of a large boxed set, and I often have extras that don’t get used for everyday meals. Any plain plate will work – white provides a striking contrast for black spider webs, but feel free to experiment with other colors!
- Spider Web Window Clings: This is the star of our show! I found an entire sheet of these clings for only 99 cents at Party City, which was music to my frugal ears. Look for designs that include spider webs, individual spiders, or a combination of both. These clings are typically found in the seasonal or party supply aisles of craft stores, dollar stores, or general merchandise retailers.
- Scissors (Optional): Depending on the size and shape of your clings and plates, you might need a pair of scissors to trim the web design for a better fit.
- Cleaning Supplies: A soft cloth and mild dish soap are essential for preparing your plates.
Step-by-Step Guide: Crafting Your Spooky Spider Plates
Get ready for a craft so simple, you’ll wonder why you haven’t tried it sooner! This project is perfect for last-minute decorating or for involving little hands in the Halloween fun. Follow these easy steps to create your own bewitching spider plates:
-
Preparation is Key: Clean Your Plates
Before applying any clings, ensure your plates are sparkling clean and completely dry. Any dust, grease, or moisture can prevent the clings from adhering properly or leave unsightly bubbles. Give them a quick wash with mild soap and water, then dry thoroughly with a lint-free cloth.
-
Unleash Your Creativity: Choose and Arrange Clings
Lay out your cleaned plates and examine your sheet of window clings. Consider which web designs and individual spiders would look best on each plate. Think about the overall composition and how many spiders you’re comfortable with – I didn’t want too many, as that would genuinely creep me out! My goal was just enough to be festive without being overly menacing.
-
Gentle Application: Smooth onto the Plate Surface
Carefully peel your chosen window cling from its backing. Position it onto the center or desired area of your plate. Once positioned, gently smooth the cling onto the plate surface, working from the center outwards to remove any air bubbles. My kids loved helping with this part, making it a truly collaborative effort!
-
Precision Trimming (Optional): For a Perfect Fit
If your spider web cling is slightly too large for your plate, don’t hesitate to grab your scissors. Carefully trim the edges of the web to ensure it fits neatly within the plate’s rim. This small step can make a big difference in how polished and professional your finished plate looks. Once trimmed, smooth again to ensure good adhesion.
-
The Grand Reveal: Arrange and Display
And just like that, your DIY spider plates are complete! Wasn’t that incredibly easy? I created a total of three plates, adding an extra spider to one for a touch more creepiness. The designs genuinely look as if they were intricately painted onto the plates, offering a high-end look at a fraction of the cost. Arrange them to your heart’s content, ready to cast a delightfully eerie glow on your Halloween festivities.
Expert Tips for a Flawless Finish and Long-Lasting Spooky Charm
While this craft is wonderfully straightforward, a few extra tips can help you achieve the best results and maximize your enjoyment of your new Halloween decor:
- Involve the Little Helpers: As mentioned, this is a fantastic project for kids! Let them choose cling designs, help with smoothing, and enjoy the process of creating something special for Halloween.
- Experiment with Placement: Don’t feel limited to placing the cling perfectly in the center. Try off-center designs, multiple smaller clings, or even wrapping clings slightly over the rim for a unique effect.
- Mix and Match Designs: If your cling sheet comes with various spider sizes or web patterns, mix them up across your plates for added visual interest.
- Consider Plate Color Contrast: While white plates offer a classic backdrop for black spider webs, consider how different plate colors might create a unique mood. A pale green or orange plate could also be interesting!
- Temporary and Reusable: Window clings are designed to be temporary and removable, which is perfect for seasonal decor. Store them carefully on their original backing paper or wax paper, and you can reuse them year after year.
- Care Instructions: Since the clings are applied to the surface, these plates are strictly for decorative purposes and should NOT be used for serving food directly. If you need to clean them, gently hand wash the plate, avoiding scrubbing the cling area. They are definitely not dishwasher safe!
- Where to Source Affordable Plates: If you don’t have spare plates at home, check your local thrift stores, dollar stores, or even discount sections of department stores. You can often find beautiful, inexpensive plain plates that are perfect for crafting.
Inspiring Ways to Display Your Enchanting Halloween Plates
Once your DIY spider plates are complete, the fun continues with finding the perfect spots to showcase them! Their versatility allows for numerous creative display options that will enhance your Halloween ambiance. I placed all three of mine in my china cabinet, and they look absolutely delightful, adding a touch of spooky elegance. And remember, at just 99 cents for three decorative plates, you simply can’t beat the value!
- China Cabinet Elegance: As I did, integrate them into your existing china cabinet display. The contrast of the spooky spiders against elegant dishware creates a surprisingly chic Halloween statement.
- Festive Buffet Spread: Use them as part of a decorative centerpiece on your Halloween buffet table. Place them on stands or propped against other decor elements to draw the eye.
- Enchanting Entryway Decor: Arrange your spider plates on an entryway console table or shelf to greet guests with a festive, friendly scare.
- Spooky Centerpiece: Combine a few plates with mini pumpkins, faux cobwebs, candles (battery-operated for safety!), and other Halloween trinkets to create an eye-catching table centerpiece.
- Wall Art Statement: Consider using plate hangers to transform your spider plates into unique wall art. Group them together or scatter them across a wall for a dynamic display.
- Party Serving Trays (for dry snacks only, with caution): While not food-safe for direct contact with food if the cling is on the top surface, you could place a doily or a small sheet of parchment paper over the cling before arranging dry, pre-packaged snacks like wrapped candies or cookies. Use with extreme caution and only for non-messy items. Better yet, stick to decorative purposes!
Beyond the Plates: More Window Cling Decor Ideas
The beauty of those inexpensive window clings isn’t limited to just plates! Their versatility allows you to extend your Halloween decorating to other areas of your home, creating a cohesive and spooky theme without additional cost. I took the remaining spiders from my sheet and scattered them on my bathroom mirrors, instantly transforming a mundane space into something a little more eerie.
- Mirrors: Just like the bathroom mirrors, any mirror in your home can become a fun canvas for spiders, bats, or ghosts.
- Windows: Their original purpose! Adorn your windows to share your Halloween spirit with neighbors and passersby.
- Glass Vases and Jars: Apply clings to empty glass vases or jars to create unique spooky containers for candles (again, battery-operated is safest), faux flowers, or candy corn.
- Fireplace Tiles or Mantels: While I personally opted against having “itsy bitsy” spiders crawling up my fireplace wall, window clings can certainly be applied to smooth tile surfaces or even directly onto a mantel for a subtle touch of fright.
Embrace the Spirit of Frugal Halloween Decor
Halloween is a time for fun, creativity, and a touch of the macabre, and it doesn’t have to break the bank. This DIY spider plate project perfectly embodies the spirit of frugal decorating – using simple, affordable materials to create high-impact, charming decor. It’s about being resourceful, having fun with your family, and transforming your space into something festive and memorable without stress or excessive spending. The satisfaction of looking at your handmade decor is truly priceless.
Frequently Asked Questions (FAQ) About DIY Spider Plates
- Are these spider plates safe for eating on?
- No, these plates are intended for decorative purposes only. The window clings are not food-safe and should not come into direct contact with food.
- How long do the window clings last on the plates?
- Window clings are designed to be temporary and can be easily removed. They will stay on the plates indefinitely for display. For cleaning, gently hand wash the plate, avoiding scrubbing the cling itself. Store them carefully on their original backing for reuse next year.
- Can I use different types of window clings for other holidays?
- Absolutely! The same concept applies to any holiday. Look for festive window clings – snowflakes for winter, hearts for Valentine’s Day, bunnies for Easter – and apply them to plates for instant seasonal decor.
- Where can I find affordable plain plates?
- Check your local dollar stores, thrift shops, second-hand stores, or the clearance sections of home goods stores. You can often find sets or individual plates for very low prices, making them perfect for DIY projects.
- What if I don’t have white plates?
- Any plain plate will work! Consider how the cling design will contrast with the plate color. A dark cling on a light plate will stand out the most, but a lighter cling on a darker plate could also create an interesting effect.
Thank you so much for stopping by to explore this super easy and incredibly cute DIY Halloween craft. I truly adore this time of year – the changing leaves, the festive spirit, and the joy of creating spooky decor. It’s a season full of magic and wonder, don’t you agree? I hope this project inspires you to add a touch of handmade charm to your own Halloween celebrations. Have a fantastic day, and happy crafting!
Dee 🙂