
DIY Polymer Clay Easter Egg Earrings: A Fun & Easy Spring Craft Guide
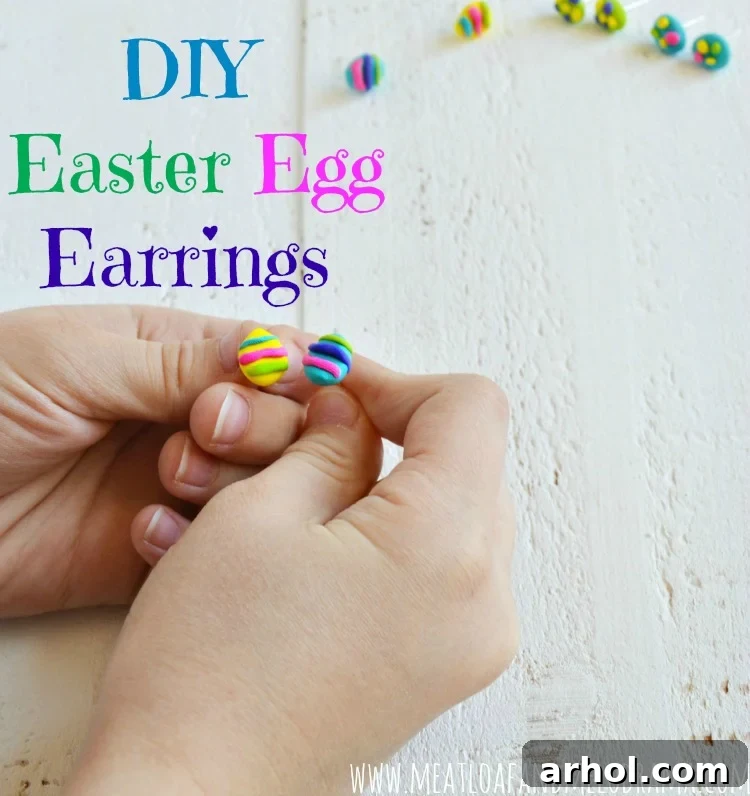
Spring has officially sprung, bringing with it a vibrant burst of color, renewed energy, and the perfect excuse for creative crafting! While many are still yearning for warmer weather, the season of blossom and joy is here, and for many families, that means it’s also Spring Break. We’ve been busy embracing the spirit of the season with various spring-themed projects. Our latest endeavor, a collaboration with my talented daughters, resulted in these absolutely charming DIY Easter Egg Earrings, crafted from versatile polymer clay.
Embrace the Spirit of Spring with Handmade Easter Jewelry
Crafting is a wonderful way to celebrate the changing seasons, and Easter offers a particularly delightful theme for handmade creations. My eldest daughter, a true enthusiast of polymer clay, has previously conjured up all sorts of miniature wonders, from dollhouse food to intricate beads and various earring designs. With Easter just around the corner, she was inspired to expand her collection with some festive Easter egg earrings. These aren’t just any earrings; they’re super easy to make, making them an ideal project for crafters of all skill levels, including younger artists. The fundamental process involves shaping the clay into petite egg forms and then adding whimsical decorations like colorful dots and playful stripes.
Handmade jewelry offers a unique charm that mass-produced items simply can’t replicate. These polymer clay Easter egg earrings are not only a fantastic way to express personal style but also make thoughtful, personalized gifts for friends and family. Imagine the delight on someone’s face receiving a pair of unique, hand-crafted earrings, made with love!
Why Polymer Clay is Your Go-To for DIY Earrings
Polymer clay is an incredibly forgiving and versatile medium, perfect for jewelry making. Its pliable nature makes it easy to sculpt, mold, and decorate, and once baked, it transforms into a durable, lightweight, and vibrant piece. Unlike air-dry clays, polymer clay maintains its workability until it’s cured in a household oven, giving you ample time to perfect your designs. It comes in a vast spectrum of colors, and different colors can even be mixed to create custom shades, opening up endless creative possibilities for your Easter egg designs. Its non-toxic nature (when used as directed) also makes it a safe and enjoyable material for crafting with children.
Your Step-by-Step Guide to Crafting Adorable Easter Egg Earrings
Ready to create your own wearable works of art? Follow our simple steps to bring your DIY Easter egg earrings to life. This project is not only fun but also allows for immense creativity in design and color choices.
What You’ll Need: Gathering Your Supplies
- Polymer clay in a vibrant array of spring colors (pastels are perfect for Easter!)
- A plastic knife or dedicated clay tools for precise cutting and shaping
- A non-stick surface, such as a paper plate or wax paper, to work on and hold your delicate shapes
- A baking sheet lined with aluminum foil or parchment paper for curing the clay
- Earring posts and corresponding backs (hypoallergenic options are great for sensitive ears)
- A strong adhesive glue, like E6000 or Tacky Glue, to securely attach the earring posts
- Optional additions: A small rolling pin for even thickness, toothpicks or dotting tools for intricate designs, fine glitter, or a clear glaze for a polished finish.
Step 1: Preparing Your Workspace and Clay
Before you begin, ensure your workspace is clean and free of dust or lint, which can easily stick to polymer clay. Start by conditioning your chosen colors of polymer clay. This involves gently kneading and warming the clay in your hands until it becomes soft and pliable. Properly conditioned clay is easier to work with, less prone to cracking, and bakes more evenly. Encourage young crafters to get involved in this therapeutic part of the process!
Step 2: Shaping Your Perfect Easter Eggs
Take a small amount of conditioned clay and roll it between your palms to form a smooth ball. Then, gently taper one end to create an egg shape. Aim for uniformity in size for each pair of earrings, but remember that handmade items embrace subtle variations. You can create a variety of sizes, from tiny, delicate studs to slightly larger, statement earrings. Place your shaped eggs on your non-stick surface, ensuring they don’t touch each other to prevent sticking.
Step 3: Unleashing Your Creativity – Decorating the Eggs
This is where the real fun begins! Using contrasting colors of polymer clay, you can add an array of festive decorations. Roll tiny snips of clay into small balls for polka dots, or thin strands for elegant stripes. Gently press these decorative elements onto your egg shapes. Don’t be afraid to experiment! You can create swirling patterns, chevrons, or even small floral accents. Use a toothpick or a fine detailing tool to etch subtle designs or create textured surfaces. Encourage free expression – every unique design adds to the charm of these handmade pieces. My daughters absolutely loved coming up with their own unique patterns, resulting in a vibrant collection of earrings.
Step 4: The Baking Process – Curing Your Clay Creations
Once your Easter egg designs are complete, carefully transfer them to a baking sheet lined with aluminum foil or parchment paper. This lining prevents sticking and ensures even heating. Preheat your oven to 275 degrees Fahrenheit (135 degrees Celsius). It’s crucial to follow the temperature guidelines provided on your specific polymer clay package, as temperatures can vary slightly between brands. Bake your clay pieces for approximately 15 minutes, or until the shapes feel firm and rigid to the touch. The exact baking time can depend on the thickness of your eggs; thicker pieces may require a few extra minutes. Avoid over-baking, which can cause colors to darken, but ensure they are fully cured for durability. After baking, carefully remove the tray from the oven and allow the earrings to cool completely to room temperature. They will continue to harden as they cool.
Step 5: Securing Your Earring Posts
Once your polymer clay Easter eggs are completely cool and hard, it’s time to transform them into wearable earrings. Take your earring posts and apply a small dab of strong adhesive glue to the flat pad of each post. Carefully press the glued side of the post onto the back center of each cooled clay egg. Apply gentle pressure for a few seconds to ensure good adhesion. We found Tacky Glue to work well for this, but E6000 or a quality super glue are also excellent choices for creating a strong, lasting bond. Allow the glue to dry and cure completely according to the manufacturer’s instructions. This might take several hours, so patience is key for durable earrings.
Step 6: Ready to Wear or Gift!
Once the posts are securely attached and the glue is thoroughly dry, your beautiful DIY Easter egg earrings are ready to be shown off! My girls enjoyed making a diverse collection of eggs, ensuring they had several pairs to mix and match or to share with their friends as thoughtful, handmade gifts. These earrings are wonderfully lightweight, making them comfortable to wear all day long, even for younger fashionistas. My little Diva had no trouble at all wearing her pair, proudly showcasing her handiwork. They truly are super cute and add a perfect touch of spring flair to any outfit!
Tips for Polymer Clay Success
- Cleanliness is Key: Always work on a clean surface and wash your hands before handling clay to prevent lint and dust from embedding in your creations.
- Conditioning: Don’t skip conditioning the clay. It makes it easier to work with and ensures a smoother finish.
- Preventing Fingerprints: If you find fingerprints are an issue, try wearing thin latex or nitrile gloves. You can also gently smooth the surface with a soft brush or a bit of rubbing alcohol on a cotton swab after shaping (before baking).
- Experiment with Tools: Don’t limit yourself to just a plastic knife. Toothpicks, craft needles, or even small cookie cutters can create interesting textures and shapes.
- Baking Consistency: Use an oven thermometer to ensure your oven’s temperature is accurate. Inconsistent temperatures can lead to under-baked (brittle) or over-baked (burnt) clay.
- Glaze for Shine and Protection: For an extra polished look and added durability, consider applying a thin coat of polymer clay specific glaze after the earrings have cooled.
The Joy of Handmade: Why DIY Easter Egg Earrings Are a Must-Try
Engaging in DIY projects, especially with family, offers a plethora of benefits. Creating these Easter egg earrings is more than just making jewelry; it’s an experience that fosters creativity, develops fine motor skills, and provides a wonderful opportunity for bonding. The satisfaction of wearing or gifting something you’ve crafted with your own hands is truly immense. These unique accessories stand out, showcasing personality and a touch of homemade charm that mass-produced items simply can’t match.
Furthermore, polymer clay projects are incredibly cost-effective. A single block of clay can yield numerous earrings, making it an economical way to create personalized gifts for everyone on your list. From designing intricate patterns to selecting the perfect color palettes, every step in the process is an opportunity for self-expression and imaginative play. Have you ever worked with polymer clay before? It’s a truly rewarding medium, and as we’ve discovered, the possibilities for creation are truly endless!
Discover More Creative Possibilities with Polymer Clay
The beauty of polymer clay extends far beyond just these adorable Easter egg earrings. Once you start experimenting, you’ll find yourself inspired to create all sorts of wonderful things. Consider making matching necklaces or bracelets, small charms for keychains, decorative magnets, or even tiny sculptures. It’s a medium that encourages continuous learning and exploration, making it a favorite among crafters of all ages. Remember how surprisingly lightweight these earrings are? That characteristic holds true for most polymer clay creations, making them comfortable for extended wear.
We hope this guide inspires you to dive into the delightful world of polymer clay crafting this spring. These DIY Easter egg earrings are a fantastic way to add a festive touch to your holiday celebrations or to simply enjoy a creative afternoon. Thanks so much for dropping by and exploring this fun project with us!
Explore More DIY Craft Ideas
You may also like to try these other fun crafting projects:
Sharing our creative adventures at:
- Tip Me Tuesday
- Thrifty Thursday
- I Heart Naptime
- Inspiration Monday
- Monday Funday