
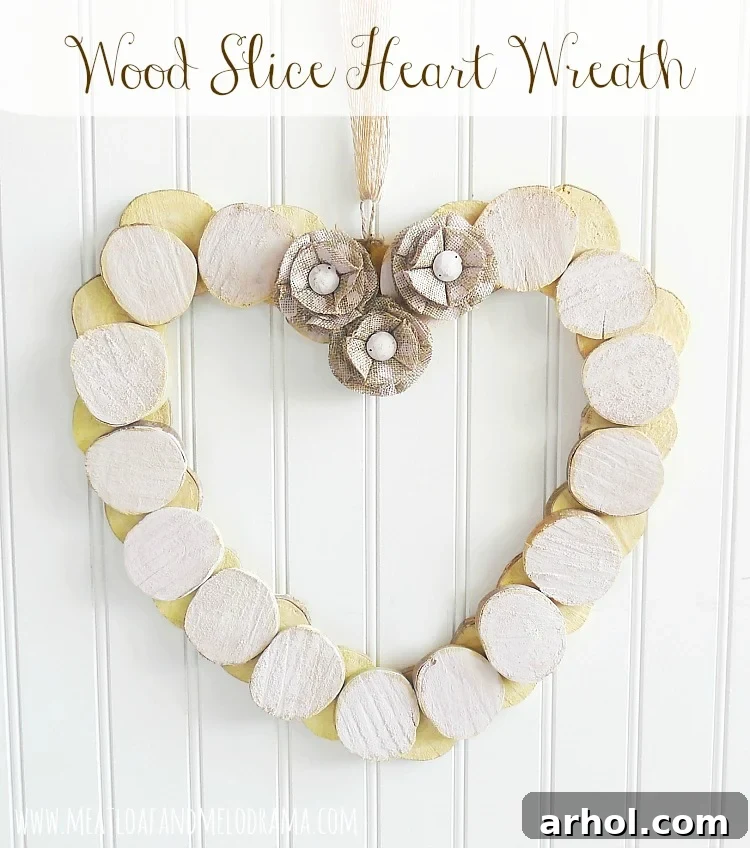
Craft Your Own Rustic Wood Slice Heart Wreath for Valentine’s Day
Hello, fellow craft enthusiasts! Today, I’m absolutely thrilled to share a project that’s been a labor of love and a true testament to the charm of handmade decor: my stunning **DIY Wood Slice Heart Wreath** designed specifically for Valentine’s Day. If you’re anything like me, you appreciate decor that tells a story, adds character, and brings a personal touch to your home. This project does all that and more, embodying a rustic elegance perfect for celebrating love.
I’ve been working on perfecting this sweet little Valentine’s decoration for a while, ensuring every detail aligned with my initial vision. Crafting, for me, is a process of patience and passion, never to be rushed. This past fall and holiday season, wood slice ornaments and crafts became incredibly popular, and I found myself utterly captivated by their natural beauty and versatility. Inspired by this trend, I envisioned a similar piece for Valentine’s Day – something heartfelt, earthy, and uniquely mine. The result, I’m delighted to say, is this beautiful wood slice heart wreath, and I couldn’t be happier with how it turned out!
The Inspiration Behind the Rustic Heart Wreath
The journey of this wreath began right in my own backyard. Before Christmas, my husband thoughtfully trimmed some branches from one of our palo verde trees. These initial wood slices were perfect for crafting festive holiday ornaments. As Valentine’s Day approached, and my vision for a heart-shaped wreath crystallized, I knew I needed more. My wonderful husband obliged, cutting a fresh batch of slices that would form the foundation of this project.
If you don’t have access to your own tree branches, don’t worry! The beauty of DIY means there are always readily available alternatives. You can easily find high-quality, pre-cut wood slices at most local craft stores or through various online retailers. When purchasing, look for slices that are relatively uniform in thickness and diameter to ensure a consistent look for your wreath. This rustic approach not only connects us with nature but also allows for a unique, one-of-a-kind piece that mass-produced decorations simply can’t replicate.
Essential Supplies for Your DIY Wood Slice Heart Wreath
Gathering your materials is the first exciting step in any craft project. For this charming wood slice heart wreath, you’ll need a few key items. Most of these are standard craft supplies, making this an accessible project for crafters of all skill levels. Here’s a detailed list to help you get started:
Supplies You’ll Need:
- Wood Slices: Approximately 34 slices, each about 2 inches in diameter. The exact number may vary slightly depending on the size of your slices and how tightly you arrange them.
- Tacky Glue: A strong, quick-drying craft glue is essential for securely bonding the wood slices together. Brands like Aleene’s Tacky Glue work perfectly due to their robust hold.
- Pink Chalk Paint: I used a lovely pink chalk paint (specifically Annie Sloan’s Antoinette, which I adore!), but any craft paint in your preferred shade will work beautifully. Acrylic paints are a great alternative.
- Twine: For hanging your finished wreath. Choose a natural jute twine for a rustic look.
- Burlap Flowers: Small burlap flowers or similar natural embellishments to add decorative accents. You can also make your own from burlap ribbon.
- Burlap Ribbon: Thin burlap ribbon can be used for extra decorative touches or as an alternative hanging method.
- Paint Brush: A small to medium-sized brush for applying paint to your wood slices and embellishments.
- Drill (with small bit): For creating a hole at the top of one wood slice for hanging. If you prefer not to drill, alternative hanging methods are available.
Step-by-Step Guide to Assembling Your Heart Wreath
Crafting this wood slice heart wreath is a rewarding experience, especially when you see it come to life. My husband was a wonderful help, assisting with the assembly – a sweet gesture I consider his thoughtful Valentine’s Day present to me!
1. Preparing Your Wood Slices
If you’re using freshly cut wood, ensure the slices are thoroughly dry to prevent warping or cracking later. For store-bought slices, a light sanding can help create a smoother surface for painting and gluing. Lay out your wood slices and sort them by size, aiming for a relatively consistent look for your base layer.
2. Arranging the Heart Shape Base
Begin by dry-fitting your wood slices on a flat surface to form the desired heart shape. This is a crucial step to ensure symmetry and the overall aesthetic. I found that creating two distinct layers provided the perfect amount of dimension and fullness. Start with the larger, base layer, carefully arranging the slices to define the heart’s outline and fill its interior. Take your time with this step, adjusting and experimenting until you are satisfied with the shape.
3. Gluing the First Layer
Once you’re happy with the arrangement of your base layer, carefully apply Tacky Glue to the edges where the wood slices meet and to the bottom of each slice where it touches your work surface. Press each slice firmly into place. Allow this layer to dry completely according to the glue manufacturer’s instructions, typically for several hours or overnight. A strong bond here is vital for the wreath’s durability.
4. Adding the Second Layer for Dimension
With the base layer securely dry, it’s time to add the second layer. These slices will be glued directly onto the top of the first layer, overlapping slightly to create depth and texture. Position these slices strategically, enhancing the heart’s curvature and adding visual interest. Apply Tacky Glue generously to the bottom of each top-layer slice and press firmly onto the base. This layering technique gives the wreath a lovely, substantial feel.
5. Preparing for Hanging
For hanging, I opted for a sturdy twine. My husband drilled a small, neat hole through the very top wood slice of the wreath. This provides a secure point to thread the twine. If you don’t have a drill or prefer not to use one, an alternative is to loop a strong, decorative ribbon over the top-most slice and secure it with a knot or a bow. This method works just as well and can add an extra touch of charm.
6. Painting Your Wood Slices
Now for the color! As you might know from some of my other Valentine’s Day crafts, I’ve developed a serious crush on Annie Sloan’s Antoinette chalk paint. Its soft, romantic pink hue was absolutely perfect for this project. I applied a thin, even coat of this beautiful paint only to the center of each wood slice on the top layer. I deliberately left the edges and the entire bottom layer unpainted. The natural, yellowish shade of the wood beautifully complements the soft pink, adding to the rustic and organic appeal of the wreath. This creates a lovely contrast and depth without overwhelming the natural material.
7. Embellishing with Burlap Accents
To give the wreath a little extra flair and personality, I decided to add some embellishments. I found a few burlap flowers I had on hand, which perfectly matched the rustic theme. To make them pop, I used a small round stencil brush to dab soft pink polka dots onto the burlap petals, mirroring the paint on the wood slices. I also painted the very center of each burlap flower for an added touch of cohesion. These small details make a big difference in the finished look.
8. Final Touches and Hanging
With the painting and embellishments complete, the final step is to prepare your wreath for display. I looped a generous length of natural twine through the drilled hole at the top, tying it securely to create a hanger. For an extra decorative element, I also added a thin strip of burlap ribbon, tying it into a simple bow at the top of the wreath. This combination of twine and burlap enhances the rustic appeal and makes it ready to adorn your chosen space.
A Rustic Touch for Your Valentine’s Day Decor
This wood slice heart wreath is undeniably a rustic Valentine’s Day decoration, and if you’ve followed my crafting adventures, you’ll know my deep appreciation for rustic decor. It brings warmth, character, and a timeless feel to any space. The best part? This charming little wreath cost me absolutely nothing to make, thanks to the free wood slices from our backyard tree. It’s a testament to how beautiful and meaningful handmade items can be, often utilizing materials you already have or can source affordably.
This beautiful wreath has found its home on our mantel, which is now almost complete! I just have a few minor tweaks to the sides, and then I’ll be able to unveil the full display. If you’ve seen my recent crafts, you can probably guess the dominant color scheme – a delightful combination of soft pink and crisp white, creating a fresh yet romantic atmosphere perfect for the season of love.
I hope this tutorial inspires you to create your own unique Valentine’s Day decor. There’s immense joy in crafting something with your own hands, infusing it with personal style and love. Thank you so much for stopping by and sharing in my creative journey. Enjoy your day, and happy crafting!
Explore More Rustic Craft Ideas
If you loved this project, you might be interested in some of my other rustic-themed crafts that bring natural charm and a handmade touch to your home:
Rustic Christmas Centerpiece with Wood Slice Ornaments
Rustic Valentine’s Day Sign