
Brighten Your Home: Easy DIY Painted Jars for a Charming Spring Garden Theme
Hello, fellow craft enthusiasts and friends! Remember the other day when I mentioned having a craft project in mind, but the unpredictable weather held us back from doing any spray painting? Well, I’m thrilled to report that today brought us the most absolutely gorgeous weather, making it the perfect opportunity to finally bring my vision to life! The sun was shining, the air was still, and creativity was definitely in the air.
My passion for repurposing old jars and transforming them into beautiful, functional containers and decorative accents for the home is no secret. In fact, if you could see my dedicated “jar stash,” you’d understand just how much I love giving new life to forgotten glass! It’s an incredibly satisfying way to reduce waste and add a personal touch to any space. For too long, my home was still adorned with the charming snowman jars I crafted for winter, and while they served us well during the colder months, it was undeniably time for a refreshing change. Spring has officially sprung, and our decor needed to reflect that vibrant energy.
So, with a renewed sense of purpose, I gathered three empty salsa jars – always a handy base for any creative endeavor – and, with the enthusiastic help of my wonderful kids, we embarked on a delightful crafting adventure. The result? These adorable and brightly colored painted jars for spring, designed to infuse our home with a touch of seasonal cheer and handmade charm. This project perfectly combines frugality with artistic expression, creating unique pieces that truly stand out.
Choosing Your Spring Theme: Beyond Easter
When planning this project, I deliberately steered away from creating strictly “Easter” themed jars. While Easter crafts are certainly lovely, I wanted these decorations to have a longer lifespan throughout the entire spring season and even into early summer. My goal was to craft versatile pieces that wouldn’t feel out of place once the holiday passed. This led me to a charming garden theme, which offers endless possibilities for creativity and resonates perfectly with the essence of spring.
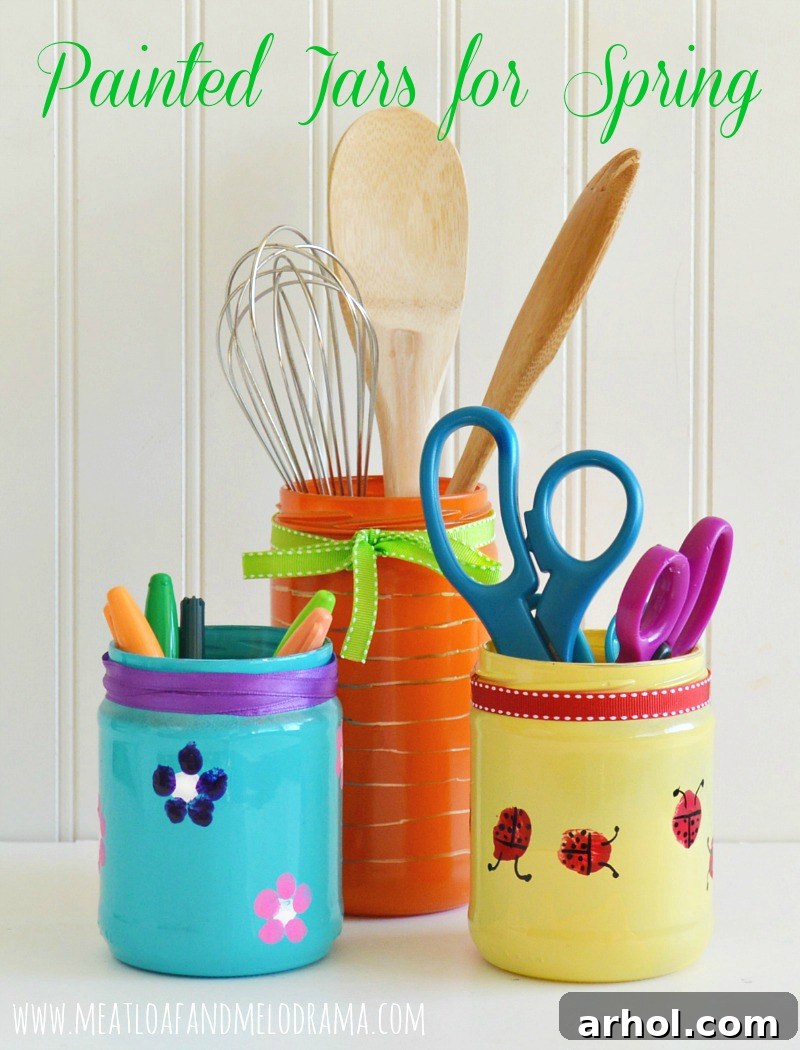
To bring this garden vision to life, I began by imagining how different elements could translate onto the jars. I thought it would be incredibly cute to feature a jar that playfully resembled a carrot. For this, I selected one of the taller jars and gave it a cheerful, vibrant orange coat of spray paint. This instantly established a whimsical, earthy tone for our trio.
Next, I picked up two of the smaller salsa jars. For these, I opted for complementary spring hues. One received a refreshing coat of aqua, reminiscent of clear spring skies or tranquil garden ponds. The other was painted a bright, sunny yellow, embodying the warmth of the spring sun and the cheerfulness of blossoming flowers. These carefully chosen colors not only evoke the beauty of a spring garden but also ensure the jars provide delightful pops of color wherever they’re placed. The combination of orange, aqua, and yellow creates a cohesive yet dynamic set, ready to brighten any room.
Materials You’ll Need for Your DIY Spring Jars:
One of the best aspects of this project is how accessible and budget-friendly the materials are. Most items can be found around the house or at your local craft store without breaking the bank. Here’s what we used to create our vibrant spring jars:
- Empty Glass Jars: We used three salsa jars, but any clean glass jars (mason jars, pickle jars, jam jars) will work perfectly. The varied shapes and sizes add character.
- Spray Paint: Choose colors that evoke spring – we used orange, aqua, and yellow for our garden theme. Ensure you’re in a well-ventilated area and wear appropriate protection when spraying.
- Acrylic Craft Paints: Red, white, pink, purple, and black are excellent choices for adding details. These are great for kid-friendly fingerprint designs.
- Paint Pens (Fine-Tip): A black paint pen for ladybug details and a gold paint pen for carrot lines really make the designs pop.
- Ribbons: Green ribbon for the carrot jar, and other coordinating ribbons for the remaining jars, to add a finishing touch around the neck.
- Craft Glue: To secure the ribbons.
- Paper Plates or Palettes: For squeezing out paints.
- Optional: Clear Sealant Spray: To protect your painted designs, especially if the jars will be handled frequently or used outdoors.
- Old Newspaper or Drop Cloth: To protect your work surface.
Step-by-Step Guide to Crafting Your Spring Jars:
1. Preparing and Base Coating Your Jars:
Start by thoroughly cleaning your empty jars. Remove any labels and wash them with soap and water, then allow them to dry completely. Any residue or moisture can prevent the paint from adhering properly. Once dry, take your jars to a well-ventilated area, preferably outdoors. Lay down newspaper or a drop cloth. Apply an even coat of your chosen spray paint to each jar. We used orange for the tall jar, and aqua and yellow for the two smaller ones. It’s often best to apply several thin coats rather than one thick one, allowing ample drying time between each coat for a smooth, durable finish. This base layer creates the perfect canvas for the decorative elements to come.
2. Involving the Kids: Fingerprint Ladybugs and Flowers:
One of the highlights of any craft project for me is getting the kids involved. It’s not just about the final product; it’s about the joy of creating together. For these jars, we decided to use their fingerprints to make adorable ladybugs and whimsical flowers.
I squirted some vibrant red acrylic paint onto a paper plate and guided my little guy to press his thumb into the paint, then onto the yellow jar, creating the bodies of the ladybugs. He wasn’t entirely thrilled with the idea of making ladybugs at first – sometimes their artistic preferences are quite specific! – but I knew the bright red would create a striking contrast against the sunny yellow, making for a truly eye-catching design. Perhaps next time, I’ll need to prepare another jar for him to make spiders or whatever creature captures his imagination! It’s all part of nurturing their individual creativity.
My little Diva, on the other hand, was more than eager to lend her artistic talents to the flower jar. She happily used her finger to create the white centers of the flowers on the aqua jar. Following that, she dipped her fingers into beautiful shades of pink and purple acrylic paints to form the delicate petals around each white center. Her enthusiasm was infectious, and the vibrant colors instantly brought the aqua jar to life, transforming it into a charming floral display.
3. Adding the Finishing Touches: Details and Embellishments:
Once the initial fingerprint designs were dry, it was time to add those crucial details that truly bring the characters to life. Since her brother had moved on to other captivating activities, my little Diva enthusiastically took over the task of completing the ladybugs. She carefully used a black fine-tip paint pen to add the distinctive dots to the ladybug bodies and draw on their tiny heads and antennae. This step instantly transformed simple red thumbprints into recognizable, charming insects.
For the orange carrot jar, I grabbed a gold paint pen. With a steady hand, I drew vertical lines down the body of the jar, mimicking the natural texture and ridges of a real carrot. This simple addition greatly enhanced its resemblance to a garden vegetable. To complete the look, I tied a pretty green bow around the neck of the carrot jar, symbolizing the leafy greens that sprout from the top. For the other two jars, I chose coordinating ribbons and glued them neatly around their necks. With these final decorative touches, the entire project was officially complete – a collection of charming, handcrafted spring jars ready to adorn our home!
Transforming Jars into Functional & Frugal Home Decor
Beyond their aesthetic appeal, these painted jars are wonderfully functional, adding both organization and vibrant color to any space. The tall carrot jar has found its perfect home in our kitchen, now serving as a charming holder for cooking utensils. It keeps spatulas, whisks, and spoons neatly organized and within reach, while also adding a whimsical touch to the countertop. The smaller jars are equally versatile; one now elegantly holds pens and pencils on a desk, while the other keeps scissors and other craft supplies tidy.
I absolutely adore the bright, cheerful pops of color these jars introduce to the room. They instantly uplift the atmosphere, bringing the fresh, lively essence of spring indoors. And the best part? I didn’t spend a single penny on new materials for this project! Everything was either repurposed from items we already had or made from craft supplies stocked in my home. Isn’t it wonderful how satisfying and rewarding frugal crafts can be? It just goes to show that sometimes, holding onto things (in moderation, of course!) really pays off when inspiration strikes.
These delightful flower and ladybug jars also make fantastic, heartfelt gifts. With Mother’s Day approaching, they would be a truly thoughtful and personalized present, made with love. It’s never too early to start thinking ahead for those special occasions! Imagine filling them with a small bouquet of wildflowers or a selection of fancy pens – a gift that’s both beautiful and practical.
Thank you SO much for taking the time to visit and share in our crafting adventure. I hope these DIY painted jars inspire you to look at your own “empty” containers with new eyes and discover the joy of creating something beautiful and useful. Happy spring to you all, and happy crafting!