
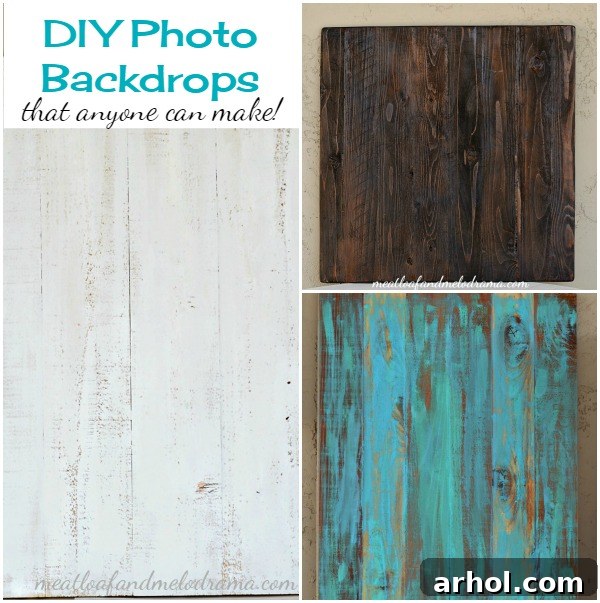
In today’s visually driven world, captivating imagery is no longer a luxury but a necessity, especially for food and craft bloggers, social media enthusiasts, and small business owners. High-quality photographs can transform how your audience perceives your creations, making them more engaging, professional, and appealing. However, achieving that polished look often seems daunting, conjuring images of expensive studio equipment and professional photographers. What if we told you that stunning, professional-grade photo backdrops are not only within reach but can be crafted by anyone with a few basic supplies and a willingness to get a little creative? Welcome to the world of DIY photo backdrops – an incredibly inexpensive and surprisingly easy way to elevate your photography game.
Many content creators, myself included, start their journey with less-than-ideal photography setups. I vividly remember photographing dishes on our dining room table, often under artificial light – a common beginner’s mistake that resulted in unflattering shadows and dull colors. The journey to better photography is a learning curve, and one of the most impactful lessons I’ve learned is the unparalleled importance of natural light. While I’m certainly not a photography expert, I’ve discovered that harnessing natural light, often found simply by a window or outdoors, can drastically improve the quality of your images. This discovery quickly highlighted another need: a collection of versatile, portable backdrops.
Why are backdrops so crucial? They set the scene, add texture, provide contrast, and help your subject truly pop. Imagine a beautifully plated dish or an intricately crafted item; its presentation can be significantly enhanced or detracted from by what lies behind it. Professional food and craft photographers often utilize surfaces like old, chippy, rustic wood or sleek, elegant marble. These textures and tones provide a rich visual foundation that complements the subject without overpowering it. However, not everyone has an antique barn door or a gourmet kitchen with marble countertops readily available. That’s precisely where DIY photo backdrops come in. You don’t need special tools or a hefty budget to replicate these coveted surfaces. Anyone can learn to create their own custom photography backgrounds, perfectly tailored to their unique style and needs.
How to Make DIY Photo Backdrops for Food and Craft Blogs
Essential Supplies for Crafting Your Own Photography Backdrops
The beauty of these DIY projects lies in their simplicity and the accessibility of materials. You likely won’t need to visit a specialized art store; most items can be found at your local hardware store or craft supply outlet. Here’s a detailed look at what you’ll need:
- Wooden Fence Boards or Wood Boards (any size): These are your primary canvas. Fence boards (like 1x3s) often have a rougher, more rustic texture, perfect for distressed looks. Smoother boards (like 1x6s or plywood) offer a cleaner surface. Consider the size based on your typical photography subjects – larger boards provide more flexibility.
- Sandpaper: Essential for smoothing rough edges or distressing surfaces to create an aged look. Keep a variety of grits on hand, from coarse (80-100 grit) for initial shaping to fine (180-220 grit) for a silky finish.
- Paint or Wood Stain: This is where your backdrops come to life. Latex or acrylic paints are versatile and come in a vast array of colors. Wood stains allow the natural grain of the wood to show through, offering warmth and depth.
- Wood Glue or Tacky Glue: For securely joining multiple wood boards together to create larger backdrops. Tacky Glue is a popular choice for its strong bond and ease of use.
- Vinyl Floor Tiles: An ingenious solution for mimicking the look of marble, concrete, or other tiled surfaces. Peel-and-stick options make this incredibly easy.
- Beadboard: This lightweight paneling offers a classic, textured, often farmhouse-style look. It’s fantastic for bright, clean backdrops or vertical backgrounds.
Beyond these primary supplies, a few basic tools will also come in handy: a paintbrush or roller for applying paint/stain, a utility knife for trimming tiles, and possibly clamps or heavy books to hold glued boards together while they dry. The “Hubs” in my life is quite handy, but for those less inclined to DIY cutting, remember that many hardware stores, like Home Depot, offer cutting services for lumber, saving you time and effort.
Step-by-Step Guide to Creating Various DIY Photo Backdrops
1. The Versatile Wooden Board Backdrops
Wooden backdrops offer endless possibilities for texture and color, from rustic farmhouse to sleek modern. The first step, if you’re joining multiple boards, is to create your base. Whether you choose rough fence posts or smooth lumber, ensure the boards are cut to your desired dimensions. For a typical photography surface, a size like 24×24 inches or 24×36 inches offers ample space. Once cut, apply a generous bead of wood glue along the long edges of the boards you intend to join. Press them together tightly, ensuring a flat surface, and allow them to dry completely. For extra security, you can use clamps or place heavy objects on top to maintain pressure during the drying process, typically 12-24 hours depending on the glue.
Once the glue is fully cured, it’s time for sanding. The amount of sanding depends on the desired finish. For a truly rustic look, a light sanding with medium-grit sandpaper (120-150 grit) just to smooth any splinters or sharp edges is sufficient. If you prefer a smoother surface, work your way up to finer grits (220 grit) for a polished feel. After sanding, wipe away all dust with a damp cloth before moving on to painting or staining.
Crafting Specific Wooden Looks:
a. Rustic White Wood Backdrop
This classic look is incredibly versatile and brightens any food or craft photo. To achieve a rough, distressed white finish, use white latex paint and a dry brush technique. Dip your brush sparingly into the paint, then wipe off most of the excess. Lightly drag the brush across the wood grain, allowing some of the natural wood to show through. This creates a weathered, ‘chippy’ effect. You can layer multiple thin coats until you reach your desired opacity, ensuring each coat is dry before adding the next. This board, for instance, started its life as a festive mantel decoration before becoming a go-to for vibrant food shots.
b. Vibrant Turquoise Rustic Board
A pop of color can bring life to your seasonal photography. For a super rustic turquoise board, the dry brush technique is again your best friend. Some prefer to stain the wood first for depth, then apply a lighter color over it. However, a simpler approach is to use a dry brush with aqua or turquoise paint, lightly ‘slapping’ it onto the rough surface. This allows the natural wood or even an underlying base coat to peek through, enhancing the distressed appeal. This vibrant backdrop is perfect for spring and summer-themed dishes or crafts, adding a refreshing visual element.
c. Aged and Weathered Wood Effect
Achieving an aged, sun-bleached, or weathered wood look is simpler than you might think, and it avoids the strong odors often associated with traditional wood stains. Instead of stain, dilute brown and grey latex or acrylic paints with water (start with a 1:1 ratio and adjust for desired transparency). Apply this watery mixture to the wood with a brush or cloth, allowing it to soak into the grain. You can wipe off excess immediately for a lighter wash or let it sit longer for a deeper tone. Layering different shades of diluted brown and grey can create incredible depth, mimicking years of natural weathering. This method is fantastic for fall, Halloween, or any theme that benefits from a natural, worn aesthetic.
d. Dark, Moody Stained Wood
For those dramatic, rich, and “moody” food shots, a dark stained wood backdrop is indispensable. For this, smooth 1×6 boards work wonderfully, as they offer a consistent surface for the stain to penetrate evenly. Choose a deep walnut, espresso, or ebony wood stain. Apply the stain according to the product instructions, usually with a brush or rag, allowing it to sit for a specified time before wiping off the excess. You may apply multiple coats to achieve your desired depth of color. Remember to work in a well-ventilated area due to stain fumes. Once dry, a dark stained board creates a sophisticated and intense backdrop that makes bright foods visually pop against the deep background, drawing the viewer’s eye straight to your subject.
2. The Elegant Faux Marble Counter Backdrop
Marble is synonymous with luxury and clean aesthetics, but a real marble slab is heavy and expensive. Enter the faux marble backdrop! This ingenious solution uses vinyl floor tiles, particularly peel-and-stick varieties, applied to a sturdy wood board. Start with a smooth, flat piece of plywood or a joined wooden board. Choose vinyl tiles with a marble pattern that you love; they come in various sizes and veining styles. Lay out your tiles on the board to plan your arrangement, ensuring seams align neatly. Then, peel off the backing and firmly press each tile onto the board, working outwards from the center to avoid air bubbles. The sturdy wood base makes it durable and portable. The main drawback might be the visible lines where the tiles meet, but these are often minor and can be easily edited out in post-production with a bit of cropping or cloning. This backdrop is perfect for showcasing delicate pastries, vibrant salads, or any item that benefits from a bright, clean, and elegant presentation.
3. The Simple and Bright Beadboard Backdrop
For the absolute easiest backdrop, look no further than beadboard. This lightweight paneling, typically used for decorative wall coverings, features characteristic vertical grooves that add subtle texture without distraction. You can purchase a large sheet and have it trimmed down at the hardware store to a more manageable and portable size – again, around 24×24 or 24×36 inches is ideal. Painting it a crisp white instantly creates a clean, bright canvas that works beautifully as both a flat surface and a vertical background. It provides a timeless, slightly farmhouse-chic aesthetic that makes your subjects stand out with natural radiance. Its lightweight nature also makes it incredibly easy to move and position for optimal natural lighting conditions.
Advanced Tips for Maximizing Your DIY Backdrops
- Storage and Maintenance: Store your backdrops flat or leaning against a wall in a dry place to prevent warping. For painted or stained wood, a quick wipe with a damp cloth is usually enough to clean them. Vinyl tile backdrops are exceptionally easy to clean with soap and water.
- Experiment with Two-Sided Backdrops: To maximize efficiency and save space, consider creating two different looks on opposite sides of a single board. For example, a rustic white on one side and a dark stain on the other.
- Consider Texture and Reflectivity: Matte finishes are generally preferred for backdrops as they prevent unwanted glare. However, some reflective surfaces, like the faux marble, can add a beautiful subtle sheen to your photos.
- Natural Light is Key: No matter how beautiful your backdrop, natural light remains the most crucial element for stunning photography. Position your setup near a large window, ideally out of direct harsh sunlight, or outdoors in diffused light.
And there you have it! With these simple instructions and readily available materials, you can craft a diverse collection of professional-looking photo backdrops without draining your wallet or requiring specialized tools. These DIY solutions empower you to create compelling visual content, elevating your blog posts, social media feeds, and product showcases. The ability to customize your backgrounds means you can perfectly match your brand aesthetic and the mood of your subjects, ensuring every photograph tells a captivating story.
While backdrops provide the essential stage, props are another powerful element that can truly enhance your photography. But that’s a story for another time, a detailed post perhaps focusing on styling and prop selection. For now, unleash your creativity and start building your own library of stunning photography backgrounds.
Do you already make your own photography backgrounds, or are you inspired to give it a try?
Happy Crafting,
Sharing At
Weekend Retreat