
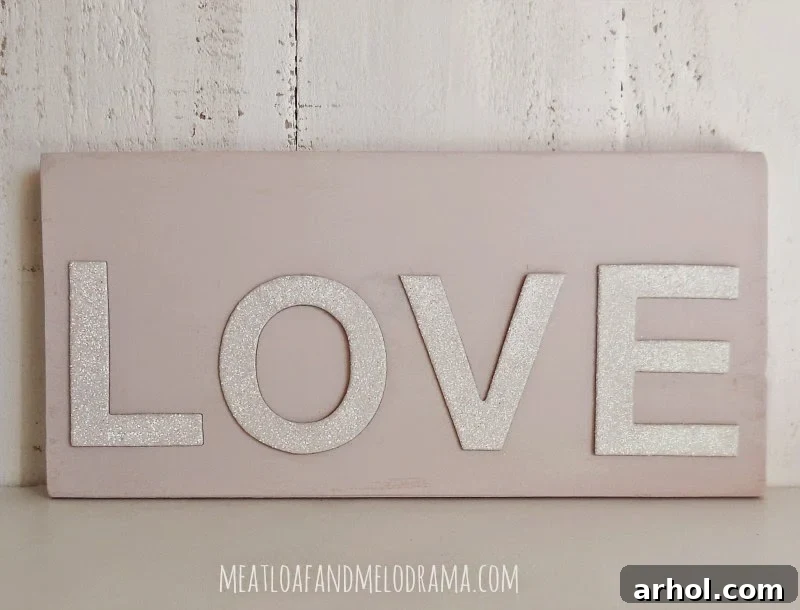
Crafting Joy: Your Guide to an Effortless DIY Love Sign for Valentine’s Day
Hello, fellow craft enthusiasts and home decorators! As the season of love approaches, I’ve been immersed in the delightful task of curating a charming Valentine’s Day mantel display. Today, I’m absolutely thrilled to share the star of this setup: a remarkably simple yet utterly captivating DIY Love Sign. Seriously, this project is so straightforward, it might just be the easiest sign I’ve ever brought to life. Initially, I hadn’t even planned on dedicating a whole post to it, but its incredible ease and the sheer joy it brings compelled me to show you how anyone can create a beautiful, personalized sign – even if you’re short on time, working with a tight budget, or don’t have a workshop full of specialized tools. This project is a testament to the fact that stunning decor doesn’t have to be complicated or costly.
In a world bustling with complex DIY ideas, there’s something truly refreshing about a project that delivers maximum impact with minimal effort. This “Love” sign embodies that spirit perfectly. It’s not just a decoration; it’s a heartfelt statement, a touch of whimsy, and a celebration of creativity that anyone can embrace. Whether you’re sprucing up your living space for Valentine’s Day, looking for a thoughtful handmade gift, or simply want to add a splash of personalized charm to your home, this tutorial is designed for you. Let’s dive into creating a piece that radiates warmth and affection, proving that sometimes, the simplest projects yield the most beautiful results.
Why DIY Your Valentine’s Day Decor?
Embracing DIY projects, especially for seasonal decor like Valentine’s Day, offers a multitude of benefits beyond just saving money. Firstly, it allows for unparalleled personalization. Instead of generic store-bought items, you create pieces that truly reflect your style, color preferences, and the unique atmosphere of your home. Each brushstroke and placement of a letter adds a touch of your own personality, making your decor truly one-of-a-kind. Secondly, crafting can be incredibly therapeutic. The process of focusing on a creative task can be a wonderful way to unwind, de-stress, and channel your energy into something positive and productive. There’s immense satisfaction in seeing your vision come to life through your own hands. Thirdly, handmade decor often carries a deeper sentimental value. When guests admire your “Love” sign, you can proudly say you made it yourself, perhaps even sharing the story behind its creation. Finally, it’s an excellent way to be resourceful and sustainable. Repurposing materials you already have, like scrap wood or old signs, reduces waste and gives forgotten items a new lease on life, transforming them into cherished decorative elements.
Gather Your Simple Supplies for This Heartfelt Project
One of the most appealing aspects of this DIY Love Sign is its reliance on readily available and often inexpensive materials. You truly don’t need a huge craft store haul to get started. Here’s what you’ll need, along with some helpful tips for sourcing:
Materials:
- Wood Board or Canvas: I always keep a collection of scrap wood on hand for projects like this, sourced from previous home improvement tasks or reclaimed pieces. If you don’t have any spare wood, a small pre-cut wood board can be purchased affordably at craft stores or hardware shops. Alternatively, a canvas provides an excellent, lightweight surface. You can even repurpose an old picture frame backing or paint over an existing sign you no longer love – it’s a fantastic way to give items a second life!
- Paint: For this project, I opted for a beautiful light pink shade, specifically Annie Sloan’s Antoinette chalk paint. Chalk paint is fantastic because it adheres well to almost any surface with minimal prep, dries quickly, and offers a lovely matte finish. However, don’t feel limited! Any brand or type of paint will work wonders – acrylic craft paint, latex wall paint samples, or even spray paint can achieve a great look. Choose a color that complements your existing decor or the specific holiday theme you’re aiming for.
- Lettering: I used pre-cut glittery white cardboard letters to spell out “LOVE,” which I picked up on sale a while back. These are incredibly convenient and add a lovely sparkle. Other options include wooden letters, foam letters, stenciling the word “LOVE” onto your board, or even freehanding the letters if you’re confident in your calligraphy skills. Vinyl decals are another super easy option that offers a clean, professional finish.
- Strong Adhesive: Craft glue, wood glue, or a hot glue gun will work perfectly for attaching your letters securely to the wood.
Tools:
- Paintbrush or foam roller
- Small dish or palette for paint
- Pencil (for marking letter placement, optional)
- Ruler or tape measure (for even letter placement, optional)
- Scissors or craft knife (if cutting your own letters)
Your Step-by-Step Guide to Crafting a Beautiful DIY Love Sign
Ready to unleash your inner artist? This project is designed to be enjoyable and stress-free. Follow these simple steps to create your own charming “Love” sign:
Step 1: Preparing Your Wood Surface
Before applying any paint, it’s a good idea to ensure your wood board is clean and smooth. If your wood has rough edges or splinters, a quick sanding with fine-grit sandpaper will make a significant difference in the final finish. After sanding, wipe down the surface with a damp cloth to remove any dust or debris, then allow it to dry completely. If you’re using a repurposed piece of wood or an old sign, ensure it’s free from grease or dirt. For chalk paint, often no primer is needed, which is another reason it’s perfect for quick projects. If you’re using a very dark surface with light paint, or a type of paint that benefits from it, a coat of primer can help achieve true color more quickly.
Step 2: Painting Your Base Color
Now for the fun part: adding color! I chose a delightful light pink (Annie Sloan’s Antoinette) to complement a wreath I had just finished, aiming for a soft and romantic aesthetic for my Valentine’s mantel. Pour a small amount of your chosen paint into a disposable dish. Using a paintbrush or foam roller, apply an even coat of paint to the entire surface of your wood board. For chalk paint, you’ll notice it goes on beautifully and covers well. Allow the first coat to dry completely – this usually takes about 15-30 minutes for chalk paint or acrylics. Depending on the color and type of paint, you may need a second coat to achieve full, opaque coverage. Always let each coat dry thoroughly before applying the next to prevent streaking and ensure a smooth finish. Don’t be afraid to experiment with different colors; a vibrant red, a soft lavender, or even a neutral white can look equally stunning depending on your decor scheme.
Step 3: Adding Your “LOVE” Letters
Once your painted base is completely dry, it’s time to add the word “LOVE.” I used glittery white cardboard letters, which instantly add a touch of sparkle and festivity without any extra effort. Carefully arrange your letters on the painted board to determine the perfect spacing and alignment. You might want to use a ruler to ensure they are evenly spaced and straight, especially if you’re particular about symmetry. Once you’re happy with the placement, apply a small amount of strong adhesive to the back of each letter. Press each letter firmly onto the wood board, holding it in place for a few seconds to ensure a good bond. If you’re using a hot glue gun, work quickly as the glue dries fast. For craft glue, give it ample time to set according to the product instructions. The contrast of the glittery white against the soft pink background creates a beautiful, eye-catching effect that’s just perfect for Valentine’s Day!
Step 4: Optional Embellishments and Finishing Touches
While the sign is absolutely beautiful in its simplicity, you can always add a few extra touches to make it even more unique and polished. Consider these optional enhancements:
- Distressing: For a rustic or farmhouse look, lightly sand the edges and corners of your sign after the paint and glue have dried. This will reveal some of the natural wood underneath, adding character.
- Sealant: If your sign will be placed in a high-traffic area or exposed to any moisture, a clear protective sealer (like a polycrylic spray or brush-on varnish) can help protect the paint and letters. A matte finish sealer will maintain the chalk paint look, while a gloss sealer will add shine.
- Ribbons or Bows: Attach a small satin or lace ribbon bow to one corner of the sign using hot glue for an extra touch of romance.
- Glitter or Rhinestones: If your letters aren’t already glittery, you can add a touch of fine craft glitter around the edges of the letters or tiny self-adhesive rhinestones for extra sparkle.
- Hanging Hardware: If you plan to hang your sign on a wall, attach a sawtooth hanger to the back. For mantel display, it’s perfect as is!
Displaying Your Radiant DIY Love Sign
The true beauty of this DIY Love Sign shines when it’s integrated into your home decor. Its versatility means it can enhance almost any space. On a mantel, it becomes an instant focal point, beautifully complementing other Valentine’s Day accents like candles, floral arrangements, or small decorative trinkets. I especially love how the glittery letters catch the light, adding just the right amount of sparkle and warmth – making it feel special enough for Valentine’s Day without being overly elaborate. Imagine it nestled amongst flickering fairy lights or elegant vases, creating a romantic ambiance. Beyond the mantel, this sign also works wonderfully on shelves, coffee tables, or as part of a gallery wall. You could even lean it against a wall on a bedside table for a sweet, everyday reminder of love. Given its simple design, it effortlessly blends with various decor styles, from modern minimalist to cozy farmhouse chic. It’s a statement piece that speaks volumes with its handmade charm.
Tips for Customization and Beyond Valentine’s Day
This DIY Love Sign project is incredibly adaptable, allowing you to personalize it for any occasion or recipient. Instead of “LOVE,” consider spelling out “HOME,” “JOY,” “PEACE,” or a family initial. Change the paint colors to match different seasons or holidays – think rich oranges and browns for fall, festive reds and greens for Christmas, or bright pastels for spring. You could use different fonts for your letters or incorporate various textures like felt, fabric, or even natural elements like pressed flowers for unique designs. This simple technique can be applied to create signs for birthdays, nurseries, or even personalized wedding gifts. The possibilities are truly endless, making this an invaluable project framework for your crafting arsenal. It’s a fantastic way to stretch your creativity and make personalized gifts that are cherished far more than anything store-bought.
This project truly took me less than half an hour from start to finish, and since I already had all the supplies on hand, it was absolutely free! You really can’t beat that combination of speed, affordability, and charm. It’s proof that you don’t need to spend a lot of time or money to create something beautiful and meaningful for your home.
I’m currently putting the finishing touches on my complete Valentine’s Day mantel reveal and the exciting first phase of my kitchen redo, which I’ll be sharing with you all next week – hooray! So, please do make sure to come back and check out all the transformations. I promise you won’t want to miss it.
Thank you so much for stopping by and spending some time with me today. I hope this easy DIY Love Sign inspires you to embrace your creative side and add a personal touch to your home decor. Have a truly wonderful and creatively fulfilling day!