
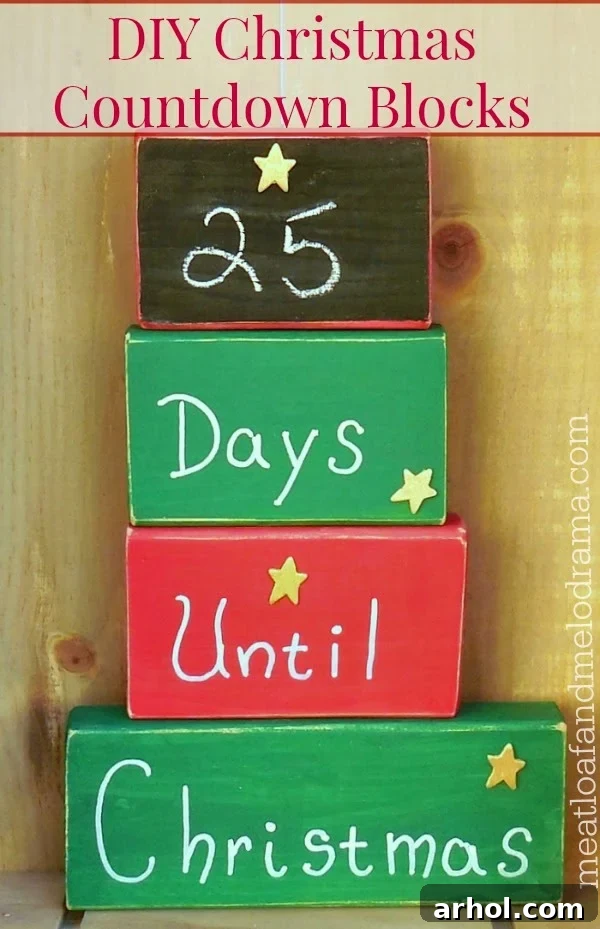
Crafting Joy: Our DIY Wooden Christmas Countdown Calendar
Hello fellow craft enthusiasts and holiday lovers!
As the crisp air of November gives way to the undeniable anticipation of December, our home is already buzzing with Christmas excitement. The festive spirit is truly contagious, especially with eager little ones counting down the days until Santa’s arrival. While the weekends seem to fly by in a whirlwind of activity, we wouldn’t have it any other way. This year, to fuel that delightful anticipation, we decided to embark on a special family project: creating our very own wooden Christmas Countdown Calendar. It’s a simple, rewarding craft that brings everyone together, and the kids absolutely loved helping with the painting!
Why a DIY Christmas Countdown Calendar?
In our home, Christmas is a season of abundance – not just in cheer, but apparently in countdown calendars too! We typically pick up an Advent calendar each year, and we already have a couple of other festive countdowns in various corners. But with five lively children and two parents, one can truly never have too many ways to mark the days until Christmas. Indeed, the more, the merrier! Crafting your own wooden countdown calendar offers a unique blend of benefits that store-bought versions simply can’t match.
Firstly, it’s a wonderful opportunity for family bonding. Spending an afternoon painting, sanding, and decorating together creates cherished memories that become part of your holiday tradition. The collaborative effort fosters teamwork and allows each child to contribute their unique artistic flair. Secondly, a DIY calendar is entirely customizable. You choose the colors, the style, and the embellishments, ensuring it perfectly complements your home’s holiday decor. This project, in particular, was designed to be interactive, allowing the kids to actively participate in changing the “days until Christmas” rather than just passively observing. This hands-on approach cuts down on those inevitable sibling squabbles over whose turn it is to move the marker, adding a little extra peace to the season!
Beyond the practical aspects, there’s an immense sense of pride and accomplishment in creating something beautiful and functional with your own hands. This isn’t just a countdown; it’s a keepsake, imbued with the love and laughter of your family. It stands as a testament to the joy of the season and becomes a unique piece of decor that tells a story, year after year.
Gather Your Crafting Essentials
Ready to start your own festive countdown project? Here’s what you’ll need to create your personalized wooden Christmas blocks:
- 4 Wood Blocks: You can purchase these pre-cut from a craft store, or if you’re handy, cut them yourself from a 2×4 piece of lumber. Choosing varying sizes adds to the visual interest and the “Christmas tree” stacking effect.
- Red and Green Acrylic Paint: Classic Christmas colors are a must! Ensure you have enough for multiple coats to achieve vibrant, even coverage.
- Chalkboard Paint: This is key for the interactive element, allowing you to easily change the numbers daily. A small can or bottle will suffice.
- Paint Pens (White or Light Color): These are fantastic for writing clear, crisp letters on the painted wood. They offer more control than a brush and give a charming, chalk-like appearance once dry.
- Optional Embellishments: Small wooden stars, snowflakes, glitter, ribbons, or even vinyl decals can add extra festive charm to your blocks.
- Fine-Grit Sandpaper: For smoothing edges and creating a rustic, distressed look.
- Paintbrushes: Various sizes for applying base coats and chalkboard paint.
I was fortunate to have a stash of wood blocks on hand, already cut from a 2×4, which simplified the initial steps. I selected four distinct sizes to create a visually dynamic display when stacked. If you’re cutting your own, ensure the ends are smooth and free of splinters before you begin painting.
Step-by-Step Guide to Crafting Your Countdown Blocks
Step 1: Base Coat Painting
Our first step was to apply the base colors. We painted two of the blocks a cheerful festive red. It’s often best to apply two thin coats, allowing each coat to dry completely, to ensure full, opaque coverage without streaks.
Following the red, we then painted the remaining two blocks a vibrant Christmas green. Again, patience with drying time between coats will yield the best results. The kids really enjoyed this part, getting to pick which block got which color!
Step 2: Applying Chalkboard Paint
To incorporate the interactive element we desired, we chose one of the red blocks to be our “days until” block. On one side of this red block, we applied several coats of chalkboard paint. This special paint transforms any surface into a writable chalkboard, perfect for scribbling out numbers daily. I found it best to apply 2-3 thin, even coats, allowing sufficient drying time (usually an hour or two) between each coat for a durable, smooth finish. This allows the kids to personally update the countdown, making it much more engaging than simply flipping a number block.
Step 3: Sanding and Lettering
Once all the paint layers were thoroughly dry, I gently sanded the edges of each block. This light sanding not only smooths any rough spots but also creates a charming, slightly distressed, rustic look that beautifully complements holiday decor. It’s a simple step that adds character and depth to your finished pieces. After sanding, I used a white paint pen to write the festive words on the non-chalkboard blocks. I highly recommend paint pens for this task; they offer excellent control for lettering, allowing for neat and precise writing. Plus, the opaque finish of the paint pen gives the text a lovely chalk-like appearance, perfectly tying into the chalkboard element of the calendar. I wrote “DAYS” on one block, “UNTIL” on another, and “CHRISTMAS” on the third, distributing them across the red and green blocks.
Step 4: Adding Embellishments and Finishing Touches
After the paint pen lettering was completely dry, I added a few small wooden stars to the blocks for an extra touch of holiday sparkle. These were simply glued on. This is where you can truly let your creativity shine! Consider adding glitter, small bells, ribbons, or even personalized initial stamps to make your calendar uniquely yours. Once all embellishments were secure and dry, I gave the entire set one final, very light sanding around the edges again, just to further enhance the rustic appeal and ensure all surfaces were smooth to the touch.
Displaying Your Festive Creation
Once completed, these blocks stack beautifully, creating an effect reminiscent of a stylized Christmas tree. The varying sizes and vibrant colors truly pop, making it a focal point in any room. We love placing ours on the mantelpiece, where it can be admired by everyone and easily accessed for the daily number change. It would also look wonderful on an entry table, a bookshelf, or even as a centerpiece on a festive dining table.
I initially set the number to “25” on the chalkboard block, hoping to kick off our countdown precisely on December first. However, I have a feeling the kids will be far too eager and will adjust that number as soon as they walk in the door from school! Their excitement is palpable, and that’s precisely the magic we hoped to capture with this project.
Consider personalizing your blocks further with different fonts, patterns, or even by adding small hooks to hang tiny ornaments for each day. The possibilities for customization are endless, allowing you to create a piece that perfectly reflects your family’s unique holiday style. This durable wooden calendar can be safely stored away after the holidays and brought out year after year, becoming a treasured part of your family’s Christmas traditions.