
Hello, fellow craft enthusiasts and creative parents! Can you believe how quickly summer is approaching? It feels like just yesterday we were enjoying spring, and now the days are getting longer, and the kids are buzzing with anticipation for school to be out. With the promise of sunshine and endless possibilities, my children and I recently gathered for a fun brainstorming session, dreaming up a list of exciting summer craft projects we couldn’t wait to try. Among them, one idea truly sparked their imagination and ours: creating adorable, personalized jewelry.
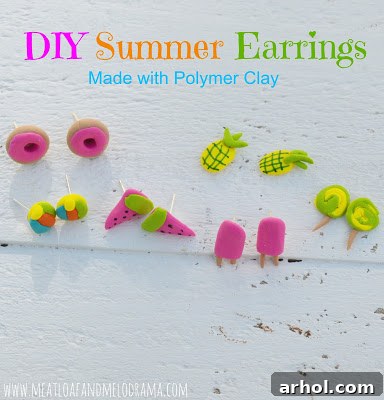
Their absolute favorite material to work with right now is polymer clay. Its vibrant colors, soft texture, and incredible versatility make it a fantastic medium for all sorts of projects. We’ve been captivated by its potential, and it wasn’t long before they decided to dive into making a batch of DIY summer earrings. These delightful little gems are not just accessories; they are miniature celebrations of everything wonderful and whimsical about the summer season, captured in wearable art. From juicy watermelons to sunny beach balls, each pair tells a tiny, joyful story. They truly are incredibly cute and surprisingly simple to create!
Unleashing Creativity: Why Polymer Clay is Perfect for DIY Jewelry
My older girls have been exploring the world of polymer clay crafting for quite some time now. Their passion began with making intricate miniature food items for their shared dollhouse, which quickly evolved into a love for crafting unique earrings. They’ve already created a charming collection, including sweet little Easter-themed earrings a couple of months ago, which were a huge hit. This experience naturally led them to the exciting idea of designing their very own summer jewelry collection.
Polymer clay earrings are an ideal project for several reasons. First, they are incredibly easy and quick to make, even for beginners. This means you can create a stunning pair in a relatively short amount of time, perfect for a spontaneous crafting session. Second, they offer endless possibilities for customization, allowing you to express your personal style or match them to your favorite summer outfits. Finally, they make fantastic handmade gifts! The girls’ friends absolutely adore wearing these unique, custom-made accessories, making them thoughtful and personal presents.
One of the biggest advantages of working with polymer clay is its accessibility. You only need a few basic items to get started, most of which are readily available at any craft store or even around your home. The creative journey itself is incredibly rewarding, fostering imagination, fine motor skills, and a sense of accomplishment. Plus, it’s a wonderful activity to share with family, creating lasting memories along with beautiful wearable art.
Gather Your Crafting Essentials: Supplies for Handmade Polymer Clay Earrings
Before you embark on your journey to create stunning polymer clay earrings, it’s essential to gather all the necessary supplies. The beauty of this craft lies in its simplicity; you don’t need a huge array of specialized tools to get started. Here’s a breakdown of what you’ll need, along with a few tips for selecting the best options:
Supplies for Polymer Clay Earrings
- Polymer Clay: Choose a variety of colors that inspire you and evoke the spirit of summer. Brands like Sculpey or Fimo are popular and widely available. Think bright, cheerful hues like red, yellow, blue, green, and orange for a truly summery palette. Consider purchasing a multi-pack if you’re experimenting with different designs.
- Earring Posts and Backs: These are the essential hardware that will transform your clay creations into wearable earrings. You can easily find them in the jewelry-making section of any craft store. They come in various finishes, such as silver, gold, or bronze, allowing you to match them to your design. Ensure you get both the flat posts (to glue onto the clay shapes) and the corresponding backs.
- Strong Adhesive Glue: A reliable glue is crucial for securely attaching the earring posts to your baked clay shapes. We personally recommend Tacky glue, as it provides a strong, durable bond that holds up well over time. However, any robust craft glue designed for multi-surface adherence should work just fine. Always check the drying time and instructions on your chosen glue.
- Baking Sheet and Aluminum Foil: You’ll need these for baking your polymer clay creations. Line the baking sheet with foil or parchment paper to prevent sticking and for easier cleanup.
- Craft Knife or Blade (Optional): While you can shape clay by hand, a craft knife or a dedicated polymer clay blade can help you achieve cleaner cuts and more intricate details, especially for shapes like watermelon slices or popsicle sticks. Adult supervision is recommended if children are using sharp tools.
- Work Surface: A clean, smooth, non-porous surface is ideal for working with polymer clay. A ceramic tile, glass cutting board, or even a sheet of wax paper can work well.
- Rolling Pin (Optional): A small acrylic rolling pin or even a smooth glass bottle can be useful for flattening clay to a uniform thickness.
- Fine-Tip Markers (e.g., Sharpies): These are fantastic for adding delicate details and accents to your baked clay pieces, such as seeds on watermelon or stripes on a beach ball.
Step-by-Step Guide to Crafting Your Summer-Themed Earrings
Once you have all your supplies ready, the real fun begins! Creating polymer clay earrings is a straightforward process that allows for immense creativity. Here’s a detailed guide to help you craft your own unique summer accessories:
1. Prepare Your Workspace and Clay
Start by setting up a clean, dry workspace. Condition your polymer clay by kneading it with your hands. This softens the clay, making it more pliable and easier to work with. Warmth from your hands will make it more flexible. If the clay is particularly stiff, you may need to work it for a few minutes until it’s smooth and easy to shape.
2. Design and Shape Your Earrings
Now for the most exciting part: creating your shapes! Take small amounts of conditioned clay and let your imagination run wild. The girls focused on popular summer themes, crafting miniature Popsicles, slices of fruit, and vibrant beach balls. You can also explore other ideas like tiny suns, ice cream cones, flip-flops, seashells, or even cute little animals. Remember to keep the shapes relatively small, as they are for earrings.
Important Tip for Thickness: When shaping your designs, be sure not to make the earrings too thick. Overly thick pieces will take much longer to bake thoroughly and may not cure evenly. Aim for a thickness of about 1/4 inch (approximately 6-7 mm) for most designs. This ensures optimal baking and a lightweight, comfortable earring. If you’re using a rolling pin, you can easily achieve a consistent thickness.
3. Bake Your Clay Creations
Once you’ve finished shaping your designs, carefully arrange them on a baking sheet lined with aluminum foil or parchment paper. Make sure the pieces are not touching each other to ensure even baking. Refer to the specific instructions on your polymer clay package for precise baking temperatures and times, as these can vary by brand. Generally, most polymer clays bake at around 275 degrees Fahrenheit (135 degrees Celsius) for about 10 to 15 minutes, or until the shapes are hard and firm to the touch. Avoid over-baking, as this can cause the clay to burn or become brittle.
4. Cool and Attach Earring Posts
After baking, carefully remove the baking sheet from the oven and allow your clay shapes to cool completely. They will be soft when they first come out of the oven but will harden as they cool. Once they are at room temperature, take a small amount of your chosen adhesive glue and apply it to the flat pad of an earring post. Then, firmly press the glued side of the post onto the back of your cooled clay earring shape. Hold it in place for a few seconds to ensure a good initial bond. Repeat this for all your earring pairs.
5. Allow Glue to Dry and Add Details
Once all the earring posts are attached, set your earrings aside and allow the glue to dry completely according to the manufacturer’s instructions. This usually takes several hours, or even overnight, to ensure a strong, lasting bond. Patience here is key to prevent your posts from detaching.
While the glue dries, or even after it’s fully cured, you can add finer details to your earrings. For instance, the girls used fine-tip Sharpie markers to draw the tiny seeds on their watermelon slices and the distinctive lines on their pineapples after the earrings were baked. This step adds character and brings your miniature designs to life. Once the glue is dry, your beautiful, handmade polymer clay earrings are ready to be worn and admired!
Showcasing Your Summer Creations: Fun and Flavorful Designs
It’s truly that easy and quick to create your own unique summer jewelry! The sense of accomplishment when you slip on a pair of earrings you’ve made yourself is incredibly satisfying. Let’s take a closer look at some of the delightful designs my daughters crafted:
Here we have a vibrant orange cream Popsicle, perfectly capturing the refreshing taste of summer treats. Imagine the smiles these will bring on a warm day!
And here’s a dazzling array of other summer-inspired designs: playful beach balls, juicy watermelon slices, tropical pineapples, sweet lollipops, and even more colorful pink Popsicles. The possibilities are truly endless when it comes to shapes and colors you can create with polymer clay. The girls even ventured beyond strictly summer themes, crafting adorable pink frosted donuts. While donuts aren’t exclusive to summer, they’re just too fun to make and wear any time of the year!
The addition of small details, like the lines and seeds on the watermelon and pineapples, was done with fine-tipped Sharpie markers after the earrings were baked and cooled. This simple step can elevate your designs and add a professional touch to your handmade jewelry.
The Joy of Handmade: Beyond Just Earrings
One of the absolute best things about these delightful summer treat earrings? They’re calorie-free! And for me, that’s a huge bonus. More importantly, they represent the joy of creation, the satisfaction of making something beautiful with your own hands, and the fun of sharing that creativity with others.
Have you ever tried making your own earrings or other pieces of jewelry? It’s a surprisingly addictive hobby once you start. The endless array of colors, textures, and techniques available with polymer clay means you can continuously explore new ideas and designs. It’s not just about the final product; it’s about the process, the shared laughter, and the memories made during those creative moments. These DIY polymer clay summer earrings are more than just accessories; they are tiny masterpieces that carry a story, a feeling, and a piece of your heart.
Thank you so much for stopping by and taking a peek at our adventure in crafting these fun and festive DIY polymer clay summer earrings. We hope this guide inspires you to grab some clay and start creating your own wearable works of art. Whether you make them for yourself, as gifts for friends, or as a fun family activity, you’re sure to have a super day filled with creativity and joy!