
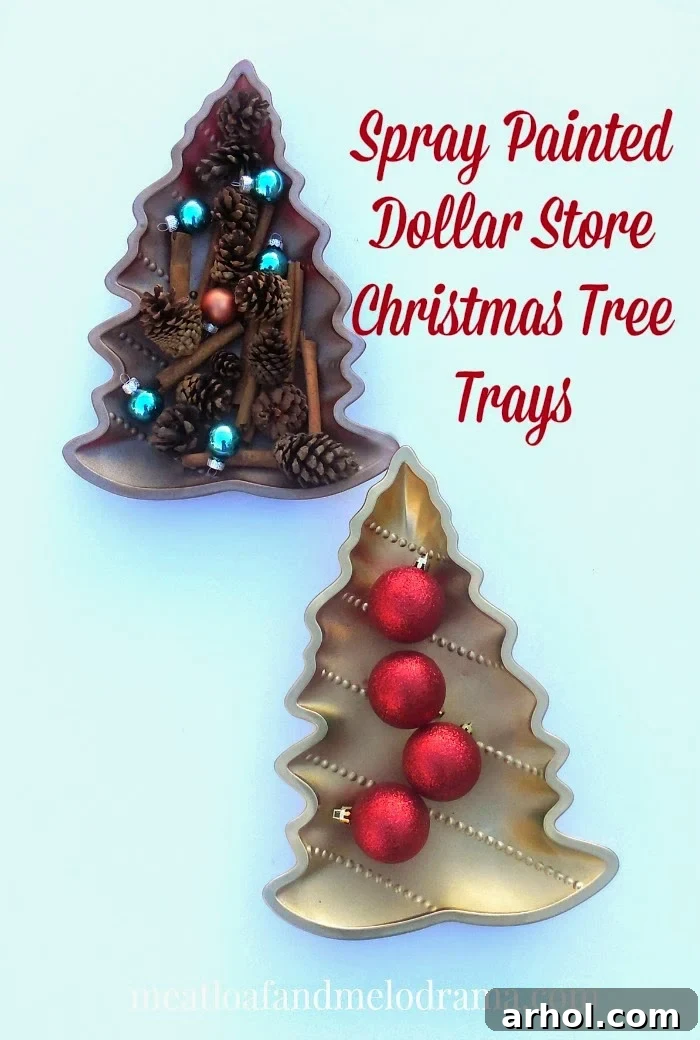
Transform Your Holiday Decor: DIY Metallic Christmas Tree Trays from the Dollar Store
Hello everyone! As a devoted fan of thrifty decorating and ingenious makeovers, I always keep an eye out for potential DIY projects wherever I go. Last week, during a delightful trip to the Dollar Store, I stumbled upon an array of adorable items, each brimming with exciting possibilities for transformation. For me, these stores aren’t just about cheap buys; they’re treasure troves of craftable potential, especially when it comes to decking out my home for the holidays without breaking the bank. Of course, this means my “quick” shopping trips often turn into lengthy expeditions, much to my husband’s amusement (or sometimes, his quiet exasperation!).
From Ordinary to Extraordinary: A Simple Dollar Store Makeover
On this particular visit, a set of cheap plastic candy dishes, shaped like charming Christmas trees, caught my eye. They were plain, unassuming, and exactly the kind of blank canvas I adore. With just a couple of coats of metallic spray paint, these humble dishes were completely reimagined, becoming elegant and festive Christmas Tree trays – a perfect addition to my holiday display!
The Inspiration Behind the Sparkle
This isn’t my first venture into transforming Dollar Store finds. Earlier in the fall, I successfully executed a similar makeover with some plastic leaf-shaped dishes, turning them into beautiful autumnal accents. That experience immediately gave me a clear vision for these Christmas tree dishes. While their original purpose was to hold candy, I’ve found that treats tend to disappear almost instantly around my house, leaving me with empty, somewhat forlorn dishes. Instead, I prefer to use these versatile trays for decorative purposes, filling them with festive elements like pine cones, shimmering ornaments, and fragrant cinnamon sticks. This way, they contribute to the holiday ambiance throughout the season, rather than just for a fleeting moment!
Crafting Rustic Glam: The Spray Painting Process
To achieve that perfect “rustic glam” look, I opted for Rust-Oleum metallic finish spray paint in stunning gold and rich copper. The holiday season practically demands a touch of gold, and these colors perfectly complement each other, adding warmth and sophistication. The process itself is wonderfully straightforward: I started by spraying the bottom of the trays first, ensuring an even, light coat. Once dry to the touch, I flipped them over to meticulously paint the tops, making sure every curve and edge of the Christmas tree shape was beautifully covered.
A Note on Drying Time and Patience
While the gold paint dries almost instantly, allowing for quick progress, the copper shade usually requires a little more patience. I learned this the hard way, as my eager crafting hands sometimes get ahead of themselves! A touch of impatience resulted in some copper-tinged fingers, but thankfully, metallic spray paint washes off skin quite easily. The key is to apply several light coats rather than one thick one, allowing sufficient drying time between each to prevent drips and ensure a smooth, professional finish. Remember to work in a well-ventilated area and use a drop cloth to protect your workspace.
Styling Your New Metallic Masterpieces
Once the paint was thoroughly dry and cured, the fun part began: styling! I filled my newly transformed metallic trays with a delightful combination of pine cone vase filler, fragrant cinnamon sticks, and a selection of small, festive ornaments. These simple additions completed the rustic glam transformation, turning plain plastic into charming holiday centerpieces.
The beauty of this project is its incredible affordability. The ornaments and cinnamon sticks were also Dollar Store finds, and I already had the pine cones on hand. This makes it an incredibly thrifty way to enhance your Christmas decor without a significant investment. Plus, the entire project took hardly any time at all – a huge bonus for busy holiday schedules!
Why You’ll Love This Dollar Store DIY for the Holidays
There are so many reasons to embrace Dollar Store DIYs, especially during the holiday season:
- Unbeatable Value: For just a few dollars, you can create stunning, high-end looking decor pieces that would cost significantly more elsewhere.
- Personalized Touch: Store-bought decorations are lovely, but handmade items infuse your home with unique character and a personal touch that truly makes it feel special.
- Quick & Easy: This project requires minimal supplies and can be completed in an afternoon, making it perfect for last-minute decorating or a fun family craft session.
- Versatility: These trays aren’t just for Christmas! Their metallic finish makes them suitable for general winter decor or even as elegant accents throughout the year.
- Eco-Friendly Upcycling: Giving new life to inexpensive plastic items is a fantastic way to practice sustainability and reduce waste.
Tips for Successful Dollar Store Makeovers
If you’re inspired to try your own Dollar Store transformations, here are a few tips:
- See Beyond the Obvious: Don’t just see a plastic candy dish; envision what it *could be*. A plain vase can become a chic metallic centerpiece, a simple frame can get a distressed look, and plastic toys can become quirky sculptures.
- Prioritize Paintable Surfaces: Look for items made of plastic, glass, wood, or ceramic, as these tend to take spray paint and other finishes beautifully. Avoid highly porous or rubbery materials.
- Prep is Key: Always clean your items thoroughly before painting. A quick wash with soap and water, followed by complete drying, ensures better paint adhesion and a smoother finish.
- Experiment with Finishes: Don’t limit yourself to metallic paints. Explore matte, glossy, chalk paint, or even glitter sprays to achieve different looks.
- Safety First: When using spray paint, always work in a well-ventilated area, preferably outdoors. Wear gloves and a mask to protect yourself from fumes and paint residue.
Frequently Asked Questions About Dollar Store DIYs
Here are some common questions about transforming Dollar Store finds:
- Q: Can I use different colors for this project?
A: Absolutely! While I loved the gold and copper for a rustic glam feel, you could easily use silver, white, red, green, or even glitter spray paints to match your specific holiday theme and personal style. - Q: Are these trays safe for food after painting?
A: It’s generally not recommended to use spray-painted items for direct food contact, even if the paint is non-toxic when dry. The paint can chip or leach chemicals into food. These trays are best used for decorative fillers like pine cones, ornaments, or wrapped candies. - Q: What other Dollar Store items are good for makeovers?
A: The possibilities are endless! Think about glass vases, plastic storage bins, picture frames, ceramic mugs, plastic animal figurines, or even simple baskets. With a little imagination and paint, almost anything can be elevated. - Q: How long will the paint last on these plastic dishes?
A: With proper preparation (cleaning) and allowing the paint to fully cure (which can take up to 24-48 hours depending on the paint and humidity), the finish should be quite durable. For decorative items that aren’t handled roughly, the paint should last for many seasons.
I’ll be proudly setting out these glittering metallic trays right after Thanksgiving, eagerly anticipating the start of the official holiday decorating season. Honestly, where does the time go?!
Have you embarked on any creative Dollar Store decorating projects lately? I’d love to hear about your thrifty finds and transformations!
Thank you for stopping by! Wishing you a wonderfully creative and joyful day!