
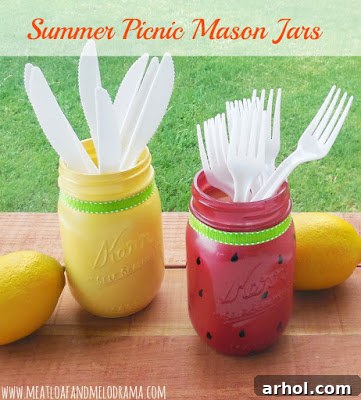
Brighten Your Summer: Easy DIY Watermelon & Lemon Mason Jar Utensil Holders
Summer is synonymous with warm breezes, outdoor gatherings, and the joy of al fresco dining. As the days grow longer and temperatures rise, many of us embrace the casual charm of backyard barbecues, picnics in the park, and relaxed meals on the patio. While the food often takes center stage, creating an inviting atmosphere is just as important. That’s where simple, charming DIY decor can make all the difference!
Today, we’re revisiting a beloved summer craft that perfectly blends functionality with vibrant aesthetics: fruit-inspired mason jar utensil holders. These delightful creations are not only incredibly easy to make but also add an instant pop of color and personality to any setting, whether it’s your kitchen island, a picnic blanket, or a festive cookout table. I originally crafted these for a contributor post, and with summer just around the corner once more, it’s the perfect time to share this timeless project with you all.
Imagine your summer spread, with delicious grilled treats and fresh salads, and beside it, these cheerful watermelon and lemon jars neatly holding forks, knives, and spoons. They’re not just practical; they’re a conversation starter, infusing your space with the lighthearted spirit of the season. Let’s dive into how you can easily create these charming accents for your own summer celebrations!
The Enduring Appeal of Mason Jars in DIY Projects
It’s no secret that mason jars hold a special place in the hearts of crafters and home decorators alike. Their classic shape, durability, and incredible versatility make them a go-to choice for countless DIY projects. From preserving food to creating stunning decorative pieces, mason jars are a blank canvas for creativity.
For this project, we’re opting for spray paint to achieve a vibrant, smooth, and durable finish. While chalk paint offers a lovely matte, rustic look, spray paint provides a glossy sheen that truly makes these fruit designs pop. Plus, for items that will be handled frequently, moved between indoor and outdoor settings, and potentially exposed to the elements, spray paint often offers superior resilience and a more protective coating, ensuring your beautiful creations last through many summers to come.
The choice of paint method is crucial depending on the intended use and desired aesthetic. Given that these jars are designed for practical use at lively gatherings, a sturdy, shiny finish from spray paint is an ideal choice, perfectly capturing the fresh and cheerful essence of summer fruits.
Supplies for Your Fruit-Inspired Painted Mason Jars
Gathering your materials is the first exciting step in any DIY adventure. For these charming fruit-themed jars, you’ll need just a few simple items, most of which you might already have on hand or can easily find at any craft store or even a hardware store.
- Mason Jars: Any size will work, but quart-sized jars are excellent for holding a good amount of utensils. Ensure they are clean and dry before painting.
- Red and Yellow Spray Paint: Choose bright, vivid shades that truly evoke the colors of a ripe watermelon and a zesty lemon. Look for paints suitable for glass and ensure they have a glossy finish for that fresh, vibrant look.
- Black Permanent Marker (e.g., Sharpie): A fine-tip or medium-tip marker will be perfect for drawing the distinct watermelon seeds. Ensure it’s permanent to withstand handling.
- Green Ribbon: A medium-width green ribbon will serve as the “rind” for both your watermelon and lemon jars, adding a lovely textural element and a pop of contrasting color.
- Strong Craft Glue: A clear-drying, strong adhesive that works well on glass and fabric will be essential for securing your ribbon firmly in place.
- Optional: Drop Cloth or Newspaper: To protect your work surface from spray paint.
- Optional: Painter’s Tape: If you want very crisp lines, though not strictly necessary for this design.
Step-by-Step Guide to Crafting Your Summer Mason Jars
With your supplies ready, let’s begin the creative process! These steps are straightforward, making this an ideal project for crafters of all skill levels.
Preparation is Key
Before you even think about paint, ensure your mason jars are thoroughly clean and completely dry. Any dust, grease, or moisture can prevent the paint from adhering properly, leading to an uneven or peeling finish. A quick wash with soap and water, followed by a good rinse and air dry, should do the trick. If you’re eager, you can gently wipe them down with rubbing alcohol for an extra clean surface, then let them dry completely.
When working with spray paint, always choose a well-ventilated area, preferably outdoors or in a garage with open doors. Lay down a drop cloth, old newspapers, or cardboard to protect your workspace from overspray. Wearing gloves is also a good idea to keep your hands clean.
Painting Your Mason Jars: The Foundation of Your Fruit Design
Now for the fun part! Take your clean jars and turn them upside down. This method is highly recommended as it allows you to paint the entire exterior surface evenly, including the lip, without having to handle the wet paint. It also minimizes drips and ensures excellent coverage.
For the watermelon jar, apply several light, even coats of red spray paint. For the lemon jar, use the yellow spray paint. The key to a smooth, professional-looking finish is to apply multiple thin coats rather than one thick coat. A thick coat is more likely to run, drip, and result in an uneven texture. Hold the can about 6-8 inches away from the jar and use a steady, sweeping motion. Allow each coat to dry to the touch for about 10-15 minutes before applying the next.
Depending on the paint and the original color of the jar, you might need 2-3 coats to achieve full, opaque coverage. Once you’ve applied the final coat, let the jars dry completely. Warm weather naturally speeds up drying time, but patience is still a virtue here. A full cure can take 24-48 hours, even if the surface feels dry sooner. This waiting period ensures the paint is hardened and durable.
Adding the Green Ribbon “Rind”
Once your painted jars are fully dry to the touch, it’s time to add the charming green ribbon detail. This ribbon will represent the rind of both the watermelon and, for our lemon jar, provide a complementary accent that mimics the green zest often seen in citrus themes.
Measure a piece of green ribbon that can comfortably wrap around the top rim of each jar, with a slight overlap for gluing. Apply a thin line of strong craft glue around the top edge of the jar, just below the threaded neck. Carefully press the ribbon into place, ensuring it’s straight and taut. Hold it for a few moments to allow the glue to set. You can also use a small clothespin or binder clip to hold the overlapping ends together while the glue dries completely for a seamless finish.
The green ribbon provides a beautiful contrast to the bright red and yellow, instantly giving the jars their distinct fruit character. This simple step adds depth and visual interest, elevating a plain painted jar into a themed decorative piece.
Drawing the Watermelon Seeds
This step brings the watermelon jar to life! With your black permanent marker, carefully draw tear-shaped or oval “seeds” onto the red painted surface. There’s no need for perfect precision here; the natural variation in seed placement and size will make your watermelon jar look even more authentic and charming.
Experiment with different seed densities – some areas might have more, some less, just like a real watermelon slice. For a truly professional look, you might test your marker on a scrap piece of paper or an inconspicuous spot on the jar first to get a feel for the ink flow. This simple detail transforms the red jar into an unmistakable watermelon delight.
While the original design for the lemon jar doesn’t include additional drawn details, you could, if desired, add small, subtle lines with a yellow or light green marker to mimic lemon zest or texture, though the green ribbon already provides a wonderful accent.
Final Touches and Curing Time
Once the marker ink is dry (which usually only takes a few seconds), your fruit-inspired mason jar utensil holders are essentially complete! However, for maximum durability and longevity, especially if they’ll be used outdoors or washed, it’s highly recommended to allow the paint to fully “cure” for at least 24-72 hours before heavy use or washing. This allows the paint to harden completely, making it more resistant to chips and scratches.
During this curing period, keep the jars in a dry, room-temperature environment away from excessive humidity. Once cured, they are ready to beautifully adorn your picnic table, hold straws for a summer party, or simply brighten your kitchen counter with their cheerful presence.
Beyond Utensil Holders: Creative Uses for Your Painted Mason Jars
While these fruit-themed jars are perfect for holding utensils, their versatility extends far beyond that! Don’t limit your imagination. Here are a few more ideas to inspire you:
- Vases: Fill them with fresh-cut flowers from your garden for a charming centerpiece. Yellow jars with sunflowers or red jars with daisies would be stunning.
- Party Favors: Fill small versions with candies or treats for guests to take home after a summer party.
- Desk Organizers: Keep pens, pencils, and other office supplies tidy with a splash of color.
- Candle Holders: Place a small votive or tea light inside for a soft, ambient glow during evening gatherings (ensure ventilation and safety, especially with spray paint, or opt for battery-operated candles).
- Gift Packaging: Present homemade jams, cookies, or a small gift in a beautifully painted jar for an extra personal touch.
- Bathroom Storage: Organize cotton balls, Q-tips, or hair ties on your vanity.
Care and Maintenance Tips
To ensure your beautiful painted mason jars remain vibrant and chip-free for as long as possible, a little care goes a long way. Hand washing is highly recommended. Gently wipe the exterior with a damp cloth if it gets dirty. Avoid scrubbing aggressively or soaking the jars, as this can compromise the paint finish and glue. If you use them for liquids or items that require frequent cleaning, consider spray painting only the exterior and not the interior to maintain food safety and ease of cleaning for the inside.
Embrace the Joy of Summer Crafting
Creating these watermelon and lemon mason jar utensil holders is more than just a craft; it’s an invitation to embrace the cheerful and laid-back spirit of summer. They’re a testament to how simple DIY projects can add so much character, organization, and joy to your home and gatherings. The satisfaction of making something beautiful and functional with your own hands is truly rewarding.
So why stop at just two? Consider expanding your collection with other fruit themes – perhaps a vibrant orange, a zesty lime, or even a speckled kiwi jar. Mix and match colors and patterns to create an eclectic and playful summer collection that truly reflects your personal style. These jars are not just containers; they are a celebration of sunshine, fresh produce, and memorable moments shared with loved ones.
We hope this detailed guide inspires you to unleash your creativity and add these delightful fruit-inspired mason jars to your summer decor. They’re a bright, practical, and utterly charming way to make your seasonal entertaining even more special. Happy crafting, and here’s to a wonderfully colorful summer!
Sharing and Inspiration
Thank you so much for joining us on this creative journey! If you loved this DIY project, we encourage you to share your own creations and inspire others. Connecting with fellow crafters is always a delight, and seeing how you personalize these designs brings immense joy. For more inspiring ideas and to explore a community of talented makers, check out some of these wonderful platforms where creativity thrives:
Share Your Style,
Inspiration Monday,
Met Monday,
Tweak It Tuesday,
Inspire Me Tuesday,
The Scoop,
Wow Us Wednesdays,
Thrifty Thursday,
I Heart Naptime,
Monday Funday,
Before and After