
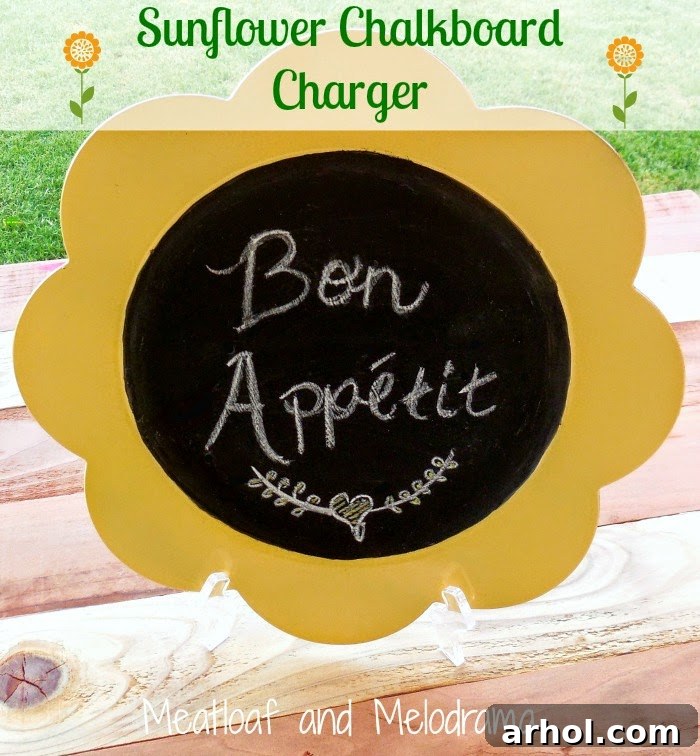
Transforming an Inexpensive Charger into a Radiant Sunflower Chalkboard
Gather Your Creative Arsenal: Materials Needed
To embark on this delightful DIY journey, you’ll need just a few essential items. Most of these can be found at your local craft store, hardware store, or even around your house.
- **An Inexpensive Charger Plate:** Look for one with a floral or scalloped edge, ideally from a clearance bin or thrift store. The original color doesn’t matter, as we’ll be painting over it!
- **Yellow Spray Paint:** My preferred brand is Rustoleum because it includes a primer, ensuring excellent coverage and adhesion on various surfaces. Choose a bright, cheerful yellow that reminds you of a sunflower.
- **Black Chalkboard Paint:** This specialized paint will create a writable surface in the center of your sunflower.
- **Painter’s Tape (Optional but Recommended):** Useful for creating a clean line between the yellow petals and the black center, especially if your charger doesn’t have a distinct raised center.
- **Drop Cloth or Newspaper:** Essential for protecting your workspace from overspray.
- **Gloves and a Face Mask:** Always recommended when working with spray paint for safety.
- **Chalk:** For priming your new chalkboard surface.
- **Soft Cloth or Paper Towels:** For wiping off chalk and cleaning.
- **Cleaner/Degreaser:** To thoroughly clean your charger before painting.
Step-by-Step Guide to Your Radiant Sunflower Chalkboard
Step 1: Preparation is Paramount for a Flawless Finish
Before any paint touches our charger, proper preparation is key to achieving a smooth, professional-looking result. Start by thoroughly cleaning your charger plate. Use a mild soap and water solution or a degreaser to remove any dirt, dust, or oily residue that might prevent the paint from adhering properly. Pay close attention to any nooks or crannies, especially if the charger is intricately shaped. Once cleaned, allow it to dry completely. Set up your workspace in a well-ventilated area, preferably outdoors, and lay down a drop cloth or old newspapers to protect the surrounding surfaces from paint. Wearing gloves and a mask is highly recommended during the spray painting process.
Step 2: Infusing Sunshine with Yellow Paint
Now for the fun part – transforming that drab surface into a brilliant bloom! Shake your can of yellow spray paint vigorously for at least a minute to ensure the pigment is well mixed. Hold the can approximately 8-12 inches away from the charger and apply the paint in light, even coats. Avoid holding the can in one spot for too long, as this can lead to drips and uneven coverage. My metallic orange charger required only two coats of Rustoleum’s yellow spray paint, thanks to its built-in primer, to achieve a beautiful, opaque sunflower yellow. Allow each coat to dry to the touch before applying the next, typically about 15-20 minutes, depending on humidity and temperature. Once you’re satisfied with the color and coverage, let the yellow paint cure for several hours, or even overnight, to ensure it’s completely dry before moving on. This prevents smudging when you handle it for the next step.
Step 3: Crafting the Chalkboard Heart
With the vibrant yellow petals perfectly dry, it’s time to create the contrasting black center that will serve as our chalkboard surface. If your charger has a clearly defined raised center, you can carefully paint it freehand. However, for a crisper, cleaner line, I highly recommend using painter’s tape to mask off the yellow petals, leaving only the center exposed for painting. Apply the black chalkboard paint with a foam brush or a small paintbrush. As with the spray paint, apply several thin, even coats rather than one thick one. Chalkboard paint often requires a few coats to achieve the desired dark, opaque finish that allows chalk to show up clearly. Allow each coat to dry according to the manufacturer’s instructions before applying the next. Once you’ve achieved full coverage, carefully remove the painter’s tape while the final coat is still slightly wet (this helps prevent paint from peeling off with the tape). Let the chalkboard paint dry and cure for at least 24 hours, or even longer as per product instructions, to ensure it’s fully hardened and ready for use. This curing time is crucial for the durability of your chalkboard surface.
Step 4: Priming for Perfection – The Essential First Step for Any Chalkboard
You’re almost ready to start writing! But before you grab your chalk and scrawl a message, there’s one essential step: priming the chalkboard surface. This process helps condition the paint, making it easier to write on and, more importantly, to erase. To prime your new chalkboard, simply take a piece of chalk and gently rub the side of it over the entire black surface. Ensure you cover every inch with a light, even layer of chalk dust. Once the entire surface is covered, take a soft, dry cloth or paper towel and wipe away the chalk dust. You’ll notice a faint, ghost-like residue of chalk, which is exactly what you want! Your sunflower chalkboard is now officially primed and ready for all your messages, menus, and delightful doodles.
Unleashing Creativity: Styling Your Sunflower Chalkboard
Now that your beautiful DIY sunflower chalkboard is complete, it’s time to find its perfect home. This versatile piece offers endless possibilities for adding a personalized touch to your decor. I plan on keeping my new sunflower chalkboard in the kitchen, a natural fit for displaying daily menus, grocery lists, or sweet messages to family members. Last year, I transformed an old silver thrift-store tray into a chalkboard menu for the dining room, so this new addition complements my existing upcycled pieces beautifully. However, its cheerful design makes it ideal for so much more!
Beyond the Kitchen: Versatile Uses for Your New Chalkboard
The charm of this DIY sunflower chalkboard extends far beyond just kitchen decor. Here are some creative ideas to inspire you:
- **Outdoor Gatherings:** Its durable spray-painted finish makes it perfect for outside cookouts, barbecues, or garden parties. Use it to label dishes on a buffet, display a welcome message, or guide guests to different areas.
- **Seasonal Decor:** Prop it up on a mantel, shelf, or console table as part of your summer or fall seasonal decorations.
- **Welcome Sign:** Place it by your front door or on a porch to greet guests with a personalized message.
- **Table Centerpiece:** For a casual dining setting, use it as a unique centerpiece, writing a daily quote or special message for your family.
- **Kids’ Room Decor:** A fun and interactive addition to a child’s bedroom or play area, allowing them to draw and express their creativity.
- **Gift Idea:** Craft a few of these and give them as thoughtful, handmade gifts for birthdays, housewarmings, or holidays.
For just a dollar (the cost of the charger, assuming you have paint on hand), this project yields a fantastic decorative and functional item. I was so pleased with the outcome that I went back to Michael’s and stocked up on more clearance chargers. Who knows what other creative transformations await them!
The Joy and Value of DIY Projects
This sunflower chalkboard project beautifully illustrates the many benefits of engaging in DIY crafts. Firstly, it’s incredibly budget-friendly. By repurposing an inexpensive clearance item, you’re saving money while still creating something beautiful and useful. Secondly, it allows for immense personalization. You can choose any color palette, shape, or design to match your specific home decor style. More importantly, there’s an immense sense of satisfaction that comes from creating something with your own hands. Transforming an old, overlooked item into a cherished piece of decor is incredibly rewarding. It’s also an eco-conscious choice, extending the life of an item that might otherwise end up in a landfill. DIY projects foster creativity, problem-solving skills, and provide a wonderful outlet for self-expression.
Your Next Upcycling Adventure Awaits
I hope this tutorial inspires you to look at everyday items with a fresh, creative eye. What seems like junk to one person can be a hidden gem waiting for a magical transformation in the hands of a DIY enthusiast. Whether it’s an old tray, a picture frame, or a simple charger plate, the possibilities for upcycling are truly endless. Grab your paints, unleash your imagination, and start creating something wonderfully unique for your home.