
Hello, creative spirits and Halloween enthusiasts!
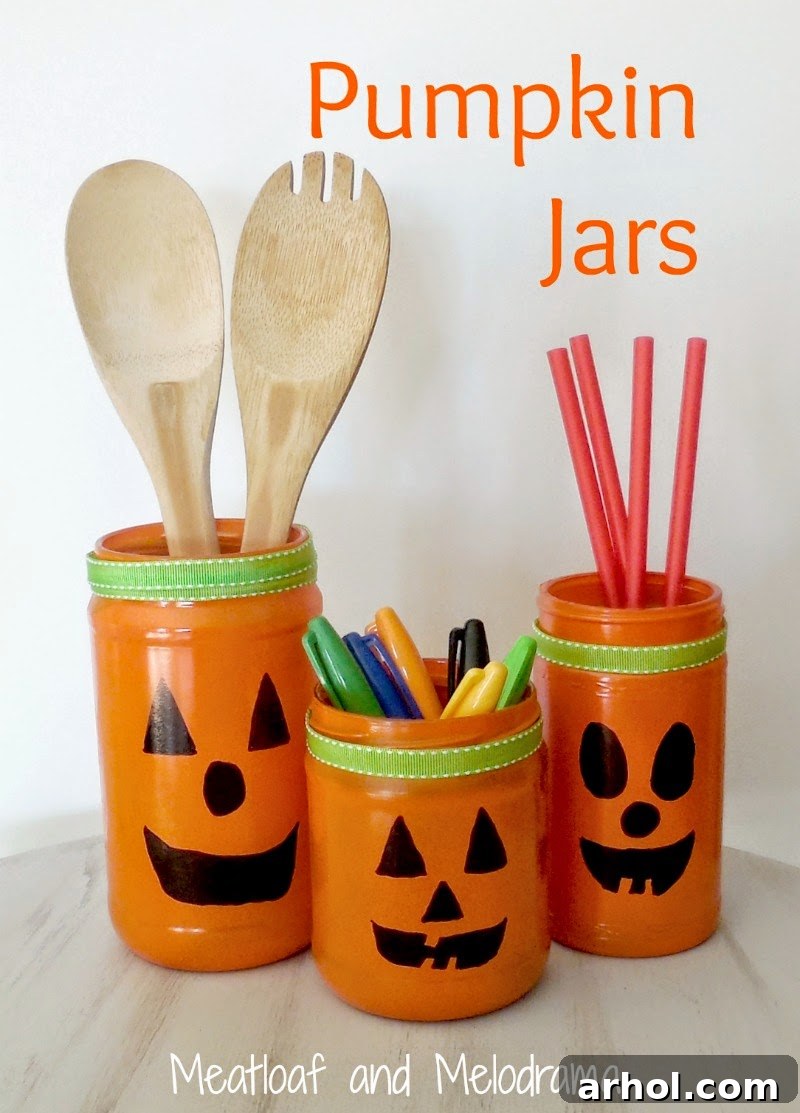
Even though the autumn leaves are just beginning to turn and the air is getting crisp, it’s never too early to start thinking about festive Halloween decorations. Today, I’m thrilled to share a super simple, incredibly fun, and budget-friendly DIY project that will add a charming touch to your spooky season setup: transforming ordinary glass jars into adorable pumpkin jars and glowing jack-o’-lanterns! This craft is not only easy but also a fantastic way to repurpose items you likely already have around the house.
Like many crafters and homemakers, I confess to being a bit of a “jar hoarder.” I find myself constantly saving empty glass containers from pasta sauce, pickles, jam, and more, envisioning their potential for a second life. While beautiful mason jars are often a go-to for DIY projects, reusing jars that would otherwise be discarded is even more economical and environmentally friendly. My collection was certainly growing, so I decided it was high time to put some of them to good use.
For this project, I handpicked three different sizes of glass jars from my stash, each offering a unique canvas for our Halloween theme. With just a few basic supplies – primarily some vibrant orange spray paint and a trusty black Sharpie – we’re going to turn these unassuming jars into delightful pumpkin decorations. Get ready to add a personal, handmade touch to your Halloween ambiance without breaking the bank!
The Art of Upcycling: Why Repurpose Glass Jars?
Before we dive into the nitty-gritty of crafting, let’s take a moment to appreciate the beauty of upcycling. In an age where sustainability is more important than ever, giving new life to everyday items like glass jars is a small yet impactful step towards reducing waste. Beyond the environmental benefits, there are several compelling reasons to embrace jar hoarding (with purpose, of course!):
- Eco-Friendly: By transforming old jars, you’re diverting them from landfills and minimizing your environmental footprint. It’s a simple way to practice conscious consumption.
- Budget-Friendly: This project proves that stunning decor doesn’t require a hefty investment. Most of the materials, especially the jars themselves, are free! You only need to purchase a few craft supplies.
- Versatility: Empty jars come in all shapes and sizes, making them incredibly versatile for various crafts. They can become vases, storage containers, candle holders, and, in this case, charming Halloween accents.
- Personal Touch: Handmade decorations infuse your home with warmth and personality that store-bought items simply can’t match. Each pumpkin jar will be unique, reflecting your creativity.
- Engaging Activity: Crafting is a wonderful way to unwind, express yourself, and even involve family members, making it a perfect activity for a cozy autumn afternoon.
So, if you’re like me and have a growing collection of glass jars, consider this your official invitation to put them to good use. Let’s transform them into something festive and fun for Halloween!
Gather Your Supplies: What You’ll Need for Your Pumpkin Jars
One of the best aspects of this DIY project is its simplicity and minimal material requirements. You probably have most of what you need already! Here’s a quick checklist to get you started on your journey to creating adorable Halloween decor:
- Empty Glass Jars: Collect various sizes and shapes. Pasta sauce jars, jam jars, pickle jars, and even small spice jars work wonderfully. Ensure they are thoroughly cleaned, labels removed, and completely dry. Any moisture or residue can affect paint adhesion.
- Orange Spray Paint: This is the key to achieving that vibrant pumpkin hue. I personally swear by Rustoleum brand for its smooth application and excellent coverage, which helps in minimizing streaks and runs. However, feel free to use any brand you trust and have success with. A quick trip to your local hardware store, like Home Depot, should solve this need! One can is usually enough for several jars.
- Black Permanent Marker (Sharpie): A standard black Sharpie is perfect for drawing the iconic jack-o’-lantern faces. You might want a fine-tip for intricate details and a broader one for filling in larger areas like eyes and mouths.
- Newspaper or Drop Cloth: Essential for protecting your workspace from overspray. Lay it down generously!
- Cardboard Box: An old cardboard box provides a stable surface for painting and helps contain any stray paint. It also allows you to easily rotate the jars while painting without touching the wet surfaces.
- Ribbon, Twine, or Fabric Scraps: (Optional, but highly recommended) For decorating the neck of the jars. Green, black, orange, or even rustic twine works wonderfully to add a charming finishing touch and conceal any minor paint imperfections.
- Gloves and Face Mask: (Optional, but recommended for safety) When working with spray paint, it’s always a good idea to protect your hands and avoid inhaling fumes. Safety first!
With your materials ready, let’s move on to the fun part: transforming these plain jars into spooky-cute pumpkin masterpieces!
Step-by-Step Guide: Crafting Your Jack-o’-Lantern Jars
Step 1: Prepare Your Jars and Workspace for Painting
The foundation of any great craft project is good preparation. Start by ensuring your chosen glass jars are immaculately clean. Wash them thoroughly with soap and water, remove any lingering labels or adhesive residue (rubbing alcohol or Goo Gone can help with stubborn bits), and let them dry completely. Any moisture, oil, or grime can prevent the spray paint from adhering properly, leading to an uneven or peeling finish.
Next, set up your painting area. Choose a well-ventilated space, preferably outdoors or in a garage with open doors. Lay down newspaper or a drop cloth to protect the surface from overspray. Place your jars upside down on an old cardboard box; this technique helps ensure even coverage, especially around the rim, and makes them easier to handle without touching the wet paint directly. The cardboard also helps to catch any excess paint.
Step 2: The Art of Spray Painting Your Jars Orange
Now for the magic! Shake your can of orange spray paint vigorously for at least a minute to ensure the pigment is well mixed. This step is crucial for achieving a smooth, consistent color. Hold the can about 6-8 inches away from the jar and apply the paint in light, even coats. Resist the urge to drench the jar in one thick layer, as this is a common cause of drips, runs, and streaks, which can be difficult to fix.
Instead, apply several thin coats, allowing each layer to dry to the touch before applying the next. This layered approach builds up the color gradually and provides a much smoother, more professional-looking finish. Painting the jars upside down on the cardboard box really helps in getting good coverage all around the jar, including the bottom rim. If you look closely at my setup in the image below, you can see the different layers of spray paint building up on the cardboard box – a testament to the thoroughness of the application! Be patient with the drying process; typically, an hour between coats is sufficient, but always check the paint manufacturer’s recommendations. You’ll likely need 2-3 coats for opaque, vibrant coverage. Once all coats are applied, let the jars dry completely for several hours, or even overnight, before moving to the next step. This prevents any smudging when you handle them for decoration.
Step 3: Bringing Your Jack-o’-Lanterns to Life with Sharpie Faces
Once your vibrant orange paint is perfectly dry and cured, it’s time to give your pumpkins personality! This is where the black Sharpie comes into play, and it’s an incredibly fun and creative step, especially if you have little assistants eager to help. Gather your black permanent markers; having various tip sizes (fine, medium, chisel) can be useful for different details and filling in areas.
Think about classic jack-o’-lantern faces: triangular eyes, a jagged smile, and a small triangular nose are traditional and instantly recognizable. However, don’t be afraid to get creative and experiment! You can draw spooky grimaces, friendly grins, sleepy eyes, mischievous winks, or even abstract patterns. Feel free to sketch out your desired design lightly with a pencil first if you’re unsure or want to perfect your face before committing. Then, carefully go over it with the Sharpie. The beauty of a permanent marker on a smooth painted surface is that it glides effortlessly, allowing for clear, crisp lines and easy filling of shapes. My assistants and I had a blast creating unique expressions for each jar, transforming simple painted glass into charming Halloween characters with distinct personalities.
Step 4: The Finishing Touch – Ribbon Embellishments
To truly elevate your pumpkin jars and give them a polished, finished look, I highly recommend adding some decorative ribbon around the neck of each jar. This simple step serves a dual purpose: it aesthetically enhances the jar, adding a touch of color and texture, and cleverly conceals any minor imperfections or uneven paint lines that might occur around the rim during the spray painting process. It’s a fantastic trick for a professional-looking finish!
You have a wide array of choices for this embellishment. While I almost opted for a rustic-looking twine – which would undoubtedly offer a charming, farmhouse-style appeal perfect for autumn – I ultimately decided on a vibrant green ribbon. The contrast of the bright green against the vivid orange felt particularly festive and undeniably cuter for a whimsical Halloween display. You could also use black ribbon for a more classic spooky look, purple for a mystical touch, or even patterned fabric strips for added texture and visual interest. Simply tie a bow or a knot, securing it snugly around the jar’s neck. This small detail truly makes a big difference in the overall presentation of your DIY pumpkin jars, giving them that extra handmade charm.
Creative Ways to Use Your DIY Pumpkin Jars
And just like that, you’ve created adorable, custom Halloween decor with minimal effort! This project truly is as simple as wielding a can of spray paint and a marker. But the fun doesn’t stop there. Once your pumpkin jars are complete, their utility extends far beyond just looking pretty. These versatile creations can be incorporated into your Halloween celebrations and everyday home decor in numerous imaginative ways:
- Festive Utensil Holders: Perfect for a Halloween party buffet. Use them to hold forks, spoons, or straws, adding a thematic touch to your serving station.
- Office Supply Organizers: Bring some festive cheer to your workspace by using them to store pens, pencils, markers, scissors, or paperclips. A fun way to keep your desk tidy!
- Kitchen Gadget Storage: Keep your cooking utensils neatly organized and easily accessible on your countertop, adding a seasonal accent to your kitchen.
- Candy Holders: Fill them with wrapped Halloween candies like candy corn, mini chocolates, or lollipops for a sweet treat display. They make great additions to a treat table or even as small party favors for guests to take home.
- Vases for Fall Foliage: Display small bouquets of vibrant fall flowers, dried grasses, or faux autumn foliage for a charming centerpiece or accent piece on any shelf.
- Votive Candle Holders/Luminaries: Place a battery-operated LED tea light or string lights inside for a safe, soft, and flickering glow. This creates a beautiful, glowing jack-o’-lantern effect without any fire hazard, making them ideal for homes with children or pets.
- Entryway Decor: Arrange a collection of varying sizes on a console table, mantelpiece, or shelf to welcome guests with a charming touch of Halloween spirit. Grouping them together creates a greater visual impact.
- Gift Jars: Fill them with homemade cookies, hot cocoa mix ingredients, or other small goodies and gift them to friends, teachers, or family members. It’s a personalized and thoughtful present.
The possibilities are truly endless, limited only by your imagination. These versatile jars offer an effortless way to decorate for Halloween without spending much money at all, proving that the most impactful and beloved decorations often come from a place of creativity and resourcefulness.
Tips for Success and Troubleshooting Your DIY Pumpkin Jars
Even with a simple and straightforward project like this, a few extra tips can ensure your crafting experience is smooth and your results are spectacular. Here’s some advice to help you along the way:
- Safety First: Always prioritize safety when using spray paint. Work in a well-ventilated area, preferably outdoors. Consider wearing gloves to protect your hands and a face mask to avoid inhaling fumes.
- Patience with Drying: Don’t rush the drying process between coats of paint or before drawing faces. Impatience is the enemy of a smooth finish and can lead to smudges and uneven results. Always allow ample drying time.
- Even Coats: Remember, light, even passes with the spray paint are key. Multiple thin coats are always better than one thick, drippy coat. If you see drips, let it dry, then you might be able to gently sand it smooth before applying another thin coat.
- Design Practice: If you’re nervous about drawing directly onto the jar, practice your jack-o’-lantern faces on a piece of paper first. You can also lightly sketch outlines on the dried paint with a pencil (ensure it’s very light so it doesn’t leave an indentation) before committing with the Sharpie.
- Permanent Marker Choice: While Sharpies are excellent for this project, ensure you are using a truly permanent marker. Some “permanent” markers might not hold up as well on painted glass or could smudge with handling.
- Sealing (Optional): For extra durability, especially if the jars will be handled frequently, washed (gently by hand), or exposed to moisture, you can apply a clear protective sealant spray (matte or glossy, depending on your preference) after the Sharpie ink has fully dried. Always make sure the sealant is compatible with your specific type of spray paint to avoid any adverse reactions.
Join the Crafting Community: Share Your Creations!
Are you a fellow jar hoarder, constantly seeking new ways to breathe life into discarded glass? I know I can’t be the only one with a secret stash, overflowing with potential projects just waiting to be brought to life! There’s a wonderful sense of accomplishment that comes from transforming something ordinary into something extraordinary, especially when it’s for a festive occasion like Halloween.
I hope this tutorial inspires you to raid your recycling bin and embark on your own pumpkin jar crafting adventure. This project is a testament to how creativity and a little imagination, combined with readily available materials, can turn everyday items into charming, personalized decorations that reflect your unique style. It’s a fantastic way to embrace the spirit of Halloween without breaking the bank or contributing to unnecessary waste.
If you decide to make these adorable pumpkin jars, I would absolutely love to see your creations! Please feel free to share them with your friends and family, and consider tagging me on social media if you post them. There’s nothing more rewarding than seeing how others interpret and enjoy these simple, yet impactful, DIY ideas. Let’s inspire each other this spooky season!
Thank you so much for dropping by today and spending some time with me in the crafting corner. Your visit means a lot, and I sincerely hope you’ll return soon for more easy, engaging, and inspiring DIY projects. Happy crafting, and have a wonderfully spooky season filled with handmade charm!
Warmly,
Dee 🙂