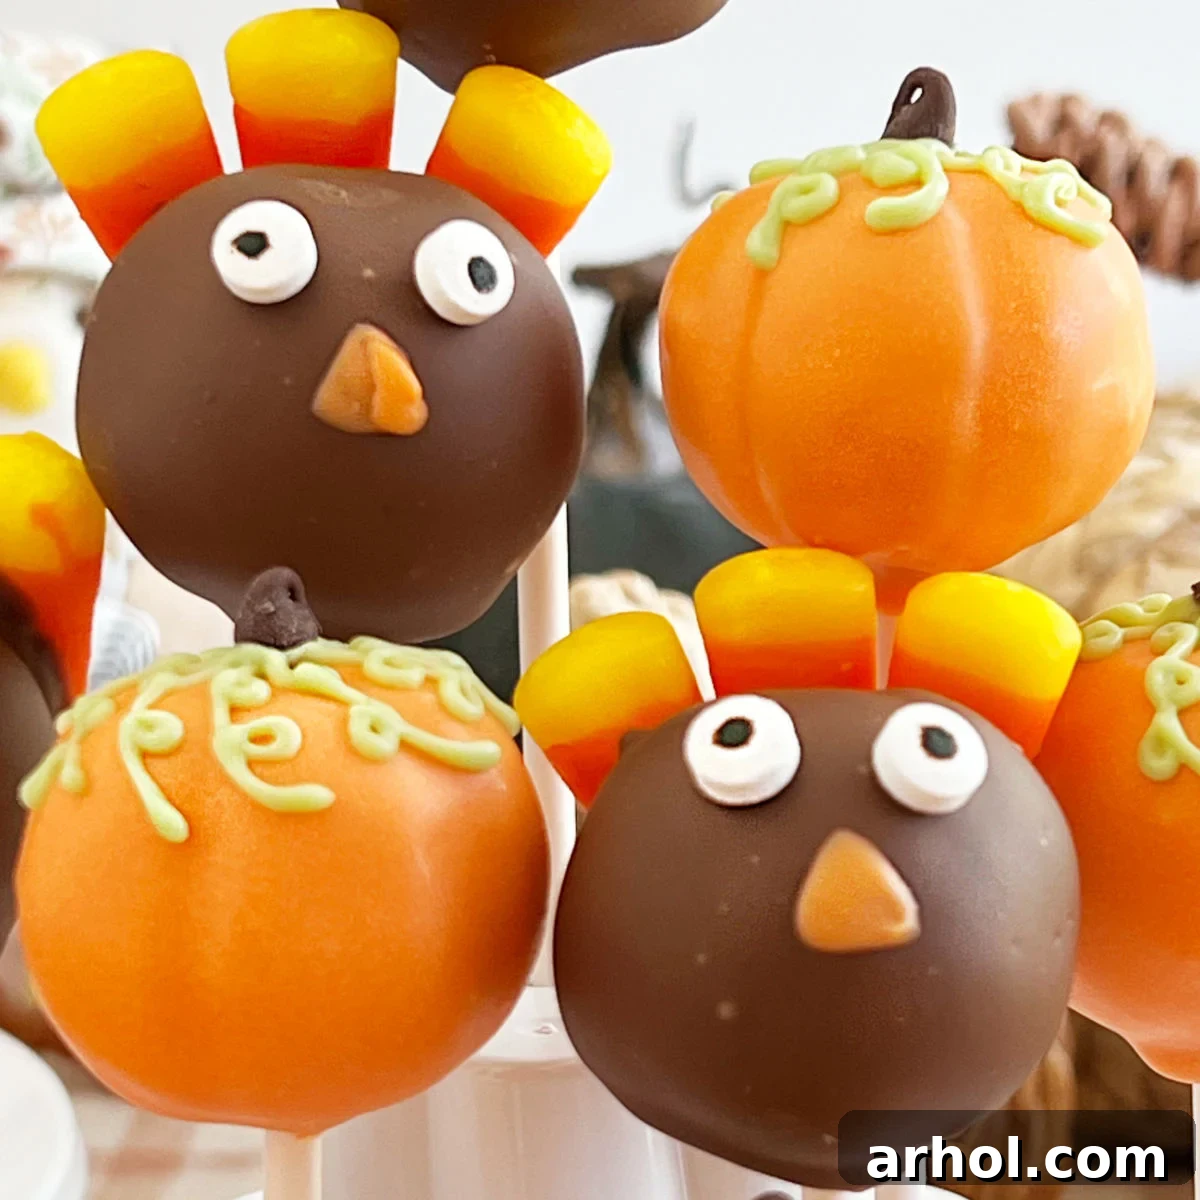
Delicious & Easy Thanksgiving Cake Pops: Turkeys and Pumpkins for Your Holiday Table
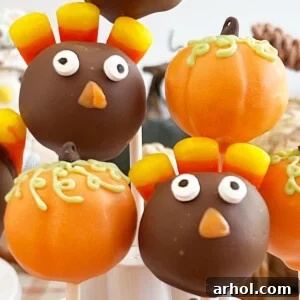
As the leaves turn golden and the aroma of pumpkin spice fills the air, Thanksgiving approaches, bringing with it a desire for heartwarming traditions and delightful treats. This year, elevate your holiday dessert spread with these utterly adorable and surprisingly easy Thanksgiving Cake Pops! Featuring charming turkey cake pops and festive pumpkin cake pops, these bite-sized delights are not just desserts; they’re edible works of art that will captivate guests of all ages.
Cake pops are the ultimate crowd-pleaser. They’re individual portions, making them hygienic and simple to serve, and their compact size makes them perfect for little hands. Beyond their undeniable cuteness, these treats offer incredible convenience. You can prepare them well in advance, freeing up precious time on Thanksgiving Day, and they’re incredibly easy to transport to potlucks or family gatherings. Get ready to transform simple ingredients into a stunning, memorable dessert that everyone will be talking about!

Table of Contents
- Essential Ingredients for Perfect Thanksgiving Cake Pops
- Helpful Tools and Equipment for Cake Pop Success
- Mastering the Basic Cake Pop: Crushing, Mixing, and Rolling
- Crafting Charming Pumpkin Cake Pops
- Designing Delightful Thanksgiving Turkey Cake Pops
- Storage and Make-Ahead Tips for Your Decorated Cake Pops
- Expert Tips and Tricks for Flawless Cake Pops
- Thanksgiving Cake Pops Recipe Card
- More Easy Thanksgiving Desserts Your Family Will Love
Essential Ingredients for Perfect Thanksgiving Cake Pops
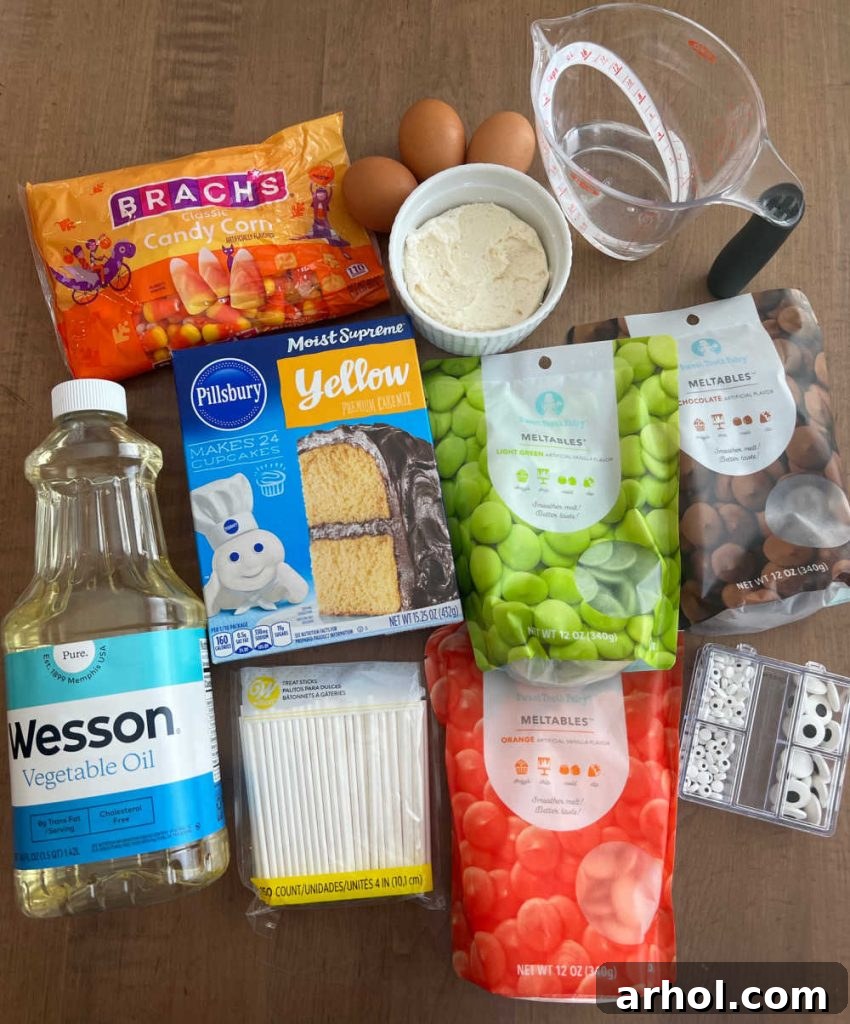
Creating these festive Thanksgiving cake pops is surprisingly simple, requiring just a handful of readily available ingredients. You’ll find most of these at your local grocery store, and specialty items like candy melts are widely available at craft stores or online. For exact measurements, refer to the printable recipe card further down this page.
- Cake Mix (plus cake preparation ingredients): The foundation of your cake pops! While we opted for a classic yellow cake mix, feel free to get creative. A pumpkin spice cake mix would infuse even more seasonal flavor, or you could try a chocolate or vanilla mix. For those who prefer homemade, leftover cake or cupcakes work perfectly and are a fantastic way to reduce food waste. Remember to follow the package directions for your chosen cake mix, which typically include eggs, oil, and water.
- Frosting: This acts as the “glue” that binds your cake crumbs together, creating that signature moist, dense cake pop texture. A container of store-bought frosting is incredibly convenient and comes in a variety of flavors. Vanilla, cream cheese, or chocolate frosting are excellent choices. If you’re feeling ambitious, homemade frosting will add an extra touch of gourmet goodness.
- Candy Melts: These are crucial for the outer coating and decoration. We recommend orange candy melts for pumpkins, green candy melts for vines and leaves, and chocolate or brown candy melts for the turkeys. Candy melts are designed to melt smoothly and set firmly, providing a beautiful, professional finish. As an alternative, you can use almond bark or even high-quality white chocolate colored with oil-based food coloring (water-based food coloring will cause chocolate to seize).
- Candy Corn: These classic fall candies are ingeniously repurposed to form the vibrant tails of our turkey cake pops. Their distinct shape and colors make them ideal for this festive detail.
- Mini Chocolate Chips: These tiny morsels are perfect for creating the realistic stems on your pumpkin cake pops, adding a small but important touch of authenticity.
- Candy Eyeballs: A simple yet effective way to bring your turkey cake pops to life! You can find these at most baking supply stores or craft stores.
- Lollipop Sticks (or Cake Pop Sticks): Essential for holding and dipping your cake pops, transforming them from cake balls into easy-to-eat lollipops.
Helpful Tools and Equipment for Cake Pop Success
While the ingredients are simple, having the right tools can make the cake pop creation process even smoother:
- Wax Paper or Parchment Paper: Indispensable for lining baking sheets to prevent cake balls from sticking and for drying your decorated pops.
- Baking Sheet: Used for chilling the cake balls and holding them during the dipping process.
- Toothpicks: Handy for creating the pumpkin ridges and for delicately drawing turkey beaks.
- Deep Bowl or Coffee Mug: Ideal for melting candy melts and for dipping the cake balls, ensuring a good, even coating.
- Cake Pop Holder (or alternative): A styrofoam block, a shoebox with poked holes, or even an upside-down colander can serve as a makeshift holder to keep your decorated cake pops upright while they set. This is crucial for preventing smudges and ensuring a perfect finish.
- Piping Bag (or Ziplock Bag): For detailed decorations like pumpkin vines and leaves. A small Ziplock bag with a tiny corner snipped off works just as well!
- Microwave-Safe Bowls: For easily melting candy melts in controlled intervals.
Mastering the Basic Cake Pop: Crushing, Mixing, and Rolling
The foundation of any great cake pop lies in its perfectly formed, moist core. Follow these initial steps to create your blank canvas for festive decorating:
- Bake the Cake: Begin by preparing your chosen cake mix according to the package instructions. A 9×13 inch pan is typically recommended for the given recipe yield. Allow the baked cake to cool completely on a wire rack. This step is crucial; attempting to crumble a warm cake will result in a sticky, unmanageable mess.
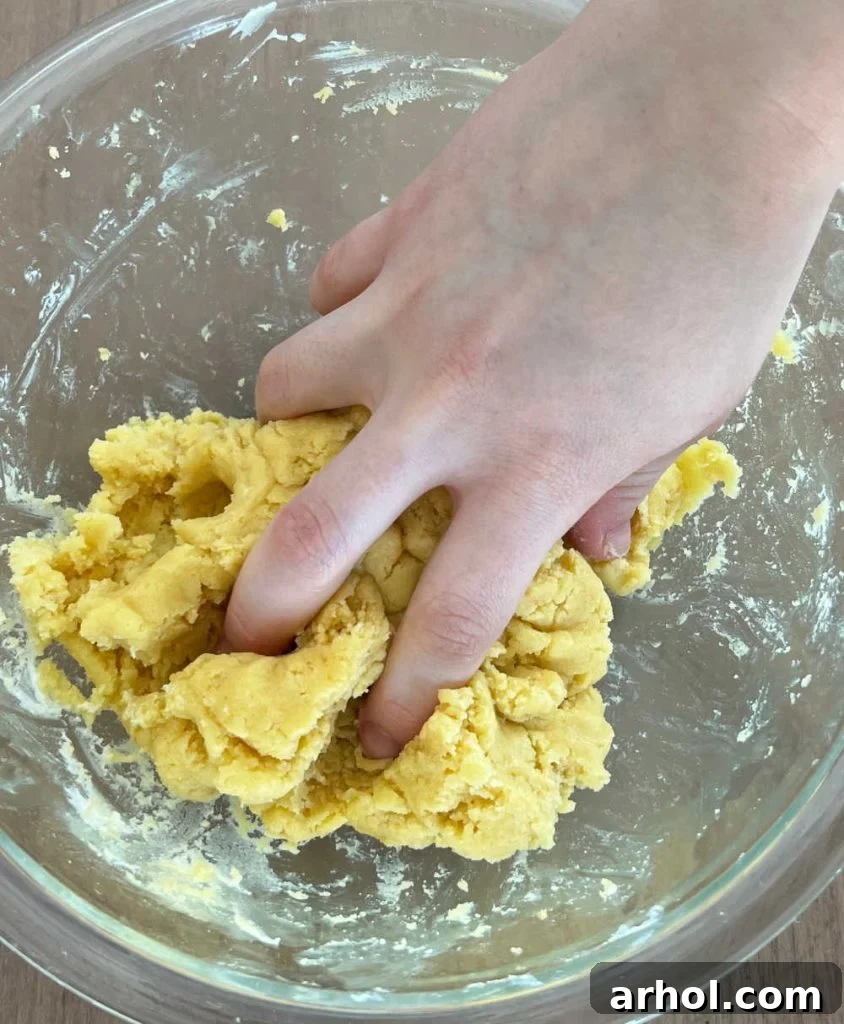
- Crumble the Cake: Once cooled, transfer the cake into a large mixing bowl. Using clean hands, thoroughly crumble the cake into fine, uniform pieces. The finer the crumbs, the smoother your cake pops will be. This is a satisfying, tactile step that gets you ready for the fun to come!
- Combine with Frosting: Add your frosting to the crumbled cake. Again, using clean hands, mix the cake and frosting together until a cohesive “dough” forms. The mixture should be moist enough to hold its shape when pressed, but not overly sticky or greasy. If it’s too dry, add a tiny bit more frosting; if it’s too wet, a tablespoon of powdered sugar can help, though this is rarely needed.
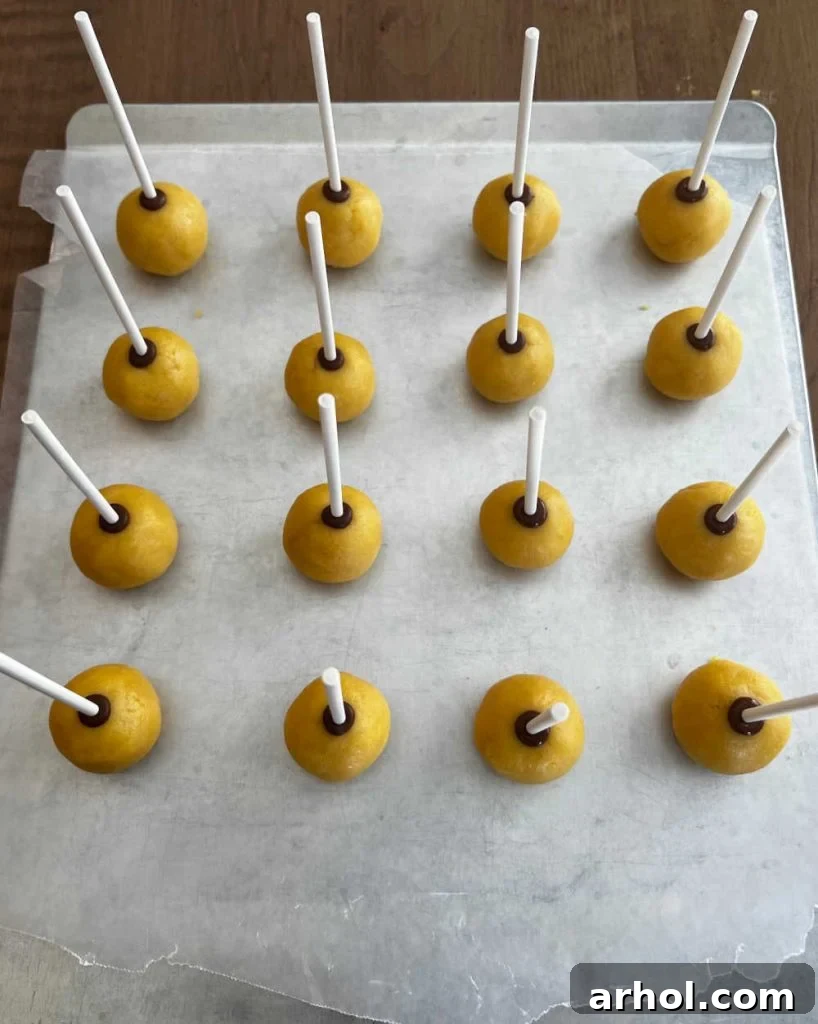
- Form the Cake Balls: Take small portions of the cake mixture and roll them into uniform 1-inch balls. Consistency in size is key for even dipping and a professional appearance. Place these cake balls onto a baking sheet lined with wax paper or parchment paper.
- Prepare for Sticks: In a microwave-safe bowl, melt a small amount (about 2 tablespoons) of your chosen candy coating (e.g., brown candy melts for turkeys, or white for the base of both). Dip one end of each lollipop stick into the melted coating, then immediately insert the coated stick halfway into the center of a cake ball. The melted candy acts as an adhesive, securing the stick to the cake ball and preventing it from falling off during dipping.
- Chill Time: Transfer the baking sheet with the cake balls to the refrigerator for at least one hour. This chilling time is essential. It allows the cake balls to firm up and the candy “glue” to set, making them much easier to dip without crumbling. Avoid over-chilling, as excessively cold cake balls can sometimes lead to cracking in the candy coating when dipped into warm melts.
Crafting Charming Pumpkin Cake Pops
Once your basic cake pops are chilled and firm, it’s time to bring them to life as festive pumpkins!
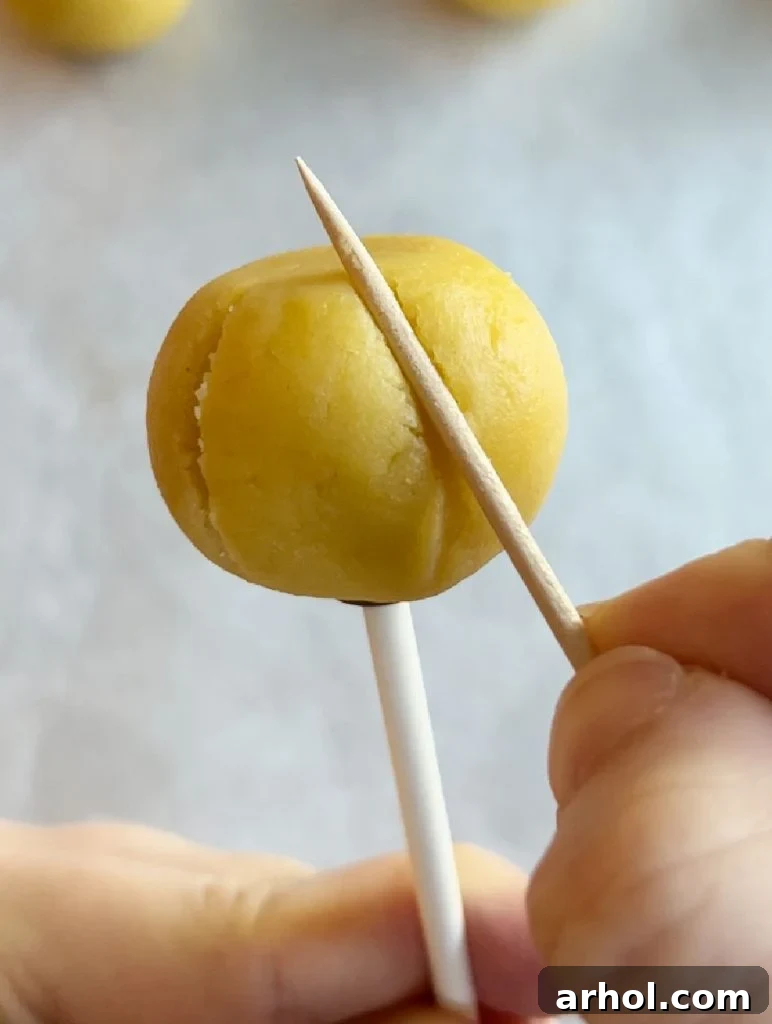
- Create Pumpkin Ridges: Before dipping, gently press a toothpick around the sides of each cake ball, creating vertical grooves that mimic the natural ridges of a pumpkin. This simple detail makes a huge difference in their appearance.
- Melt Orange Candy Melts: Place your orange candy melts in a deep, microwave-safe bowl or even a sturdy coffee mug. Melt them in 30-second intervals, stirring thoroughly after each interval, until the coating is completely smooth and fluid. Be careful not to overheat, as this can cause the candy melts to become thick and difficult to work with. If preferred, a double boiler on the stove can also be used for a more controlled melting process.
- Dip the Pumpkins: Hold a cake pop by its stick and submerge it completely into the melted orange candy coating. Gently tap the stick against the side of the bowl to remove any excess coating, allowing it to drip back into the bowl. This ensures a smooth, even layer.
- Allow to Dry: Carefully place the dipped pumpkin cake pops into your cake pop holder or styrofoam block to dry completely. This usually takes about 10-15 minutes, or slightly longer if the room is humid. Ensure they are fully set before moving to the next step.
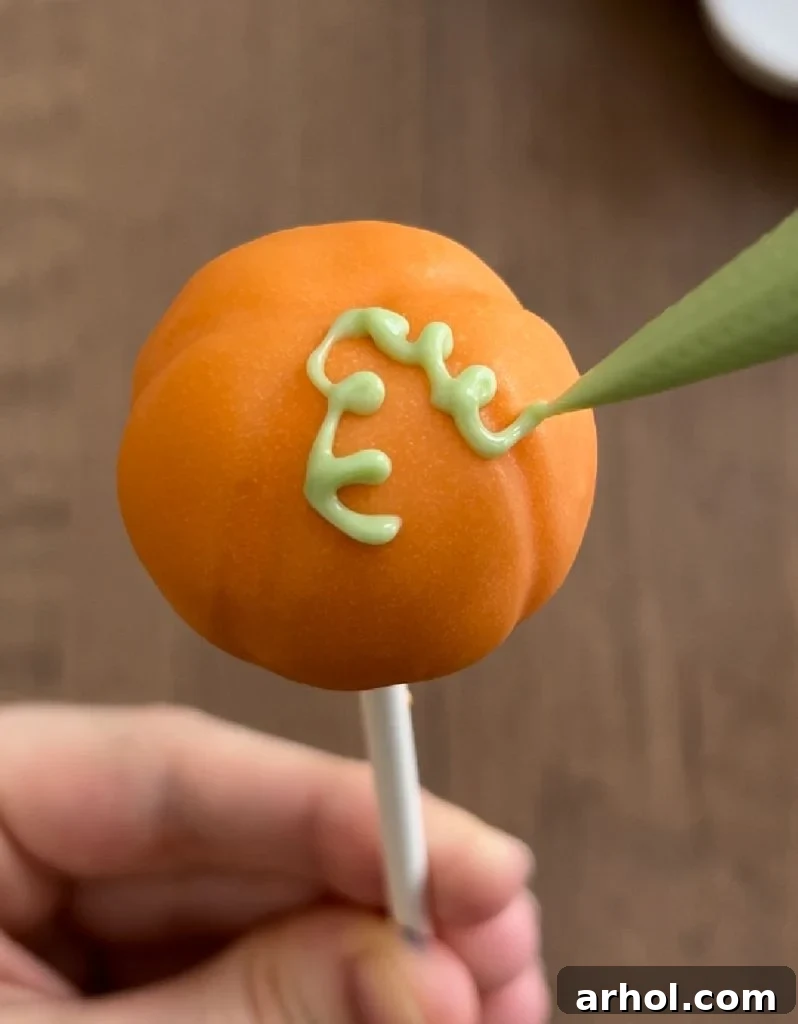
- Add Vines, Leaves, and Stems: Once the orange coating is dry, melt a small amount of green candy coating. Transfer the melted green candy to a piping bag (or a Ziplock bag with a tiny corner snipped off). Pipe delicate vines and small leaves onto the top of each pumpkin. While the green candy is still wet, gently press a mini chocolate chip into the center of the top of each pumpkin to create a realistic stem.
Designing Delightful Thanksgiving Turkey Cake Pops
Transforming basic cake pops into charming turkeys is a highlight of this recipe. Here’s how to create these festive little birds:
- Melt Chocolate Coating: Place your brown or chocolate candy melts in a deep, microwave-safe bowl. Melt them in 30-second intervals, stirring thoroughly after each, until smooth and fluid. As with the orange melts, avoid overheating.
- Dip the Turkeys: Dip each cake ball into the melted chocolate coating, ensuring it’s fully covered. Tap off any excess and place it in your cake pop holder to dry. For the turkey cake pops, you can add the candy eyeballs while the coating is still slightly wet; this helps them adhere without needing additional melted chocolate. Allow the coating to set completely before proceeding to avoid smudges.
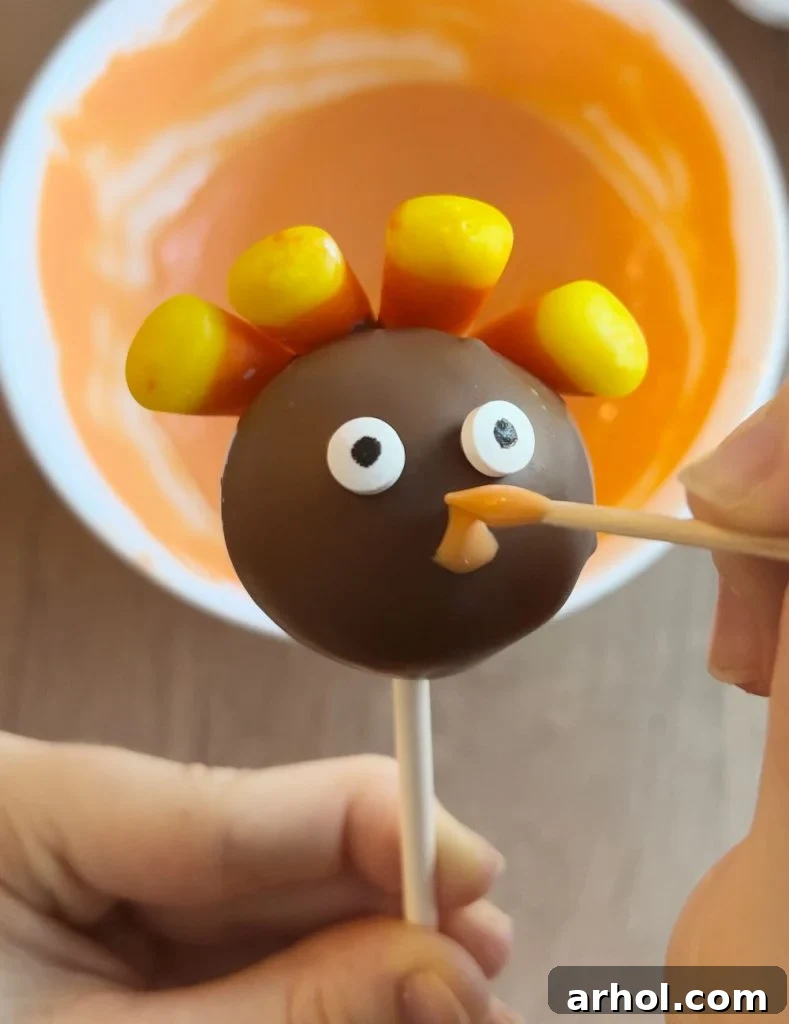
- Attach Candy Corn Feathers: Once the chocolate coating is fully dry, melt a tiny bit of additional chocolate coating. Dip the pointed end of 3-4 pieces of candy corn into this melted chocolate, then press them firmly onto the back of the chocolate-covered cake ball to form the turkey’s tail feathers. Hold each piece in place for a few seconds until it sets, ensuring they are securely “glued.” Arrange them in a fanned-out pattern for the best effect.
- Add Candy Eyes: If you didn’t attach the candy eyes while the coating was wet, use a tiny dot of melted chocolate to affix two candy eyeballs to the front of the turkey’s “face.”
- Draw the Beak: Using a clean toothpick, dip the tip into melted orange candy coating. Carefully draw a small triangular beak onto the turkey’s face, just below the eyes. While a piping bag could also be used for this, a toothpick offers greater precision for such a small detail.
Storage and Make-Ahead Tips for Your Decorated Cake Pops
One of the many advantages of Thanksgiving cake pops is their flexibility when it comes to preparation and storage. This allows you to plan ahead and reduce stress on your holiday cooking day.
You can store your beautifully decorated turkey and pumpkin cake pops in an airtight container at room temperature for up to 2-3 days. For longer freshness, or if your home is particularly warm, they can be stored in the refrigerator for up to 5 days. When refrigerating, ensure they are in an airtight container to prevent them from absorbing any unwanted odors or drying out. If you plan to serve them at room temperature after refrigeration, simply take them out about 15-30 minutes before serving to allow them to soften slightly for the best texture and flavor.
These festive treats are also excellent for making well in advance. You can prepare the cake balls (before dipping) and freeze them for up to a month. Just be sure to wrap them tightly in plastic wrap and then place them in a freezer-safe bag or container. When you’re ready to decorate, transfer them to the refrigerator to thaw overnight, then proceed with inserting sticks and dipping as usual. This make-ahead strategy is a lifesaver during busy holiday seasons, ensuring you have delicious, handmade desserts without the last-minute rush!
Expert Tips and Tricks for Flawless Cake Pops
Making cake pops can be a fun and rewarding experience, but a few simple techniques can elevate your results from good to absolutely perfect. Here are some essential tips to help you achieve flawless Thanksgiving cake pops:
- Melting Candy Coating Safely: Always melt candy coating and chocolate in the microwave in short intervals, typically 30 seconds at a time. Stir thoroughly after each interval, even if it doesn’t look fully melted. Continue until the mixture is smooth and fluid. Overheating candy melts can cause them to seize, become thick, or burn, making them unusable for dipping. For best results, use a deep bowl or coffee mug, as this provides enough depth for full submersion without requiring excessive amounts of candy melts.
- Preventing Cracks in the Coating: This is a common cake pop challenge. To prevent cracks, ensure your cake balls are chilled just until firm, not rock-hard. If the cake balls are too cold, the rapid temperature change when dipped into warm candy coating can cause the coating to contract and crack as it sets. Aim for a firm but not frozen consistency.
- Achieving a Smooth Dip: Tap the lollipop stick gently against the side of your melting bowl after dipping. This helps remove excess coating and allows gravity to smooth out any drips, resulting in a cleaner, more professional finish.
- Timing for Decorations: Allow the candy coating to dry completely before adding any decorative elements like candy corn tails or piped vines, especially if they require handling the pop. However, for elements like candy eyeballs, you can often apply them when the coating is still slightly wet (partially set). This helps them adhere directly to the coating without needing additional melted chocolate.
- Piping Bag Alternatives: No piping bag on hand? No problem! A regular Ziplock bag with a tiny corner snipped off makes an excellent substitute for piping delicate details like pumpkin vines or turkey beaks. Just fill the bag with a small amount of melted candy coating, push it towards the snipped corner, and pipe away!
- Yield Adjustments: This recipe yields approximately 45 cake pops. If you need fewer, you can easily halve the recipe. Alternatively, prepare the full batch of cake balls and freeze any undecorated ones for later use.
- Time-Saving Cake Base: For an even quicker process, you can substitute the homemade cake base with store-bought baked cake or cupcakes. Simply crumble them and proceed with the frosting mixture as directed.
- Troubleshooting Thick Candy Melts: If your candy melts become too thick while working, you can thin them out with a small amount of paramount crystals or a specialized candy oil (like coconut oil or vegetable shortening). Add just a quarter teaspoon at a time and stir well until you reach the desired consistency.
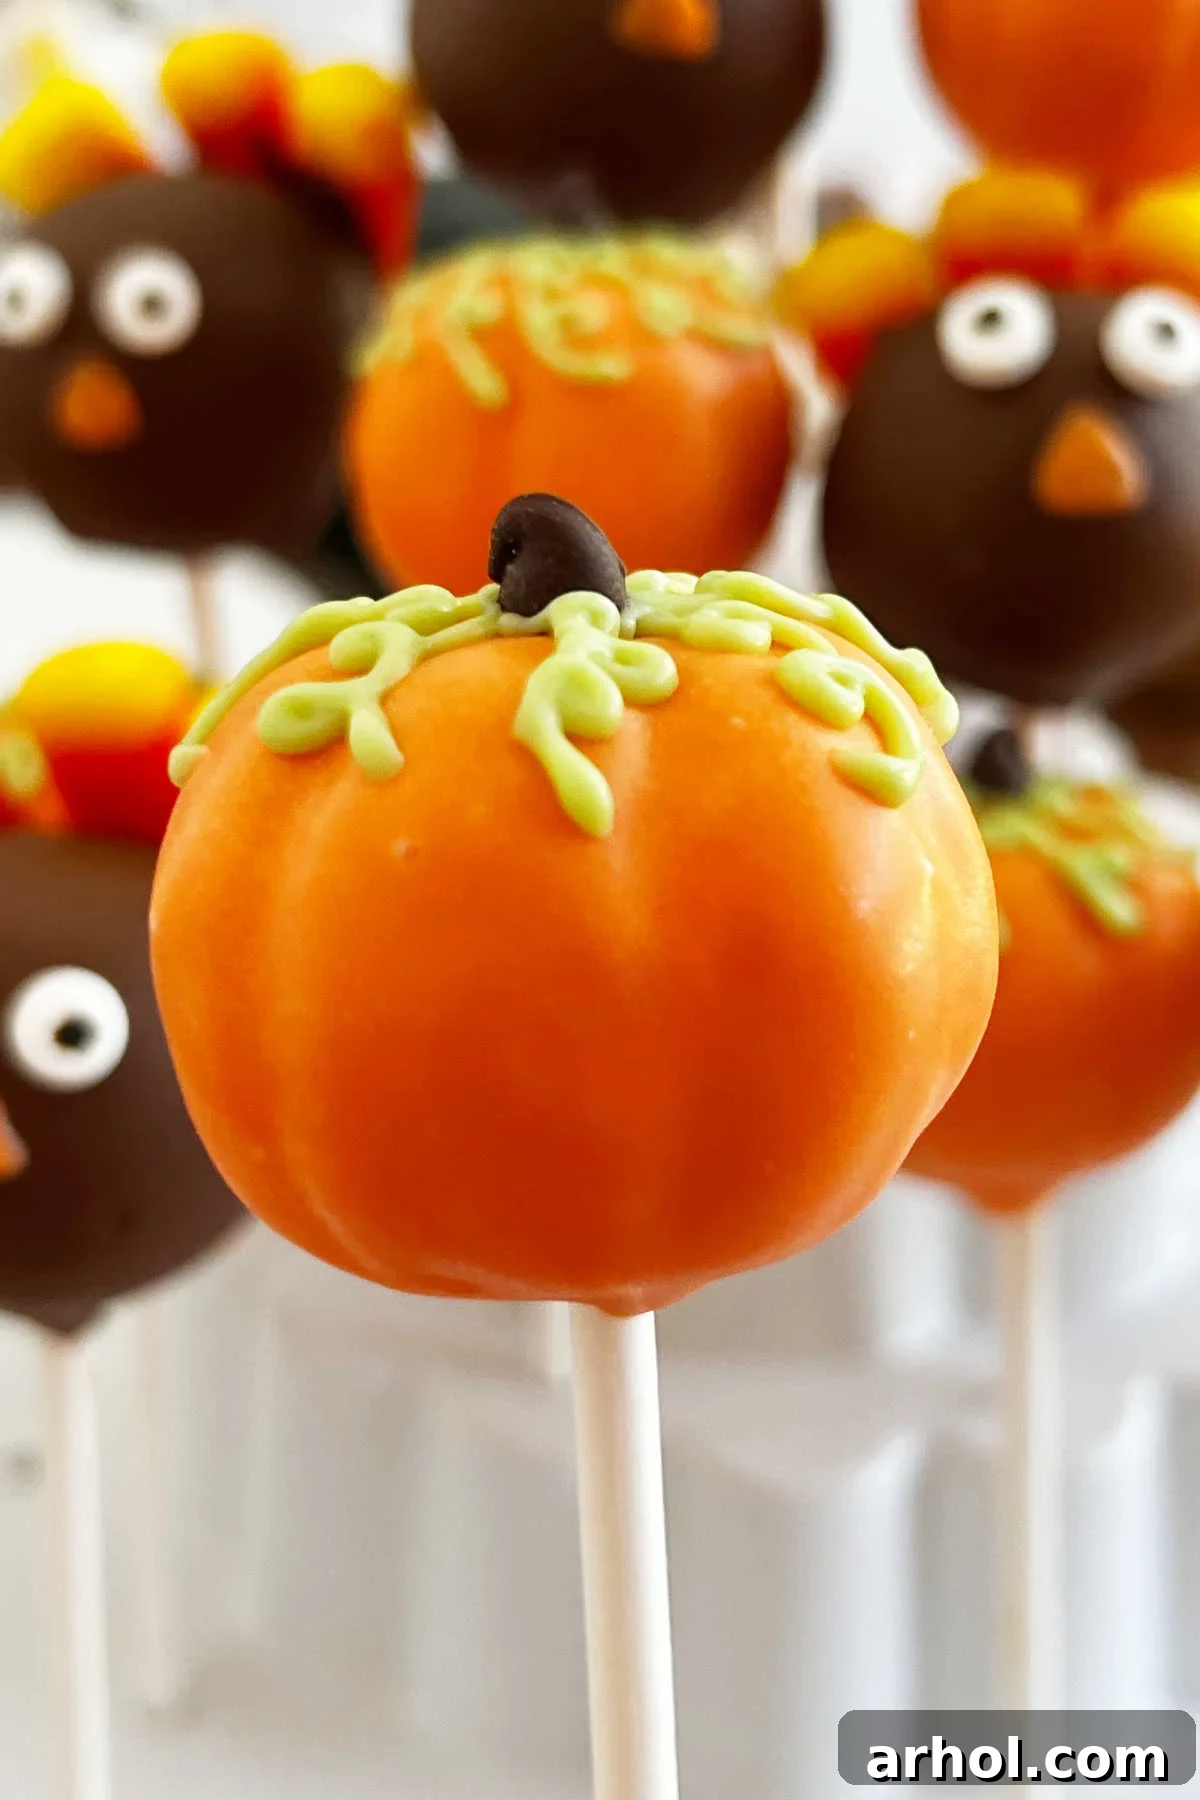
We had a blast making Halloween cake pops, and creating these delightful turkey day desserts was just as much fun, bringing smiles and festive cheer!
Thanksgiving Cake Pops Recipe Card
Thanksgiving Cake Pops Recipe
Dee
30
minutes
30
minutes
1
hour
2
hours
45
Ingredients
- 1 15.25 oz box cake mix
- 3 eggs
- 1¼ cup water
- ½ cup vegetable oil
- 1 cup frosting
- 2 cups white chocolate chips divided
- 12 oz orange candy melts
- ½ cup green candy melts
- 12 oz brown candy melts
- candy eyeballs
- candy corn
Instructions
-
Prepare and bake the cake mix according to box instructions for a 9×13 inch pan. Let cake cool completely.
-
Break the cooled cake up into small, fine pieces in a medium-sized mixing bowl. Add in frosting and mix together with clean hands until a dough forms.
-
Form the cake dough into uniform 1-inch sized balls and place onto a baking sheet lined with wax paper or parchment paper.
-
Melt 2 tablespoons of the brown candy melts. Dip one end of a lollipop stick into the melted candy coating and then carefully insert the stick halfway into each cake dough ball.
-
Refrigerate the cake pops for 1 hour to allow them to chill and firm up. This prevents crumbling during dipping.
For the Pumpkins
-
Before dipping, firmly press a toothpick around the sides of the cake pops to create the characteristic grooves of a pumpkin.
-
Melt orange candy melts in 30-second intervals, stirring after each, until completely smooth. Evenly dip the prepared cake pops into the orange candy melts, tapping off excess, and allow the coating to firm up completely in a cake pop holder.
-
Using a piping bag (or a ziplock bag with a small corner cut off), pipe on some delicate vines and small leaves with melted green candy melts. While the green candy is still wet, stick a mini chocolate chip on top as a stem for each pumpkin.
For the Turkeys
-
Melt brown candy melts in 30-second intervals, stirring after each, until completely smooth.
-
Evenly dip the cake pops into the melted brown candy melts. Allow candy melts to slightly firm up (partially set) before adding two candy eyeballs in the center of the cake pop. Let the coating firm up completely.
-
Dip the pointed end of 3-4 pieces of candy corn into a tiny bit of melted candy coating. Stick these pieces onto the back of the cake pop, fanning them out to create turkey feathers. Press firmly for a few seconds until the candy corn is “glued” in place.
-
Using a toothpick and leftover melted orange candy melts, draw a small triangle on the turkey’s face, just below the eyes. This acts as the beak.
Notes
Always melt candy coating and chocolate in the microwave in 30-second intervals, stirring well between each. Avoid overheating.
To prevent cake pops from cracking, refrigerate just until they are firm, not frozen solid. If the balls are too cold, the warm coating may crack.
Allow the main candy coating to dry before adding intricate candy decorations. Eyeballs can sometimes be added when the coating is partially set for better adhesion.
If you don’t have a piping bag, a sturdy Ziplock bag with a small corner cut off works perfectly for piping details.
For fewer cake pops, simply halve the recipe. Undecorated cake balls can be frozen for future use.
You can use store-bought cake or cupcakes as a shortcut if you prefer not to bake the cake from scratch.
Nutrition
Calories:
98
kcal
Carbohydrates:
12
g
Protein:
0.5
g
Fat:
5
g
Saturated Fat:
3
g
Polyunsaturated Fat:
0.5
g
Monounsaturated Fat:
1
g
Cholesterol:
2
mg
Sodium:
23
mg
Potassium:
25
mg
Fiber:
0.02
g
Sugar:
12
g
Vitamin A:
2
IU
Vitamin C:
0.04
mg
Calcium:
16
mg
Iron:
0.03
mg
Nutrition information is automatically calculated and should be used as an approximation.
Additional Info
Dessert
American
More Easy Thanksgiving Desserts Your Family Will Love
If you enjoyed making these fun and festive cake pops, you’re sure to love our other simple Thanksgiving dessert ideas that bring joy to the holiday table. Expand your repertoire with these delightful treats:
- Thanksgiving Oreo Turkey Cookies: Another incredibly charming and easy-to-make dessert, these Thanksgiving Oreo turkey cookies use everyone’s favorite sandwich cookie as a base, transforming them into whimsical turkeys with minimal effort. They’re perfect for involving kids in the kitchen and make a fantastic edible craft.
- No-Bake Pumpkin Pie Dip: Craving the flavors of pumpkin pie without the fuss of baking? Our super easy no-bake pumpkin pie dip is a creamy, spiced delight that comes together in minutes. Serve it with graham crackers, apple slices, or vanilla wafers for a crowd-pleasing appetizer or light dessert.
- Explore Our Thanksgiving Recipe Collection: For even more culinary inspiration, browse our extensive collection of delicious Thanksgiving recipes. From savory sides to heartwarming main courses and a plethora of sweet endings, you’ll find everything you need to create a memorable holiday feast that your family will adore.
We believe that holiday baking should be enjoyable and stress-free. These recipes are designed to be approachable for all skill levels, ensuring you can spend less time in the kitchen and more time making cherished memories with loved ones.
For more delicious desserts, easy recipes, and seasonal inspiration that your family will love, be sure to sign up for our weekly newsletter! You’ll receive fresh ideas directly in your inbox, ensuring you never miss out on the latest culinary delights. Don’t forget to follow us on social media for daily tips, behind-the-scenes glimpses, and engaging content that celebrates the joy of cooking and baking. Your feedback and creations truly inspire us, so feel free to leave a comment below and share your cake pop masterpieces!