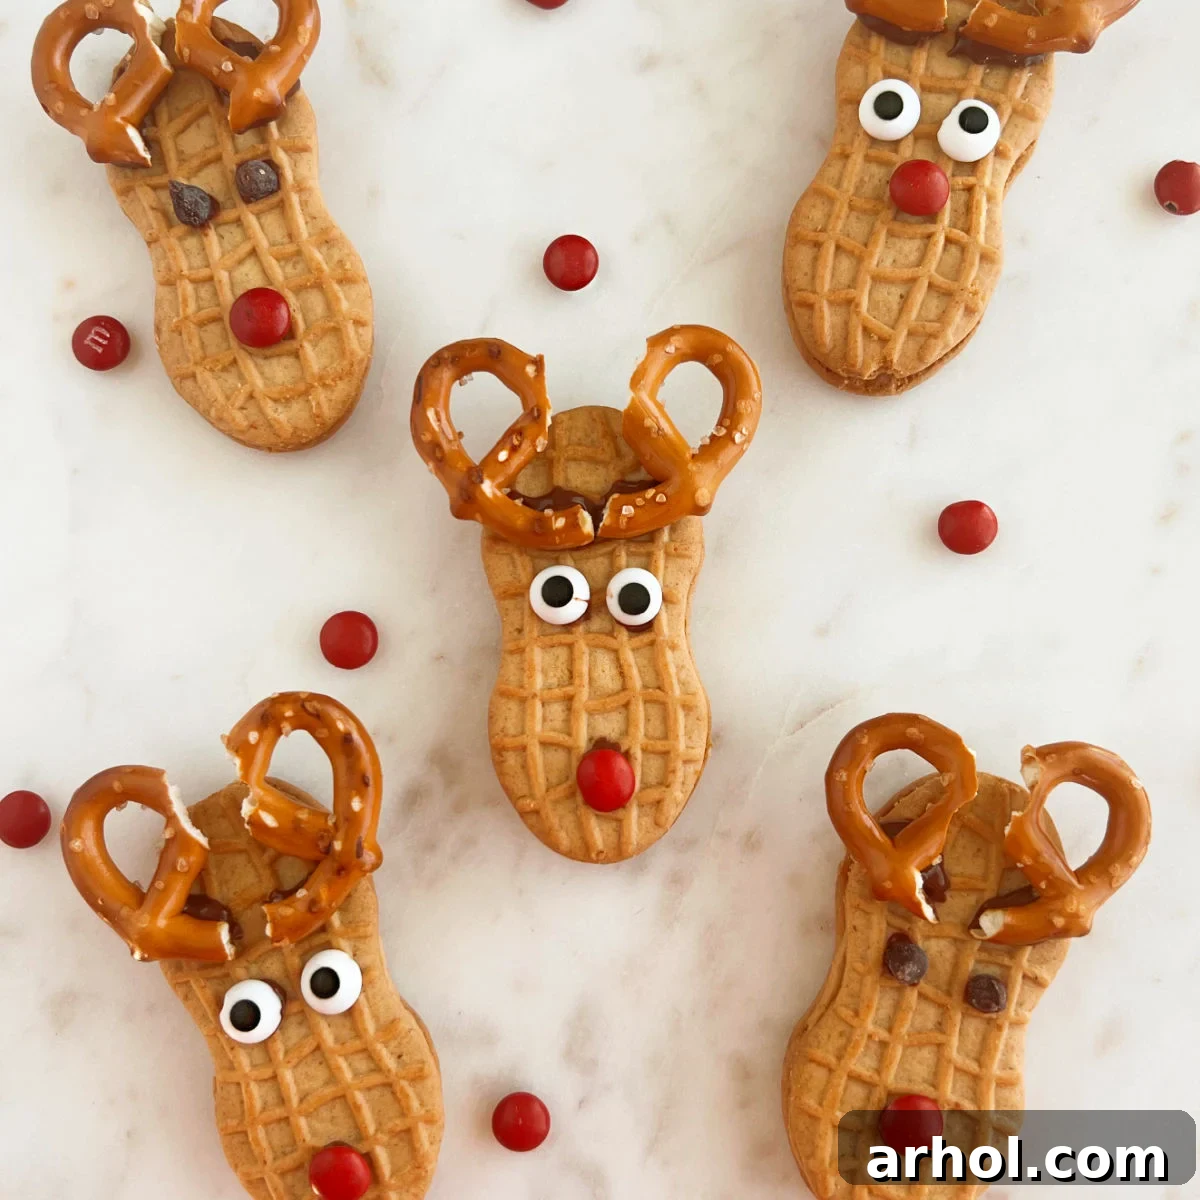
Nutter Butter Reindeer Cookies are delightfully easy, no-bake Christmas treats that capture the festive spirit with charming peanut butter cookies, crunchy pretzels, and just a few simple decorative ingredients. These adorable reindeer cookies are not only a joy to make but also perfect for holiday parties, festive gatherings, and adding a touch of whimsy to your Christmas cookie trays throughout the season!
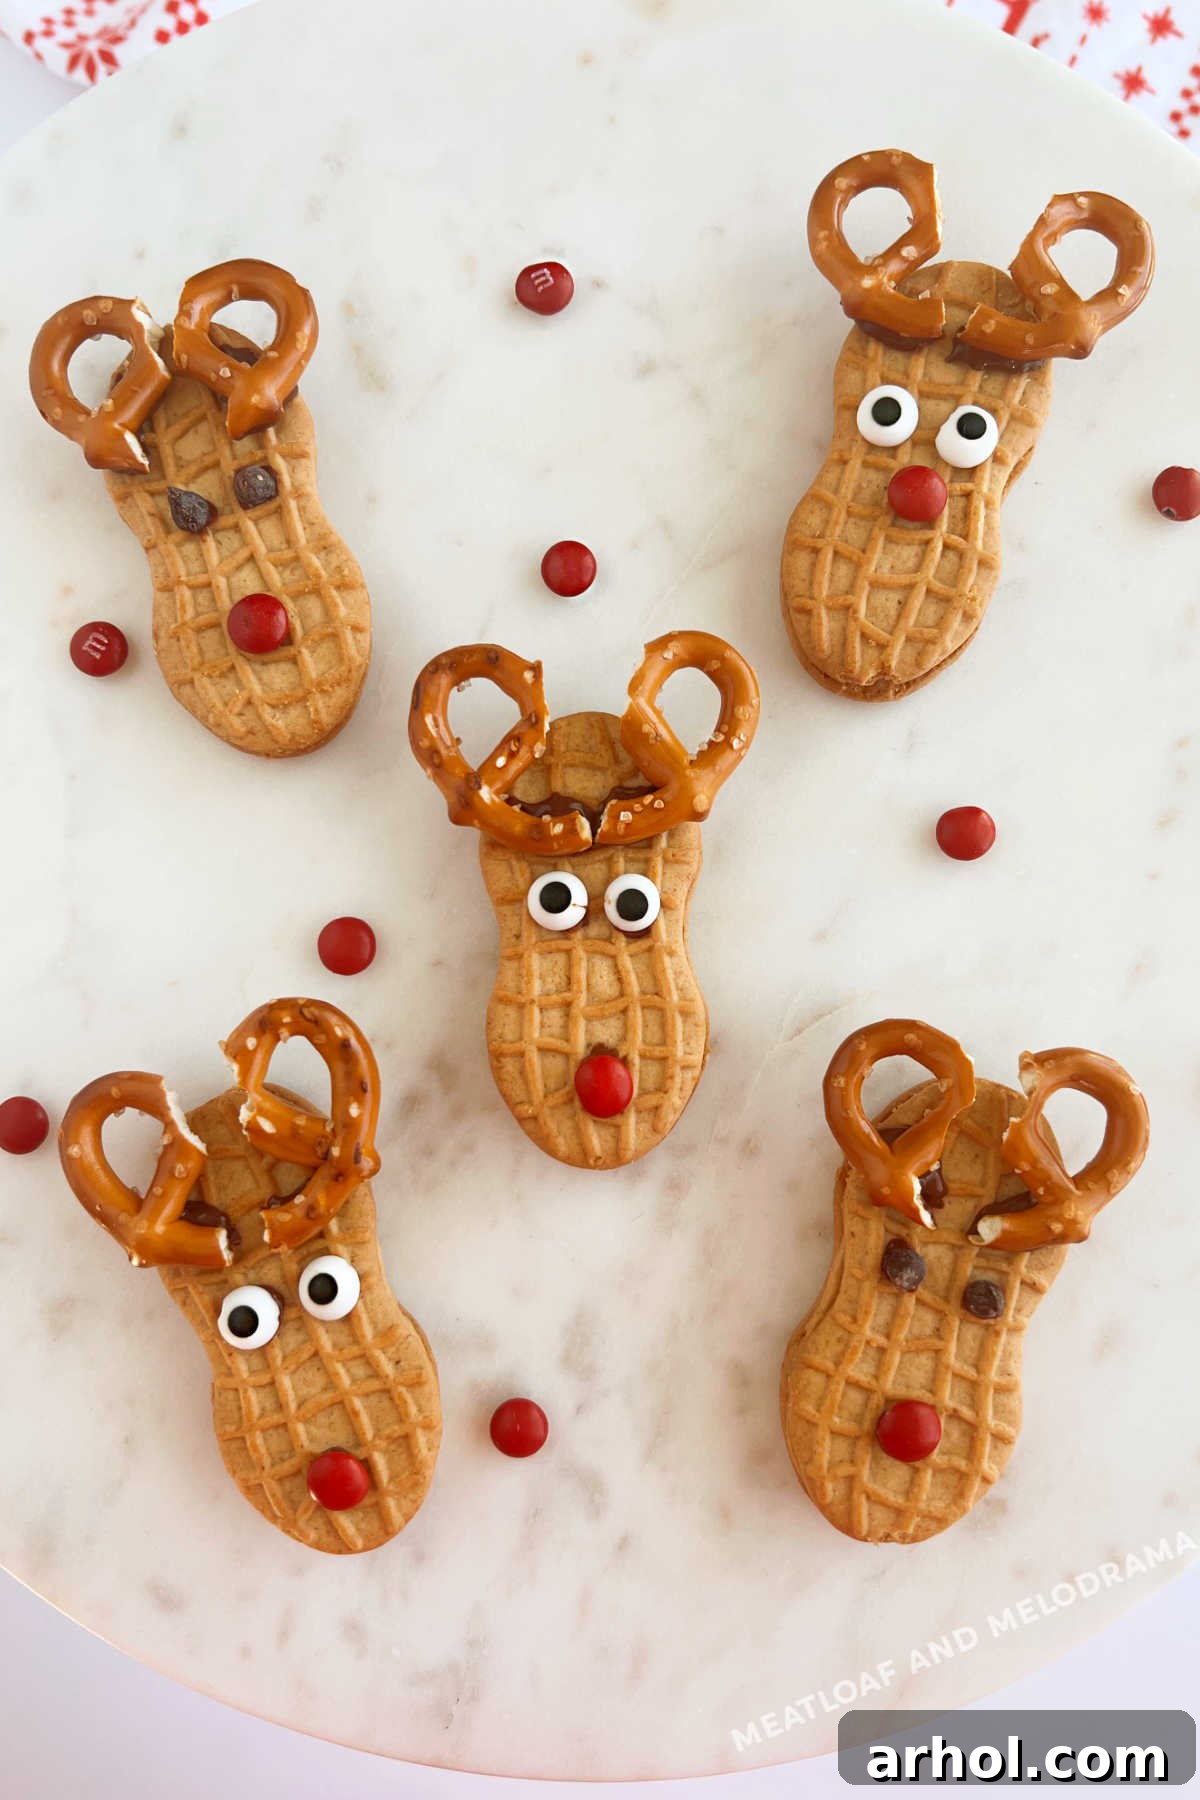
Table of Contents
- Introduction to Nutter Butter Reindeer Cookies
- Why You’ll Love These Easy Christmas Cookies
- Essential Ingredients for Your Reindeer Cookies
- Step-by-Step Guide: How to Make Nutter Butter Reindeer Cookies
- Pro Tips for Perfect Reindeer Cookies
- Creative Variations for Your Reindeer Treats
- How to Store Nutter Butter Reindeer Cookies
- Frequently Asked Questions (FAQ)
- Nutter Butter Reindeer Cookies Recipe Card
- Celebrate the Season with Sweet Reindeer Smiles
Introduction to Nutter Butter Reindeer Cookies
The holiday season is a magical time, often filled with the wonderful aromas of freshly baked goods. While traditional baking holds a special place in our hearts, sometimes the rush of festive preparations calls for simpler, quicker solutions. Enter Nutter Butter Reindeer Cookies – the ultimate solution for anyone craving adorable, delicious, and incredibly easy Christmas treats without turning on the oven! These charming cookies transform a classic peanut butter sandwich cookie into a festive reindeer with just a few decorative touches. Perfect for engaging kids and delighting guests, these no-bake wonders are a guaranteed crowd-pleaser and a staple for any holiday treat repertoire.
Why You’ll Love These Easy Christmas Cookies
If your holiday schedule is packed, or if you simply prefer a hassle-free approach to seasonal sweets, you are absolutely going to adore these super cute reindeer cookies! They embody everything we love about holiday treats: they’re fun, they’re delicious, and they bring a smile to everyone’s face. Here’s why they’re a must-try for your holiday season:
- No-Bake Simplicity: Forget about preheating ovens, measuring flour, or waiting for dough to chill. These cookies require no baking whatsoever, making them ideal for busy holiday schedules or for involving younger helpers in the kitchen. This saves significant time and effort, allowing you to focus on other festive activities.
- Minimal Ingredients: With just a handful of readily available ingredients, you can whip up a batch in no time. Most items can be found at your local grocery store, saving you time and effort on specialized shopping trips. This convenience makes them an accessible treat for everyone.
- Quick Assembly: The entire process, from preparation to decoration, takes mere minutes. You can create a whole tray of these festive reindeers faster than many traditional cookie recipes, which is perfect for last-minute party contributions or unexpected guests.
- Kid-Friendly Fun: This recipe is perfect for little hands! Kids will love breaking pretzels, dipping candies, and watching their Nutter Butter cookies transform into beloved Christmas characters. It’s a fantastic, interactive activity for family bonding and creating cherished holiday memories.
- Peanut Butter Perfection: Nutter Butter cookies provide a delightful peanut butter base that is universally loved. The irresistible combination of sweet peanut butter, salty pretzels, and smooth chocolate creates a flavor profile that appeals to nearly everyone.
- Festive & Adorable: These cookies are undeniably cute! They instantly elevate any holiday cookie plate, adding a playful and whimsical touch to your Christmas spread. They’re perfect for school parties, potlucks, gifts, or simply enjoying at home with a cup of hot cocoa.
Just like other popular no-bake creations such as Nutter Butter ghost cookies, Oreo turkey cookies, and Nutter Butter flip flops, these reindeer cookies rely on store-bought sandwich cookies as their foundation. This foundation makes them incredibly simple to prepare, allowing you to skip the complicated baking steps and jump straight to the fun part: decorating them into festive, edible masterpieces, perfect for a Christmas party or as a special treat on your Christmas Eve cookie plate!
Essential Ingredients for Your Reindeer Cookies
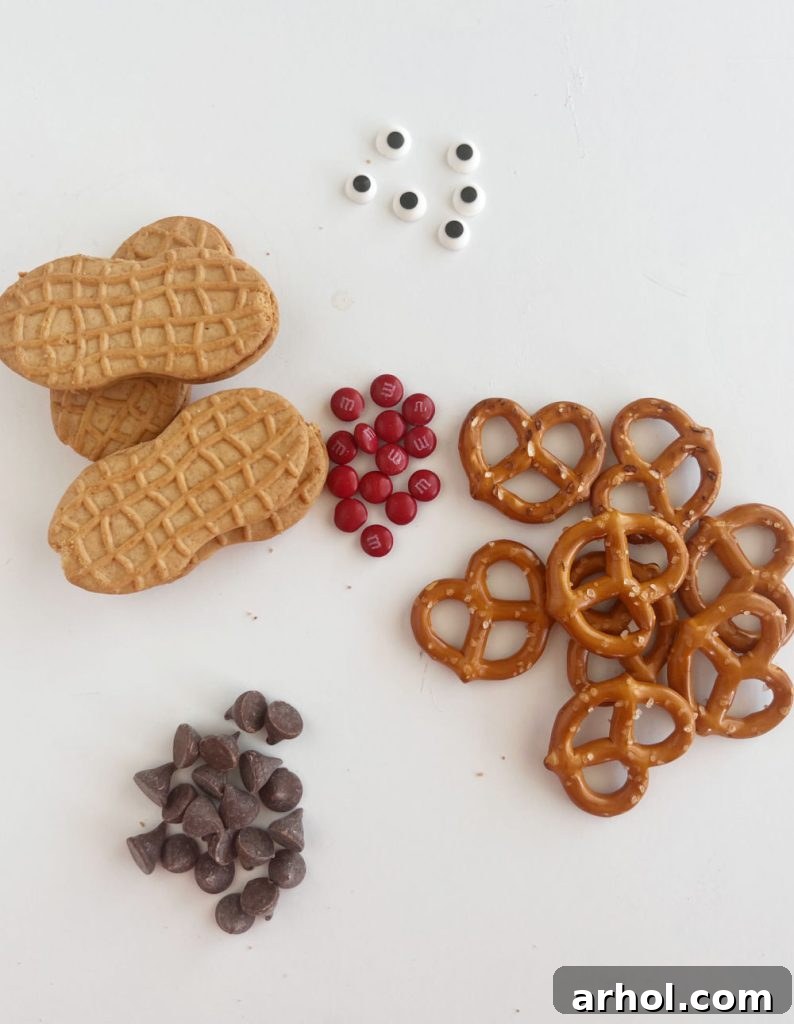
You’ll be amazed at how few ingredients are needed to bring these adorable Nutter Butter reindeers to life. This minimalist ingredient list means less shopping, less fuss, and more time enjoying the holiday spirit. You can easily find all these items at your local grocery store or order them online:
- Nutter Butter Sandwich Cookies: The undisputed star of our show! These classic peanut butter cookies provide the perfect oval base and distinctive flavor for our reindeer heads. Their unique texture and rich peanut butter taste are key to this treat’s appeal.
- Mini Pretzels: These savory, crunchy twists are cleverly used to create the reindeer’s antlers. Their unique knotted shape, when broken in half, forms the ideal silhouette for realistic-looking antlers, adding a delightful salty crunch to the sweet cookie.
- Candy Eyes: Edible candy eyes instantly add personality and bring your reindeer to life with a whimsical touch. You can find these in most baking aisles, especially during holiday seasons. They come in various sizes, so choose mini or small ones to fit the Nutter Butter scale.
- Mini Red Candies: For that iconic Rudolph touch! Mini M&Ms, Red Hots, or even small red jelly beans are perfect choices for creating those bright, cheerful red noses that make these cookies truly stand out.
- Chocolate Chips: A small amount of melted chocolate chips serves as the edible “glue” to secure all the delightful decorations. Dark, milk, or semi-sweet chocolate chips will work beautifully, adding another layer of flavor and ensuring everything stays in place.
Step-by-Step Guide: How to Make Nutter Butter Reindeer Cookies
Making Nutter Butter Reindeer Cookies is an incredibly straightforward process, perfect for beginners and seasoned decorators alike. Follow these simple steps, and you’ll have a herd of adorable reindeer ready to delight in no time!
1. Prepare Your Workspace and Gather Ingredients
Before you begin, ensure your workspace is clean and organized. Lay out all your ingredients within easy reach. This “mise en place” approach makes the assembly process smooth, efficient, and enjoyable. Additionally, prepare a cookie sheet or a large plate by covering it with wax paper or parchment paper. This provides a non-stick surface for your finished cookies and significantly aids in easy cleanup once they’re set.
2. Crafting the Perfect Antlers from Pretzels
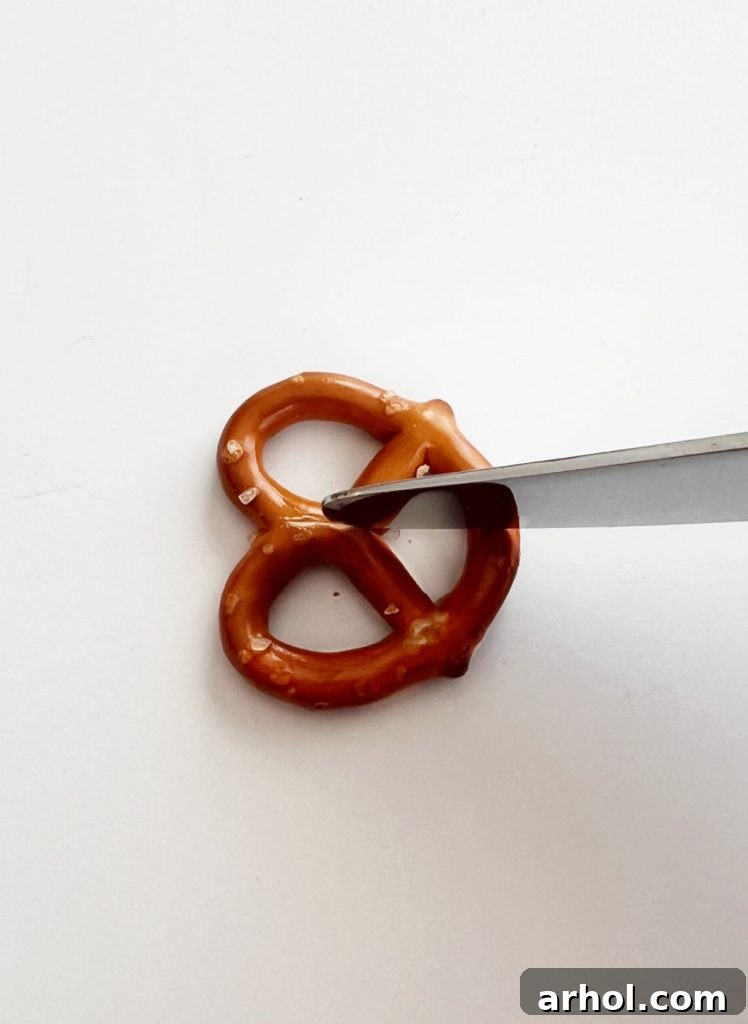
The mini pretzels will become your reindeer’s distinctive antlers. You’ll need to break each mini pretzel in half, with each half forming one antler. Achieving a clean, even break can sometimes be tricky with pretzels, as they tend to shatter. To ensure beautifully shaped antlers, here’s a useful tip:
Instead of simply snapping the pretzel, which can result in uneven or crumbly breaks, use a small, sharp knife to gently slice a shallow indent into the middle of the pretzel, right where you intend it to break. This score line will act as a guide. Then, apply gentle pressure to snap the pretzel along this indent. With this method, you should consistently get two perfectly shaped antler halves!
3. Melting the Chocolate “Adhesive”
Once your pretzel antlers are ready, it’s time to melt the chocolate chips. This melted chocolate will serve as the essential adhesive for all your reindeer’s charming features. There are two primary, reliable methods for melting chocolate:
- Microwave Method: Place the chocolate chips in a microwave-safe bowl. Heat them in short bursts – typically 15 to 30-second increments – stirring thoroughly after each interval. Continue this process until the chocolate is smooth and completely melted. Be vigilant not to overheat, as chocolate can burn quickly, becoming grainy and unusable.
- Double Boiler Method: If you prefer a stovetop approach or are working with larger quantities, use a double boiler. Place your chocolate chips in a heatproof bowl set over a saucepan of simmering water. Ensure the bottom of the bowl does not touch the water. Stir constantly and gently until the chocolate is melted and perfectly smooth.
Aim for a smooth, pourable but not watery consistency. If the melted chocolate seems too thick, you can stir in a tiny bit of coconut oil or vegetable shortening (about ½ teaspoon per cup of chocolate chips) to thin it slightly, though good quality chocolate chips usually melt to the right consistency on their own.
4. Assembling Your Nutter Butter Reindeers
With your chocolate perfectly melted and all decorative ingredients prepped, the fun of assembly truly begins! This is where your cookies transform into festive characters.
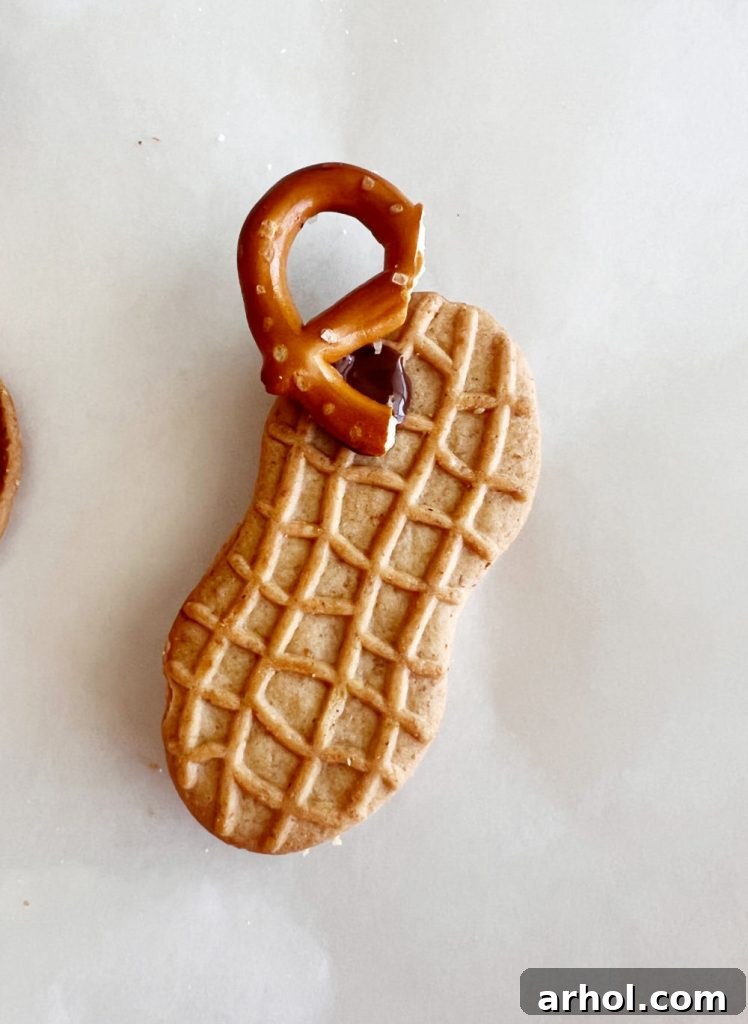
First, pick up a Nutter Butter cookie. Dip one end of a pretzel half into the melted chocolate. Using this chocolate as an adhesive, carefully place the pretzel half onto the top edge of the Nutter Butter cookie, creating the first antler. Repeat this process with the second pretzel half for the other antler, positioning them symmetrically on the top of the cookie.
For more precise application and to avoid spreading excess chocolate, you can dip the tip of a toothpick into the melted chocolate. Use this chocolate-coated toothpick to dot a small amount of chocolate onto the pretzel before attaching it. This method offers greater control and helps maintain a cleaner finish on your reindeer’s face.
Pro Tip for Antler Placement: Position the pretzel pieces not too far off the reindeer’s “head” (the cookie). Placing them slightly inward, closer to the center, will help the antlers adhere more securely and prevent them from breaking off easily during handling.
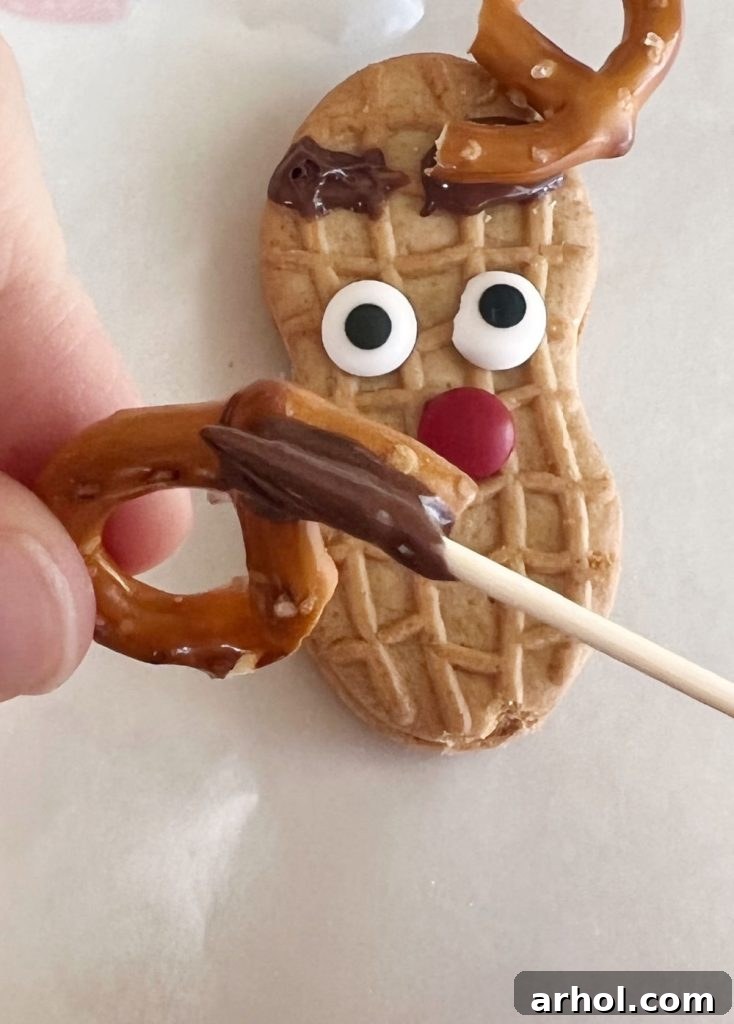
5. Adding Expressive Eyes and a Cheerful Nose
Next, use the melted chocolate and a clean toothpick (or a fine-tipped food-safe brush) to apply the candy eyes and the mini red candy noses. For the eyes, you have options: you can use pre-made candy eyes, which lend a cartoonish, expressive look, or simply use two mini chocolate chips, placed with their flat side against the cookie.
For the nose, a mini red M&M or a Red Hot candy works perfectly, giving your reindeer that iconic Rudolph glow. Apply a tiny dot of melted chocolate to the back of each candy eye and to the back of your chosen nose candy. Then, gently press them onto the Nutter Butter cookie.
Important Placement Tip: To ensure optimal adhesion and prevent your reindeer’s charming features from falling off, try to place the candy eyes and noses directly into the natural grooves or indentations that are typically found on Nutter Butter cookies. These slight depressions provide a more secure resting place for the decorations, helping them to stick better and stay firmly in place.
6. Setting and Preparing for Serving
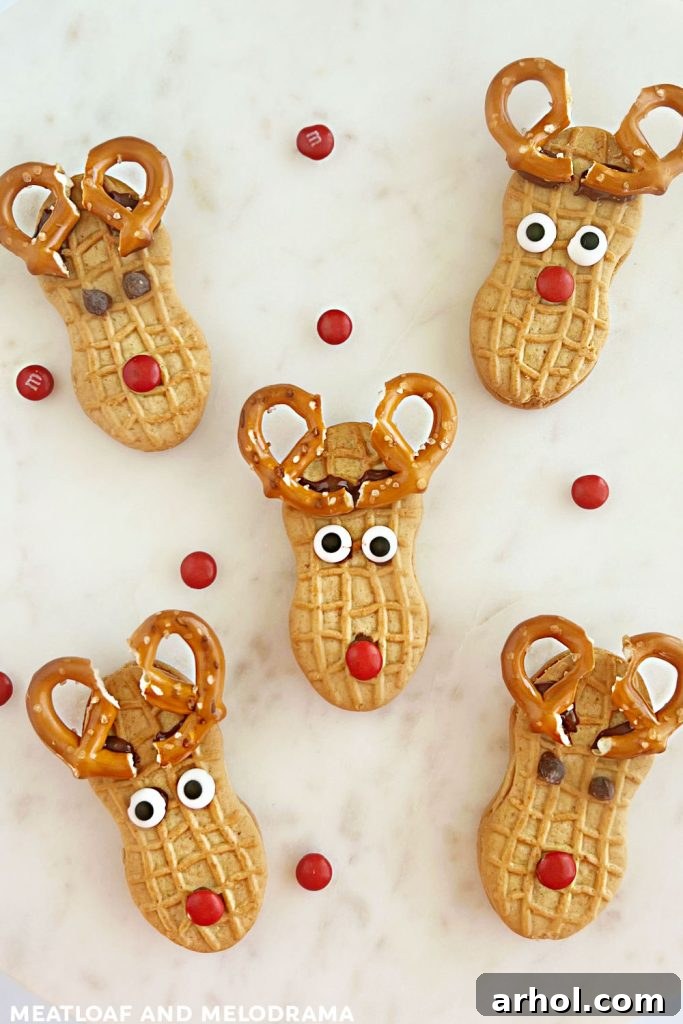
Once all your Nutter Butter reindeer cookies are decorated, carefully arrange them on your prepared wax paper-lined baking sheet or plate. To help the melted chocolate adhesive firm up quickly and securely set all the decorations, pop the entire tray into the refrigerator for approximately 10-15 minutes, or until the chocolate is completely set and hard to the touch.
That’s all it takes to make these adorable Nutter Butter reindeer cookies! These cute treats are the perfect finger food for the Christmas season, guaranteed to bring joy, laughter, and festive cheer to any gathering or holiday event. They are truly a testament to how much charm can be created with minimal effort.
Pro Tips for Perfect Reindeer Cookies
While these cookies are incredibly easy and forgiving, a few insider tips can help make your Nutter Butter Reindeer even more perfect, professional-looking, and stress-free to create:
- Work in Batches for Efficiency: If you’re planning to make a large quantity of cookies, consider working in smaller batches. This approach keeps your melted chocolate from hardening too quickly, ensuring a consistent application, and allows you to give proper attention to the details of each cookie.
- Achieve the Right Chocolate Consistency: The key to good adhesion and a smooth finish is properly melted chocolate. If the chocolate is too thick, it won’t spread easily or adhere well. If it’s too thin, it might run and create a messy look. Aim for a consistency that is smooth and pourable, yet thick enough to hold its shape once applied.
- Get Creative with Your Tools: Don’t limit yourself to just toothpicks! Small food-safe paint brushes, tiny silicone spatulas, or even the tip of a small spoon can be excellent tools for applying chocolate, offering different levels of control and precision for various details.
- Chill Time is Crucial: Do not skip the refrigeration step! It is absolutely essential for the melted chocolate to set completely. This ensures that your reindeer’s delicate features – the pretzels, eyes, and noses – stay firmly in place, which is particularly important when transporting the cookies or stacking them on a platter.
- Involve the Entire Family: This is an ideal activity for children of all ages, from toddlers to teens. Assign different tasks based on skill level: older kids can help break pretzels, while younger ones can unwrap candies or carefully place eyes and noses (with adult supervision, especially with melted chocolate). It’s a wonderful way to foster family bonding and create lasting holiday memories.
- Consider Edible Pens: For advanced detailing, edible food marker pens can be used to add small pupils to candy eyes or draw tiny eyebrows or mouths once the chocolate has set.
Creative Variations for Your Reindeer Treats
We love to keep our Nutter Butter creations simple and charming, but there’s no limit to the fun you can have with these peanut butter reindeer cookies! Feel free to unleash your creativity and customize them to your heart’s content, making each batch unique and perfectly suited to your festive vision:
Chocolate Coating and Dipping for a Polished Look
One popular way to vary these cookies is to give them a full chocolate coat. Instead of just using a small amount of melted chocolate chips as an adhesive, use a larger quantity of melted candy coating (also widely known as candy melts) or regular baking chocolate. You can dip the entire Nutter Butter cookie into the melted coating, ensuring it’s completely covered. While the coating is still wet and before it sets, gently but firmly press the mini pretzel twists for antlers, candy eyes, and your chosen red candy nose into place. White candy melts or even colored candy melts (perhaps brown for a traditional reindeer, or a festive green or red for a unique twist!) can offer a different aesthetic and a subtly different flavor profile.
Hand-Drawn Features for Artistic Flair
If you enjoy a bit more artistic expression and precision, you can use melted candy coating or different types of chocolate to draw on the reindeer features instead of relying solely on pre-made candies. This method allows for greater customization:
- Eyes: Use white chocolate or white candy melts applied with a toothpick or a fine-tipped piping bag to create the whites of the eyes. Once these have set, use a tiny dot of black candy melts, milk chocolate, or dark chocolate to make the pupils. For even finer details, a food-safe edible marker can be used once the chocolate is completely dry.
- Noses: A small, carefully placed dot of red candy melt can replace a mini red candy, allowing you to control the exact size and shape of Rudolph’s nose, or even create other colored noses.
- Mouths/Details: With a very fine-tipped applicator or toothpick, you could even add a tiny, cheerful smile, delicate eyebrows, or rosy cheeks for extra character and personality.
Nose Color Variety for a Diverse Herd
While Rudolph’s iconic red nose is a beloved classic, you certainly don’t need to make all your reindeer Rudolphs! Any type of small red candy will work beautifully for the noses—red M&Ms and Red Hots are definitely favorites due to their vibrant color and convenient size. However, for a truly diverse and charming herd, consider using other colors. A brown mini M&M, a white M&M, a small chocolate chip, or even a tiny green or blue candy will work just as well for creating adorable, uniquely nosed reindeer that add variety to your cookie platter.
Antler Alterations for Different Looks
For different antler shapes, sizes, and textures, you have several creative options beyond just breaking mini pretzels:
- Pretzel Sticks: Instead of mini pretzel twists, you can use longer pretzel sticks for a more elongated, slender, or rustic antler look. Simply break them to your desired length and attach as you would the pretzel halves.
- Coated Antlers: For a more gourmet touch and an added layer of flavor, you could dip the pretzel antlers entirely in melted chocolate or colored candy melts. Allow them to set in the refrigerator before attaching these coated antlers to the cookies. This technique adds a polished appearance and an extra chocolatey crunch.
- Alternative Antler Materials: If you’re feeling particularly adventurous, consider using other edible items like small pieces of chocolate-covered espresso beans, thin chocolate-dipped pretzel rods, or even carefully piped chocolate antlers that are allowed to harden on parchment paper before being attached.
How to Store Nutter Butter Reindeer Cookies
Proper storage is essential to keeping your Nutter Butter reindeer cookies fresh, delicious, and ensuring their adorable features stay perfectly intact. Here are the best practices for storing them to maximize their lifespan and maintain their quality:
- Airtight Container is Essential: Always store your Nutter Butter reindeer cookies in an airtight container. This is crucial for several reasons: it prevents them from drying out and becoming stale, keeps them fresh, and protects them from absorbing any unwanted odors from other foods in your pantry or refrigerator.
- Initial Refrigeration for Setting: After initially assembling your cookies and allowing the melted chocolate adhesive a few minutes to cool slightly at room temperature, it’s a very good idea to refrigerate them for about 10-15 minutes. This step is critical for helping all the features—the pretzel antlers, candy eyes, and candy noses—stick firmly and permanently to the cookies.
- Room Temperature Storage (Standard): Once the chocolate is fully hardened and the features are set, you can typically leave these charming Rudolph cookies at room temperature. Place them in the airtight container and store them in a cool, dry place away from direct sunlight or heat sources. They will stay fresh and delightful for about 5-7 days. However, if your kitchen or home tends to be particularly warm, or if you reside in a humid climate, refrigerating them is a safer bet to prevent softening or melting.
- Refrigerated Storage (Optional for Extended Freshness): If you choose to refrigerate them for longer-term storage (beyond a few days) or if your environment dictates it, place the airtight container in the refrigerator. When refrigerated, these cookies can last up to 2 weeks while maintaining their quality. For optimal flavor and texture, allow them to come to room temperature for about 15-20 minutes before serving.
- Freezing (Generally Not Recommended): While you *could* technically freeze plain Nutter Butter cookies, it’s generally not recommended for these decorated treats. Freezing and thawing can alter the texture of the pretzels (making them less crisp or even soggy) and potentially cause the chocolate decorations to “bloom” (develop harmless white streaks on the surface) or become brittle and detach. These cookies are truly at their best when enjoyed fresh within a week or two of preparation.
Frequently Asked Questions (FAQ)
Here are some common questions about making Nutter Butter Reindeer Cookies, designed to help you troubleshoot and perfect your festive treats:
- Q: Can I use different types of cookies as the base?
A: While Nutter Butter cookies are ideally suited due to their unique peanut butter flavor, oval shape, and distinct grooves (which help decorations stick), you could experiment with other similarly shaped sandwich cookies. However, the peanut butter flavor is a key element of this recipe’s charm and makes it instantly recognizable as a “Nutter Butter” reindeer. - Q: How far in advance can I make these cookies?
A: You can conveniently make these adorable cookies up to a week in advance of your event or serving time. Ensure they are stored in an airtight container at room temperature (or refrigerated if your home is particularly warm or humid) to maintain their freshness and appearance. - Q: What if my chocolate won’t melt smoothly or becomes too thick?
A: Ensure your chocolate chips are fresh and of good quality. If your melted chocolate becomes too thick to work with, try stirring in a tiny bit of neutral-flavored oil, such as coconut oil or vegetable shortening (start with ¼ to ½ teaspoon) to thin it to the desired consistency. Crucially, avoid getting any water into the chocolate, as even a tiny drop can cause it to “seize” and become a lumpy, unusable mess. - Q: My pretzels keep breaking unevenly. Are there any tricks?
A: The knife-scoring trick mentioned in step 2 of the instructions is usually very effective for achieving clean breaks. If you are still struggling, consider purchasing mini pretzel *sticks* instead of twists and breaking them into smaller, more manageable pieces. Alternatively, some stores sell bags of pre-broken pretzel pieces that might work. - Q: Can I use royal icing or frosting instead of melted chocolate for adhesive?
A: Yes, royal icing or a stiff-consistency frosting could also work as an adhesive for attaching the decorations. However, be aware that royal icing typically takes longer to set than melted chocolate, and standard frosting may not harden enough to securely hold the pretzels, making melted chocolate the preferred and most reliable option. - Q: How can I make these cookies allergy-friendly?
A: Since Nutter Butter cookies contain peanuts, they are not suitable for peanut allergy sufferers. To make a similar concept allergy-friendly, you would need to use an oval-shaped, plain vanilla cookie (ensure it’s nut-free) and use a chocolate coating that is also certified nut-free. Always check all ingredient labels carefully.
Print Recipe
Nutter Butter Reindeer Cookies
Dee
20 minutes
1 minute
21 minutes
12 Reindeer Cookies
Ingredients
- 12 Nutter Butter sandwich cookies
- 12 mini pretzels (you’ll break each into two halves for antlers)
- 24 candy eyes (or mini chocolate chips)
- 12 mini red candies (such as mini M&Ms or Red Hots)
- ¼ cup chocolate chips (for melting and using as adhesive)
Instructions
-
Carefully break each mini pretzel in half. For best results, score the middle with a knife before snapping, as described in the blog post above.
-
Melt the ¼ cup of chocolate chips. You can do this in a microwave-safe bowl, heating in 15-30 second increments and stirring well between each, until smooth. Alternatively, use a double boiler method.
-
Dip one end of a pretzel half into the melted chocolate. Place this chocolate-coated end onto the top portion of a Nutter Butter cookie, creating an antler. Repeat for the second antler on the other side.
-
Dip the back of two candy eyes into the melted chocolate. Place the eyes just below the pretzel antlers, pressing gently into the cookie’s grooves for better adhesion.
-
Apply a small dot of melted chocolate to the back of a mini red candy (or desired nose candy). Place this candy onto the lower middle part of the cookie, below the eyes.
-
Repeat steps 3-5 for all remaining Nutter Butter cookies until your entire batch of reindeer is decorated.
-
Arrange the finished cookies on a wax paper-lined baking sheet or plate. Place them in the refrigerator for 10-15 minutes to allow the chocolate to firm up and all the decorations to set securely.
Notes
M&M candies or Red Hots are excellent choices for the reindeer noses, but any small round candy will work.
For extra security, ensure candies are placed in the natural grooves of the Nutter Butter cookies.
Nutrition
Carbohydrates: 14g,
Protein: 1g,
Fat: 4g,
Saturated Fat: 1g,
Polyunsaturated Fat: 1g,
Monounsaturated Fat: 1g,
Trans Fat: 1g,
Cholesterol: 1mg,
Sodium: 66mg,
Potassium: 1mg,
Fiber: 1g,
Sugar: 7g,
Vitamin A: 11IU,
Vitamin C: 1mg,
Calcium: 6mg,
Iron: 1mg
Nutrition information is automatically calculated and is an approximation. Values may vary based on specific brands and exact measurements.
Additional Information
Dessert, Snack, Holiday Treat
American
Christmas, Holiday Parties, Winter Gatherings
Enjoy these festive Nutter Butter Reindeer Cookies!
Share your creations and spread the holiday cheer!
Celebrate the Season with Sweet Reindeer Smiles
These Nutter Butter reindeer are more than just cookies; they’re a fun, simple, and utterly charming way to celebrate the holiday season. Their delightful peanut butter flavor combined with their undeniable cuteness makes them an instant hit with both children and adults. They look absolutely adorable on any cookie tray, serving as perfect conversation starters and a testament to festive creativity, even when time is short.
Whether you’re hosting a grand holiday party, contributing to a school potluck, or simply looking for a fun activity to do with the family, these no-bake wonders are sure to bring smiles and delicious memories. So gather your ingredients, enlist your helpers, and get ready to create a festive herd of Nutter Butter Reindeer that will enchant everyone who sees (and tastes!) them. They are a true embodiment of holiday magic in edible form.
For more easy Christmas desserts and fantastic holiday cookie ideas to make your season even sweeter, be sure to explore our other recipes and subscribe to our newsletter for the latest festive inspirations directly in your inbox! Happy holidays and happy decorating!