
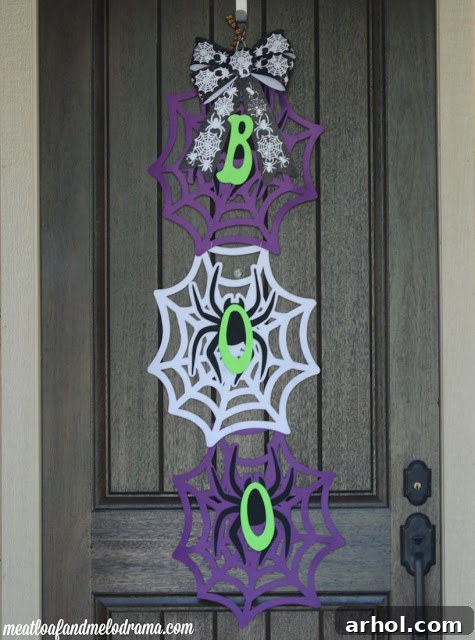
As autumn’s crisp air begins to whisper and the leaves turn vibrant shades of orange and red, a spooky excitement fills the atmosphere. Halloween, the most bewitching time of the year, is just around the corner, calling for delightful decorations that capture its festive spirit. Many of us find ourselves scrambling at the last minute, realizing our summer wreaths are still adorning our doors, a minor horror in itself!
Spooktacularly Simple: Create Your Own Easy Halloween ‘BOO’ Door Hanger for Under $10!
Don’t fret if your front door is still stuck in summer! We’re here to guide you through crafting an incredibly charming and budget-friendly Halloween ‘BOO’ door hanger that takes mere minutes to assemble. This DIY project is a perfect way to infuse your home with immediate autumnal and Halloween cheer without breaking the bank. Imagine a handcrafted piece that welcomes trick-or-treaters and guests alike, all made with simple finds from your local dollar store and craft store. This unique decoration not only adds a personal touch but also stands out from generic store-bought options, proving that fabulous festive decor doesn’t require a hefty price tag or hours of intricate work.
The Inspiration Behind Your Budget-Friendly Haunt
For the longest time, I harbored a desire to create a “BOO” themed Halloween door decoration. There’s something undeniably classic and universally loved about a “BOO” sign. The main challenge, however, was always finding the right-sized letters to make a statement. Mass-produced letters often felt too small or lacked the character I envisioned. This is precisely where the magic of DIY comes into play! During a spontaneous trip to the Dollar Store, my “Spidey senses” (quite fitting for a Halloween craft, wouldn’t you say?) started tingling.
Amidst the aisles, I discovered some generously sized felt spider webs and a large, delightfully spooky bow featuring a spider theme. Immediately, my mind started piecing together the possibilities. These seemingly simple items, costing just a dollar each, held the potential for something truly special and impactful. The Dollar Store is a treasure trove for crafters, brimming with seasonal items that can be transformed into stunning decorations with a little imagination. With the base elements secured, a quick stop at Michael’s for the perfect wooden letters and vibrant craft paint completed my material hunt. The anticipation of turning these simple finds into a fantastic door hanger was exciting, and soon I was home, ready to bring my vision to life.
Gather Your Hauntingly Good Supplies
One of the best aspects of this Easy Halloween Door Hanger project is its reliance on readily available and inexpensive materials. You won’t need to scour specialized craft stores or invest in costly supplies. Everything you need can be found at your local dollar store, craft store, or even repurposed from items you already own. Here’s a detailed list of what you’ll need, along with some helpful tips for selection:
Essential Materials:
- 3 Large Felt Spider Webs: Look for sturdy felt webs. Variety in color (like purple and white, as used here) can add visual interest and depth to your design. These form the main structure of your door hanger, so choose ones that are reasonably sized to make an impact on your door.
- Wood Letters (for “BOO”): Select letters that are large enough to be easily seen from a distance and complement the size of your spider webs. Unfinished wood letters are perfect as they can be painted any color you desire. Alternatively, you could use thick cardboard or foam letters for an even lighter craft.
- Fine Gauge Wire: This is crucial for securely attaching the felt webs together. A fine gauge wire allows for discreet connections that are strong enough to withstand outdoor conditions without being overly bulky or noticeable.
- Wire Cutters: Essential for easily cutting the fine gauge wire to your desired lengths. Small craft scissors might work in a pinch for very thin wire, but wire cutters offer precision and ease.
- Strong Craft Glue (e.g., Tacky Glue): A reliable, quick-drying craft glue is ideal for attaching the wooden letters to the felt webs. Avoid hot glue for this specific step, especially if your climate is warm, as it can soften and detach. Tacky glue provides a strong, flexible bond.
- Neon Green Craft Paint: Or any color that strikingly contrasts with your door and the spider webs. Neon colors are fantastic for Halloween as they pop! Acrylic craft paints work perfectly and are inexpensive.
- Large Halloween-Themed Bow: A decorative bow adds a festive touch to the top of your hanger. Look for one with a built-in wire twist tie on the back for easy attachment. Spider-themed bows are particularly fitting for this project.
- Optional: Halloween Ribbon: For hanging your finished door hanger. Choose a durable ribbon that matches your color scheme and can withstand outdoor elements if your door hanger will be exposed.
- Optional: Paint Brushes: Various sizes for painting your letters neatly.
- Optional: Drop Cloth or Newspaper: To protect your work surface during painting.
Having these items ready will ensure a smooth and enjoyable crafting experience. Each component plays a vital role in the final look and durability of your ‘BOO’ door hanger, proving that creativity doesn’t have to be expensive.
Step-by-Step Guide to Your Eerie-sistible Door Hanger
Now that you’ve gathered all your supplies, let’s dive into the fun part: assembling your personalized Halloween ‘BOO’ door hanger. This process is designed to be straightforward, allowing you to create stunning decor quickly and easily.
Step 1: Bring Your Letters to Life with Color
Your wooden letters for “BOO” are the focal point of this project, so making them stand out is key. Begin by laying out your letters on a protected surface, such as newspaper or a drop cloth. Using your chosen craft paint – in this case, vibrant neon green – apply your first coat. Don’t be discouraged if the first coat appears thin; this is perfectly normal. Allow the paint to dry completely between coats. Depending on the paint’s opacity and the desired intensity of the color, you may need two to three coats to achieve that wonderfully bright and opaque finish. The goal is a rich, even color that will pop against the dark spider webs and your front door. Take your time with this step; neat, fully dried letters make a significant difference in the overall appeal of your hanger. If you want to add an extra touch, consider distressing the edges after the paint is dry, or adding a sprinkle of glitter for extra sparkle!
Step 2: Weave Your Web of Spooky Style
Next, it’s time to connect your felt spider webs. Arrange your three webs in a vertical sequence, deciding on your color pattern. For instance, using purple webs at the top and bottom and a white web in the middle creates a striking visual contrast. Once you have your desired arrangement, use the fine-gauge wire to carefully attach the webs together. Thread the wire through small holes or sections of the felt, twisting the ends securely at the back to create a strong, almost invisible bond. It’s important to use wire for this step rather than hot glue, especially if your door hanger will be exposed to varying temperatures. Hot glue can soften and lose its hold in warm weather, leading to your creation falling apart. Wire provides a much more durable and reliable connection, ensuring your Halloween decor lasts through the entire season. Aim for several connection points between each web to ensure stability and prevent sagging.
Step 3: Spell Out the Spook: Attaching Your “BOO” Letters
With your webs securely connected and your letters painted and dry, it’s time to assemble the main “BOO” message. Carefully position your painted wooden letters onto the felt spider webs. Arrange them evenly across the middle web, ensuring they are straight and well-spaced to form the word “BOO.” Once you’re satisfied with the placement, apply a generous but not excessive amount of strong craft glue (like Tacky Glue) to the back of each letter. Press each letter firmly onto the felt web. Hold them in place for a few moments to allow the glue to begin setting, and then let the entire piece lie flat to dry completely, ideally overnight. This allows the glue to form a strong, lasting bond, securing your letters firmly to the webs. A steady hand and a bit of patience here will result in a professional-looking finish.
Step 4: The Grand Finale: Adding the Bow and Hanging Mechanism
The final touches bring your door hanger to life! Take your large Halloween-themed bow. Most decorative bows come with a wire twist tie on the back, making attachment incredibly easy. Position the bow at the very top of your assembled spider web design, then use its integrated twist tie to secure it firmly to the felt. Make sure it’s centered and upright. Next, choose a festive Halloween ribbon for hanging. Loop this ribbon through the bow’s twist tie or directly through the top of the felt web, creating a sturdy hanging loop. The length of this loop will depend on your door’s height and where you intend to hang it from. Once the ribbon is secured, your Easy Halloween ‘BOO’ Door Hanger is complete and ready to proudly display!
Tips for a Perfect Halloween Door Display
When hanging your newly crafted masterpiece, consider a few practical tips to ensure it looks its best and stays secure throughout the Halloween season. If you have a particularly tall door, like mine, this vertical “BOO” sign is an ideal fit, occupying the space beautifully. The contrast of the vibrant neon letters and the dark webs against a dark door creates a striking visual. Don’t forget to check for practicalities; if your door has a peephole, ensure your design accommodates it, leaving a small space for functionality. For added security against wind, especially if your door is exposed to the elements, you might consider adding a small weight to the bottom or using additional adhesive strips to keep it from swinging too much.
Unleash Your Creativity: Customization Ideas
While the “BOO” sign with spider webs is undeniably charming, this project is ripe for customization. Feel free to unleash your inner designer and adapt it to your unique style. Instead of “BOO,” why not spell out “EEK,” “SPOOKY,” or even “HAUNTED”? Experiment with different paint colors for your letters – glowing orange, spooky purple, or classic white can all create distinct looks. You could also swap out the felt spider webs for other lightweight Halloween-themed cutouts, like bats or witches’ hats, linked together with ribbon or string. Embellish your design further with plastic spiders, googly eyes, glitter, or even small battery-operated LED lights woven through the webs for an enchanting nighttime glow. The possibilities are endless, allowing you to create a truly one-of-a-kind Halloween decoration that perfectly complements your home’s aesthetic.
Why DIY Halloween Decor is a Treat
Engaging in DIY Halloween decor offers numerous benefits beyond just saving money. Firstly, there’s immense satisfaction in creating something with your own hands. Each time you glance at your door, you’ll feel a sense of pride knowing you crafted that unique piece. Secondly, homemade decorations often possess a charm and character that mass-produced items lack. Your door hanger will have a personal touch that truly reflects your creativity. Thirdly, it’s a fantastic activity for families! Involving children in simple steps like painting letters (with supervision, of course) can create wonderful memories and foster their own creative spirit. Lastly, by opting for budget-friendly materials and repurposing items, you’re embracing a more sustainable approach to seasonal decorating, reducing waste and contributing to a greener Halloween.
Caring for Your Craft: Ensuring Durability
To ensure your Easy Halloween ‘BOO’ Door Hanger lasts throughout the season and potentially for years to come, consider these care tips. If your door is exposed to heavy rain or intense sunlight, you might want to bring the hanger indoors during adverse weather to preserve its colors and materials. A quick spray with a clear, UV-resistant craft sealant can also help protect the painted letters and felt from fading and moisture. When Halloween passes, store your door hanger carefully. Lay it flat in a box or hang it gently in a closet to prevent the felt webs from creasing and the letters from becoming detached. With a little care, this charming DIY piece can become a beloved part of your Halloween traditions.
Conclusion: Your Door, Decadently Decorated!
There you have it – a wonderfully simple, incredibly affordable, and remarkably quick way to transform your front door into a festive Halloween greeting. For less than $10 and just a few minutes of your time, you’ve created a custom ‘BOO’ sign that exudes character and charm. This project is a testament to the idea that fantastic holiday decor doesn’t need to be complicated or expensive; sometimes, the best ideas come from simple materials and a spark of creativity. We hope this guide inspires you to embrace the joy of DIY this Halloween. Have you started decorating your front door for fall or Halloween yet? We’d love to hear about your creative projects in the comments below!
Thanks for stopping by and happy crafting!
More Spooky & Creative DIYs You’ll Love
If you enjoyed creating this easy Halloween door hanger, you’re sure to find inspiration in these other fantastic DIY projects. Keep the crafting spirit alive and deck out your home with even more personalized spooky decor!
DIY Pumpkin Door Hanger
Celebrate the essence of autumn with a charming DIY Pumpkin Door Hanger. This project offers another delightful way to adorn your entryway with seasonal flair, perfect for fall and Thanksgiving, leading right into Halloween.
DIY Spider Plates
Transform ordinary plates into eerie, elegant Halloween decor with this simple DIY Spider Plates tutorial. These make for fantastic party decorations or unique wall art, adding a touch of spooky sophistication to your home.