
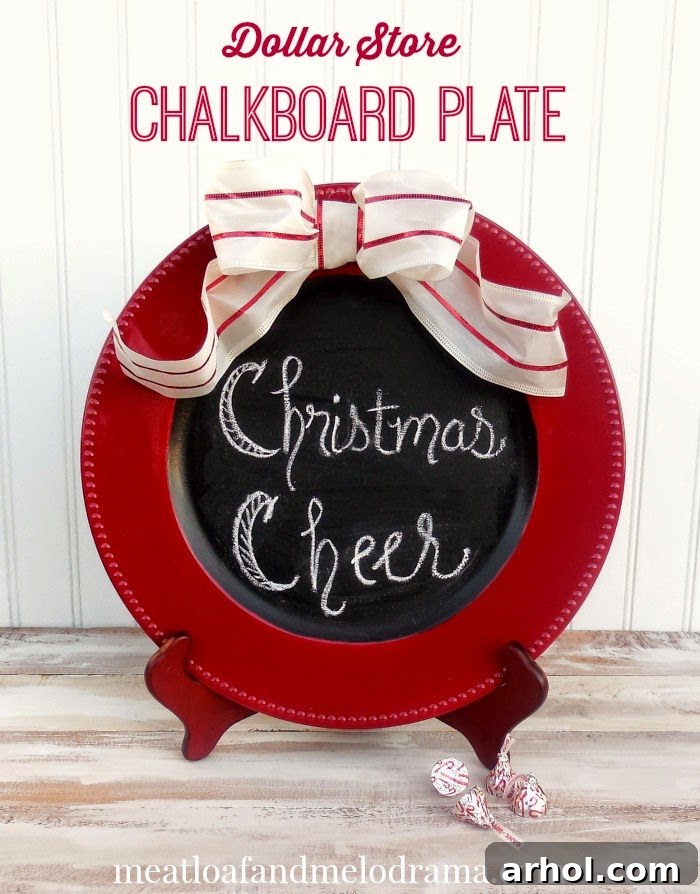
Hello Crafting Enthusiasts!
As the holiday season approaches, bringing with it the warmth of family gatherings and the joy of festive decorations, many of us are looking for creative ways to infuse our homes with seasonal cheer. While the aftermath of Thanksgiving and the bustling energy of Black Friday shopping still linger, there’s nothing quite like the satisfaction of creating something beautiful and unique with your own hands. This year, instead of battling the crowds for generic store-bought decor, let’s dive into the wonderful world of DIY crafts that are both charming and incredibly budget-friendly. Today, I’m thrilled to share an exceptionally easy and delightful Dollar Store craft idea: transforming a simple charger plate into a festive chalkboard masterpiece perfect for Christmas.
The allure of Dollar Store finds is undeniable. With a keen eye, you can discover hidden gems that, with a little imagination and a splash of paint, can be transformed into stunning pieces that look far more expensive than their humble origins. On a recent trip, I stumbled upon some plain chargers that immediately sparked an idea. Having experimented with chalkboard paint on various items throughout the summer and fall, I envisioned a holiday version that would bring a personalized touch to our Christmas kitchen decor. This project is not only simple to execute but also offers endless possibilities for customization, allowing you to change your message and design with every passing mood or holiday.
Why Choose a DIY Chalkboard Plate for Your Holiday Decor?
There are countless reasons to embrace the DIY spirit, especially during the holidays. Firstly, it’s incredibly cost-effective. Crafting with Dollar Store items means you can achieve designer-look decor without breaking the bank, leaving more room in your budget for gifts or other festive treats. Secondly, handmade items add a unique, personal touch to your home that store-bought decorations simply cannot replicate. Each DIY piece tells a story and reflects your individual style. Thirdly, crafting itself is a wonderfully therapeutic activity. It allows for a creative escape, a moment of calm amidst the holiday rush, and the immense satisfaction of seeing your vision come to life. Finally, a DIY chalkboard plate is versatile. It can be a delightful kitchen accent, a welcoming message on your entryway table, or even a charming hostess gift for holiday parties. The ability to easily change the message makes it a dynamic piece of decor that can adapt throughout the season and beyond.
Materials You’ll Need for Your DIY Chalkboard Plate:
Gathering your supplies is the first step towards your creative journey. The beauty of this project lies in its simplicity and the accessibility of the materials. Here’s what you’ll need to create your own festive chalkboard plate:
- A Large Charger Plate: The Dollar Store is a treasure trove for these! Look for plain plastic or melamine chargers. The color doesn’t matter much as you’ll be painting over it, but a smooth surface is ideal for best results.
- Spray Paint (in your desired base color): For a classic Christmas look, red is perfect. I chose Rust-Oleum’s Colonial Red, which offers a rich, deep hue without being overly dark. Ensure you pick a paint suitable for plastic surfaces if your charger is plastic.
- Chalkboard Paint: This is the star of the show! Available at most craft or hardware stores. A small can will go a long way.
- Festive Ribbon: To add that extra touch of holiday cheer. The Dollar Store often has a fantastic selection of seasonal ribbons in various patterns and widths.
- Strong Adhesive (e.g., Hot Glue Gun and Glue Sticks): For attaching your ribbon securely.
- Painter’s Tape (Optional): Useful if you want very crisp lines between your spray paint and chalkboard paint, or for creating patterns.
- Drop Cloth or Newspaper: Essential for protecting your workspace from paint.
- Chalk: For priming your chalkboard surface and for writing your messages.
I must confess, my absolute adoration for chalkboard projects runs deep. They are inherently easy, remarkably inexpensive, and offer the delightful flexibility of being seasonally transformable. The idea of acquiring this initially plain gold charger, which possessed a lovely sheen on its own, for a mere dollar, filled me with excitement. However, for the holiday season, my heart was set on a vibrant red base to truly capture the Christmas spirit.
Step-by-Step Guide to Crafting Your Christmas Chalkboard Plate:
Follow these simple steps to bring your Dollar Store charger to life as a festive chalkboard plate:
Step 1: Prepare Your Charger and Workspace
Before any painting begins, ensure your charger plate is clean and dry. Wipe away any dust or grime to allow for optimal paint adhesion. Set up your workspace in a well-ventilated area, preferably outdoors or in a garage, protected with a drop cloth or newspaper. This is crucial for spray painting safety and to prevent accidental overspray on other surfaces.
Step 2: Apply the Base Color (Spray Paint)
With your workspace ready, it was time for the gold charger to get its Christmas makeover. I applied a couple of light, even coats of Rust-Oleum’s Colonial Red spray paint. This shade is wonderfully rich – a deeper red that leans towards classic holiday elegance without veering into maroon territory. Remember to hold the can about 8-10 inches away from the surface and use sweeping motions to avoid drips. Allow sufficient drying time between coats as per the manufacturer’s instructions, typically 15-30 minutes, to ensure a smooth, durable finish.
Step 3: Apply Chalkboard Paint to the Center
Once the red base coat was completely dry and cured (which usually takes a few hours), I carefully applied chalkboard paint to the center of the charger. You can freehand this or use painter’s tape to create a crisp circle, depending on your preference. I recommend applying at least three thin coats of chalkboard paint for the best, most durable writing surface. Patience is key here; allow adequate drying time between each coat, typically 1-2 hours. More importantly, after the final coat, it’s crucial to wait the recommended 24-hour curing period before moving to the next step. This allows the paint to fully harden and ensures a long-lasting chalkboard surface that won’t scratch or peel easily.
Step 4: Prime the Chalkboard Surface
After the 24-hour curing period, your chalkboard surface is almost ready for its first message! But first, it needs to be “primed” or “seasoned.” This essential step prevents ghosting (where previous writings remain faintly visible) and makes it much easier to erase chalk later. To prime, simply take a piece of chalk and rub it lightly over the entire chalkboard surface, covering it completely. Then, wipe off the excess chalk with a soft, dry cloth or a paper towel. Your chalkboard plate is now ready to use!
Step 5: Embellish with Ribbon
To complete the festive look, I sought out some charming Christmas-themed ribbon from the Dollar Store. I fashioned a generous bow and securely attached it to the top edge of the plate using hot glue. The hot glue provides an instant and strong bond, ensuring your embellishment stays put. This step is where you can truly let your personality shine. Consider different ribbon styles, colors, or even adding other small decorative elements like faux berries, mini pinecones, or jingle bells to your bow for extra flair.
Creative Variations and Personalization Ideas:
While I initially contemplated adding more embellishments to the plate, I ultimately decided to keep it elegantly simple, allowing the contrast of the red and black, along with the festive ribbon, to stand out. However, the beauty of DIY is that you are the designer! Here are some ideas to inspire your own unique creation:
- Seasonal Versatility: Instead of red, choose a different base color. A pastel blue for winter, a vibrant green for spring, or an autumnal orange for fall can easily transform this craft for any season.
- Stenciled Designs: Use stencils to add permanent designs or borders around the chalkboard area before applying the chalkboard paint, or use chalk markers for more intricate, temporary designs.
- Metallic Accents: After the base coat, you could use a metallic gold or silver paint pen to draw intricate patterns or dots around the edge before applying the chalkboard paint.
- Functional Tray: Attach small furniture feet to the bottom of the charger to create a lovely decorative tray for displaying candles, small ornaments, or serving holiday treats (ensure food is on another plate if serving).
- Personalized Messages: Use chalk to write welcoming messages, holiday greetings like “Merry Christmas,” “Joyeux Noël,” or “Happy Holidays,” or even a countdown to Christmas. You can easily erase and update your message daily!
- Gift Giving: This DIY chalkboard plate makes an outstanding and thoughtful gift. Imagine giving one as a hostess gift, a personalized present for a teacher, or a charming token of appreciation for a neighbor. It’s a gift that truly adds a touch of handmade warmth and Christmas cheer to any home.
Tips for Success with Your DIY Chalkboard Plate:
- Patience with Drying Times: Rushing the drying or curing process for either the spray paint or the chalkboard paint can lead to a less durable finish. Always follow the manufacturer’s recommendations.
- Ventilation is Key: When using spray paint, always work in a well-ventilated area to ensure safety and proper drying.
- Thin Coats are Best: Multiple thin coats of paint are always superior to one thick coat. Thin coats dry faster, adhere better, and result in a smoother finish, minimizing drips and unevenness.
- Test Colors: If you’re unsure about a paint color, test it on a scrap piece of cardboard first.
- Chalk Maintenance: To keep your chalkboard looking fresh, use a slightly damp cloth to wipe it clean. Avoid harsh cleaners that could damage the chalkboard surface.
Can you believe the stunning transformation from that unassuming gold Dollar Store charger? The difference is truly remarkable! Since I already had chalkboard paint on hand from previous projects, the cost of this particular project was a mere $2 for the charger and the festive ribbon – an incredibly frugal way to add beautiful, personalized decor to your home. This DIY chalkboard plate isn’t just a craft; it’s an opportunity to create something meaningful, express your creativity, and spread a little extra Christmas cheer in your kitchen or any room it graces.
Thank you so much for stopping by and sharing in this crafting adventure. The holiday season is a busy one, filled with decorating, baking, and making memories, but taking a moment to create something with your own hands can be incredibly rewarding. I’m off to tackle more holiday decorating, but I look forward to connecting with you all again soon. Have a truly wonderful and creatively fulfilling day!