
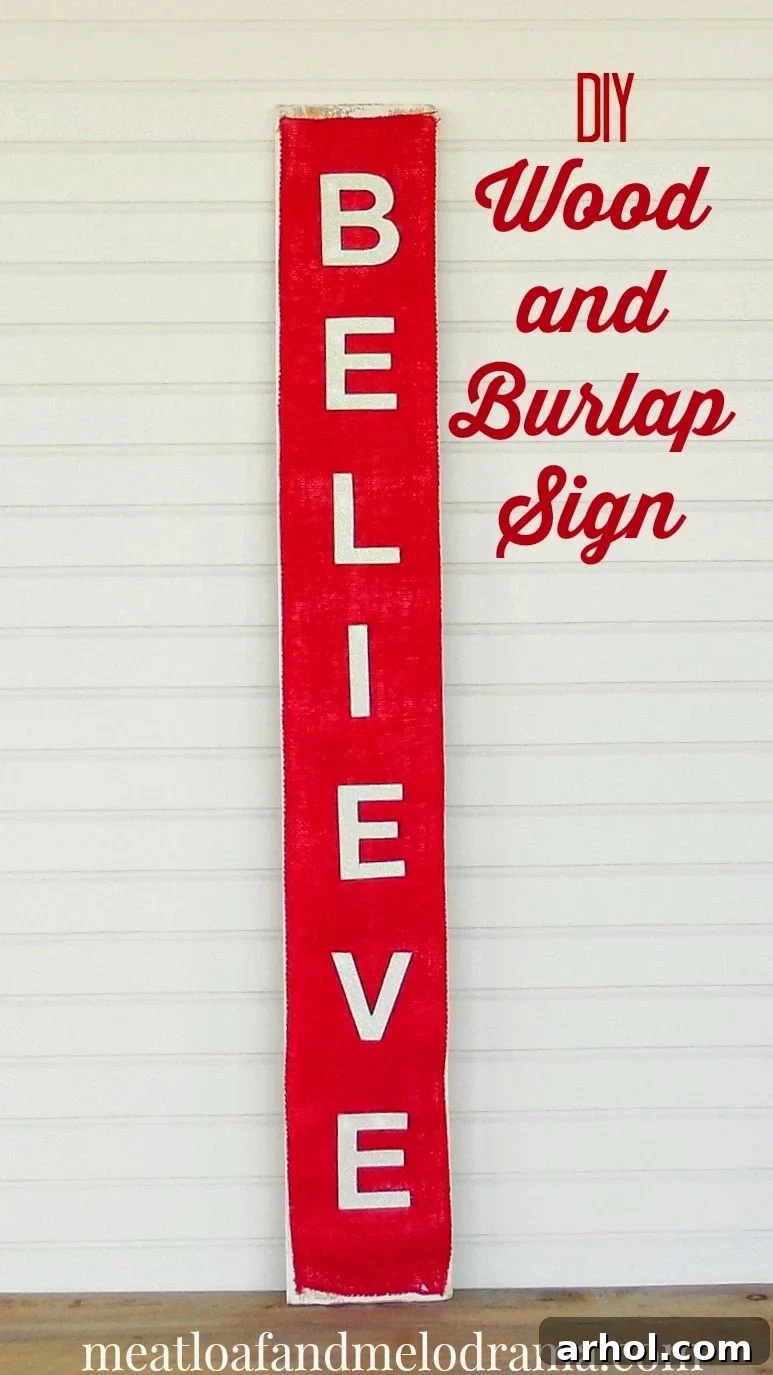
The holiday season brings with it a unique opportunity to infuse our homes with warmth, charm, and a touch of personal flair. There’s a special kind of joy that comes from creating something beautiful with your own hands, especially when it’s destined to become a cherished part of your festive decor. As the days shorten and the weather outside encourages cozy indoor activities, many of us turn to crafting as a way to embrace the spirit of the season. And what better way to do that than by designing a piece that not only looks stunning but also carries a meaningful message?
Recently, despite the persistent grey skies and a steady drizzle outside, I found myself immersed in the delightful world of DIY Christmas signs. The damp weather, while less than ideal for outdoor photography, certainly set the perfect mood for creative endeavors. Among the various projects I’ve been tackling, one particular sign truly captured my heart – a “Believe” sign. I’ve admired these signs for a while, loving the simple yet powerful message they convey, especially during this magical time of year. And now, I’m thrilled to share that I have my very own, a unique creation that perfectly blends rustic charm with a hint of festive sparkle.
Bringing this project to life presented its own set of challenges, particularly when it came to capturing its beauty in photographs. It felt like I took countless pictures, chasing fleeting moments of decent light between the clouds. But with a bit of patience and strategic timing, I finally managed to snap a few shots that truly do it justice. The result is a sign that I’m incredibly proud of, and I can’t wait to walk you through how you can create one for your home!
Embracing the Magic of DIY Holiday Decor
Why choose DIY for your holiday decor? The answer lies in the unparalleled ability to personalize every detail, ensuring your decorations truly reflect your style and personality. Mass-produced items often lack that unique touch, whereas a handmade piece carries a story and a special sentiment. Crafting your own decorations can also be a wonderful way to save money, utilizing readily available or inexpensive materials to create high-end looks. Beyond the practical benefits, there’s an immense sense of satisfaction that comes from stepping back and admiring something you’ve built yourself, knowing it will be a talking point and a source of joy for years to come.
This “Believe” sign project, for instance, offered the perfect opportunity to combine elements I adore: the timeless appeal of wood and the cozy texture of burlap. I’ve always had a soft spot for natural materials, and the rustic warmth they bring to any space. The message itself, “Believe,” resonates deeply with the essence of Christmas, reminding us of hope, wonder, and the magic that surrounds us during the holidays. My goal was to craft a piece that felt both grounded and enchanting – a “rustic glam” style that I’ve grown to absolutely love, balancing natural textures with a touch of festive shimmer.
Gathering Your Materials for the Believe Sign
Before diving into any DIY project, a well-organized materials list is key. For this stunning wood and burlap “Believe” sign, you’ll need a few essential items, most of which can be found at your local craft store or hardware store. The beauty of this project lies in its flexibility; you can easily adapt the materials to fit your preferred aesthetic or what you might already have on hand. Here’s what I used:
- Wood Board: I started with a 1 x 6-inch piece of wood, approximately 39 inches long. Pine is an excellent choice for its affordability and ease of workability, but you could also opt for reclaimed wood for an even more rustic feel. This size provides a substantial base, making a statement on any wall.
- Burlap Fabric: A piece of red burlap was central to my design. The vibrant red instantly evokes a festive Christmas spirit, while the coarse texture of burlap adds an undeniable rustic charm. Measure enough to cover a significant portion of your wood board, leaving space on both ends for the painted wood to show through. If red isn’t your preference, natural, green, or even white burlap could also look wonderful.
- White Paint: Any acrylic or chalk paint in white will work perfectly. I chose white to create a soft, distressed background that contrasts beautifully with the red burlap.
- Glitter Letters: The “Believe” letters are where the “glam” in “rustic glam” truly shines. I found pre-made glittery letters that spelled out “BELIEVE,” which saved a lot of time. The white glitter against the red burlap creates a striking visual pop. If you can’t find pre-made letters, stencils and glitter paint, or even cutting letters from glitter cardstock, are great alternatives.
- Adhesive: A strong craft glue or hot glue gun is essential for attaching both the burlap to the wood and the glitter letters to the burlap. Make sure it’s suitable for fabric and wood.
- Tools: You’ll need a paintbrush for the wood, sharp scissors for cutting the burlap, and possibly a ruler or measuring tape to ensure everything is straight and centered.
Having everything ready before you start will make the crafting process smooth and enjoyable.
Step-by-Step Guide to Crafting Your Believe Sign
Now that we have all our materials, let’s get into the fun part: bringing this beautiful sign to life! The process is surprisingly simple, making it a perfect project for crafters of all skill levels. Just follow these steps, and you’ll have a gorgeous, personalized holiday sign in no time.
Step 1: Preparing and Painting the Wood Base
First, take your 1 x 6-inch piece of wood. If it has any rough edges or splinters, a quick, light sanding can make it smoother to work with. Once prepared, it’s time to add some color. I wanted the wood to have a slightly distressed, rustic look, so I applied a very rough, thin coat of white paint. The idea isn’t to achieve full, opaque coverage, but rather to allow some of the natural wood grain to show through, creating a charming, weathered effect. Dip your paintbrush lightly into the white paint and apply it in long, somewhat uneven strokes. Don’t worry about perfection; the beauty is in the imperfection! Let the paint dry completely before moving on to the next step.
Step 2: Cutting and Attaching the Burlap
Next, it’s time to incorporate the striking red burlap. Lay your burlap flat and measure it against your painted wood board. The key here is to cut the burlap so that it covers the majority of the board, but intentionally leaves some of the painted wood visible at both ends. This design choice creates a beautiful frame for the burlap and enhances the rustic aesthetic by allowing both materials to shine. Use sharp scissors to cut the burlap precisely. Once cut, carefully position the burlap on the wood board, ensuring it’s centered and straight. Apply a generous amount of strong craft glue or hot glue to the back of the burlap and firmly press it onto the painted wood. Smooth out any wrinkles or bubbles, working from the center outwards, and allow the adhesive to set according to the manufacturer’s instructions.
Step 3: Adding the Glittering “Believe” Letters
Now for the glamorous touch! Take your glittery “Believe” letters. Before gluing them down permanently, arrange them on the burlap to determine the best spacing and alignment. Stand back and check if they look balanced and aesthetically pleasing. Once you’re happy with the arrangement, apply a small amount of adhesive to the back of each letter. Carefully press each letter onto the burlap, ensuring they adhere firmly. The combination of the rough burlap texture and the sparkling glitter creates a beautiful contrast—a true rustic glam style that I absolutely adore! The best part? This step is incredibly easy, making the entire project quick to complete.
And just like that, your DIY “Believe” sign is complete! The actual crafting process is quite straightforward and rewarding. As I mentioned earlier, the most challenging part for me wasn’t the creation of the sign itself, but rather trying to capture its beauty in a decent photograph. With the gloomy weather, indoor lighting simply wasn’t cutting it. I eventually decided to take the sign outside, patiently waiting for a brief moment when the clouds parted just enough to allow for some natural light. It made all the difference!
Displaying Your Masterpiece: Styling Your New Believe Sign
Once your beautiful “Believe” sign is finished and the glue has fully dried, it’s time for the exciting part: displaying it! This sign is versatile and can instantly elevate any corner of your home with its festive charm. I initially envisioned it as a prominent piece of wall decor above our living room couch, and that’s exactly where it found its home. However, trying to capture its full splendor in that dimly lit space proved to be quite a task, hence the struggle with indoor photography! Despite the low light, it adds a wonderful focal point to the room, spreading its hopeful message.
Beyond the couch, there are countless other creative ways to showcase your handmade sign. Imagine it greeting guests in your entryway, propped up on a console table alongside other holiday trinkets. It would look equally stunning resting on a mantelpiece, flanked by festive garlands and twinkling lights, or perhaps leaning against a wall on a bookshelf, adding a touch of rustic elegance to your holiday display. For a truly coordinated look, consider pairing it with other burlap accents or incorporating more glitter into your surrounding decor to echo the “rustic glam” theme. The possibilities are endless, allowing you to integrate this unique piece seamlessly into your existing holiday decorations.
While I was busy trying to perfect the sign’s placement and photography, it seems someone else found the new addition to be quite cozy! Our beloved Beagle, utterly unfazed by the dreary weather outside, discovered the perfect spot for an afternoon nap right beneath the newly hung “Believe” sign. His peaceful slumber was a sweet reminder that sometimes, the simplest joys are the most profound, and a little bit of comfort and warmth are all you truly need, even on the gloomiest of days.
Share Your Holiday Crafting Journey!
I truly hope this tutorial inspires you to create your own DIY Wood and Burlap “Believe” Sign this holiday season. It’s a project that combines rustic charm with a touch of sparkle, creating a truly special piece of decor that you’ll cherish. The “believe” message itself is a powerful reminder of the wonder and hope that Christmas brings, making this sign not just a decoration, but an emblem of the festive spirit.
Whether you stick to the exact design or put your own creative spin on it with different colors, words, or materials, the most important thing is to enjoy the process of making something with love. DIY projects like this are more than just crafts; they’re opportunities to infuse your home with personality and create lasting memories. So gather your materials, embrace your inner crafter, and let your creativity shine!
Thank you so much for reading and joining me on this creative journey. I’d love to hear about your own holiday crafting adventures and what messages you’re bringing into your home this year!