
Crafting Joy: DIY Foam Peeps Bunnies for Effortless Spring & Easter Decor
Hello, fellow crafters and home decor enthusiasts! As the days grow longer and the first whispers of spring fill the air, my creative spirit always shifts into high gear. There’s something truly special about transforming simple materials into charming decorations that breathe new life into your living space. And let’s be honest, one of the most satisfying aspects of DIY crafting is achieving those coveted, store-bought looks without breaking the bank. Why buy when you can create something even more personalized and unique at a fraction of the cost?
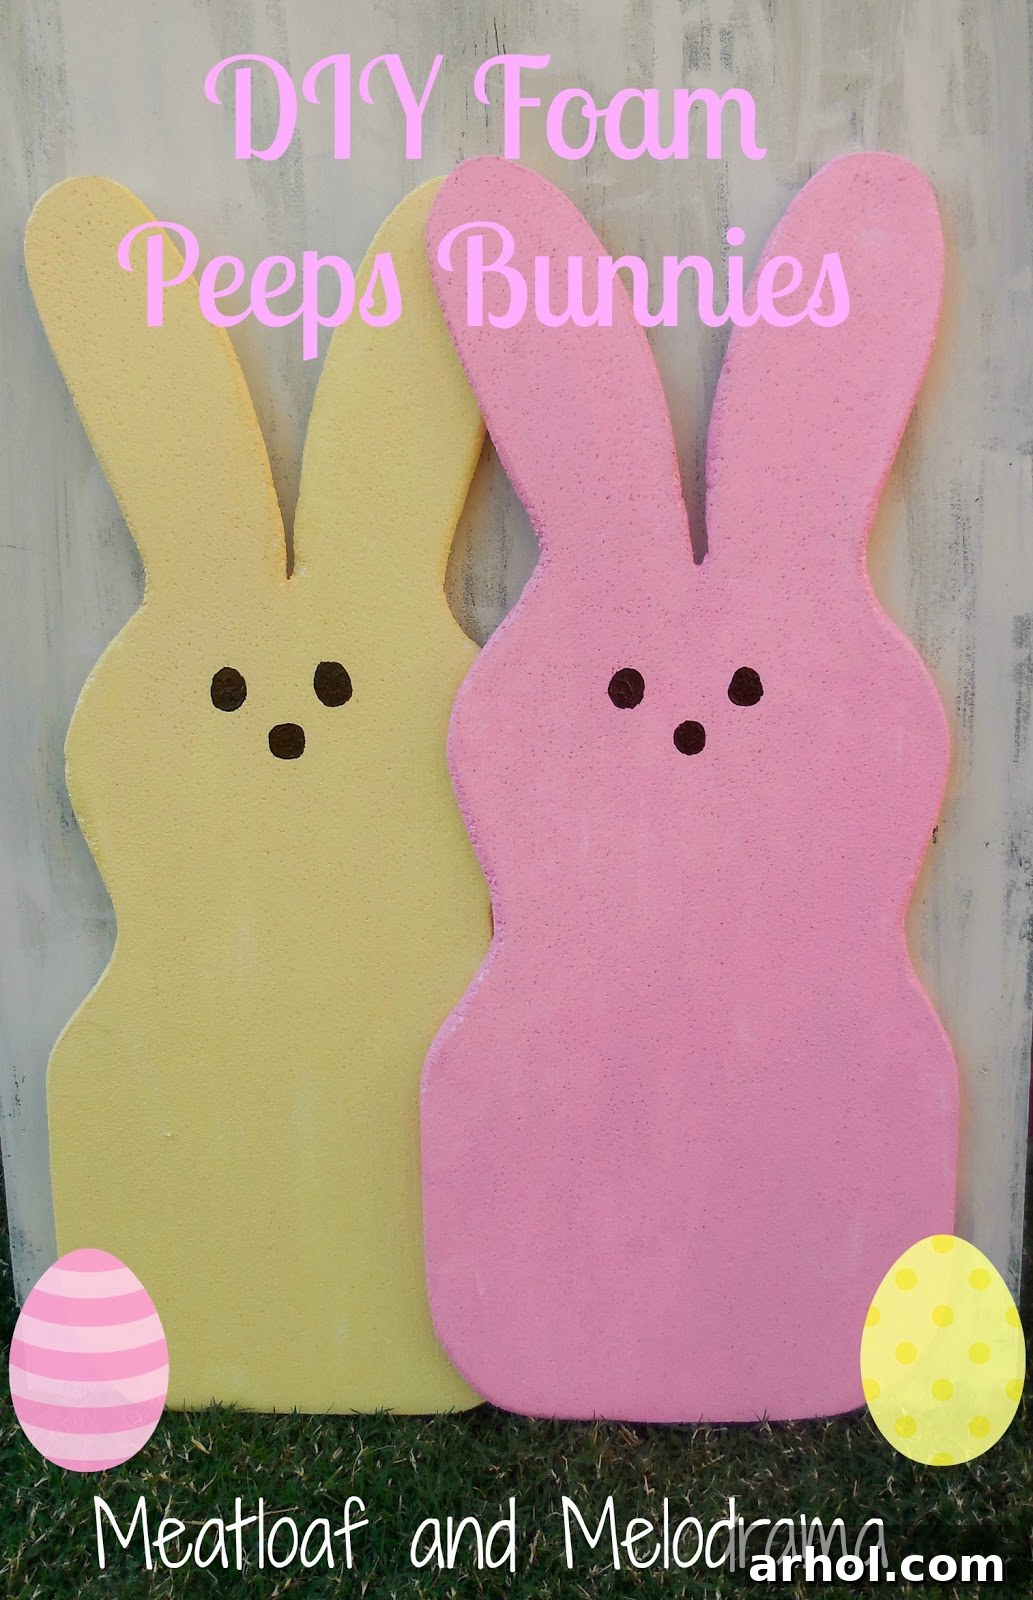
This week, I embarked on a particularly delightful project that perfectly encapsulates the joy and whimsical spirit of the season: crafting oversized foam Peeps bunnies. These aren’t your typical sugary treats; instead, they’re durable, delightful decorations that capture the iconic charm of everyone’s favorite marshmallow bunnies. The absolute best part? These Peeps come with zero guilt attached! Since you can’t eat them, they’re a perpetually perfect, calorie-free addition to your spring and Easter celebrations.
Why Craft Your Own Foam Peeps Bunnies?
Beyond the sheer fun of it, there are numerous reasons why diving into this DIY project is a fantastic idea for anyone looking to refresh their home decor:
- Budget-Friendly Decor: High-end seasonal decorations can be surprisingly expensive. Crafting your own allows you to achieve a beautiful, custom look for a fraction of the retail price. Foam board and craft paints are incredibly affordable, making this an accessible project for everyone.
- Unique & Personalized Touch: Store-bought items are often mass-produced. When you craft your own Peeps, you infuse them with your personality and style. You can choose custom colors, add unique embellishments, or even vary their expressions to make them truly one-of-a-kind.
- A Creative Outlet: Crafting is a wonderful way to relax, de-stress, and tap into your creative side. There’s immense satisfaction in seeing an idea come to life through your own hands. This project is simple enough for beginners but offers room for seasoned crafters to add their personal flair.
- Guilt-Free Indulgence: Love the look of Peeps but trying to avoid excess sugar? These foam versions offer all the nostalgic charm without the caloric downside. They’re perfect for homes with small children or pets, where edible treats might be tempting but inappropriate for decor.
- Durable and Reusable: Unlike their edible counterparts, these foam bunnies are built to last. Properly stored, they can be a cherished part of your spring and Easter decor for many years to come, becoming a delightful tradition.
- Festive Atmosphere: Nothing says “spring” and “Easter” quite like the bright, cheerful colors and whimsical shapes of Peeps. These bunnies instantly inject a playful and festive vibe into any room, welcoming the season with open arms.
Gathering Your Crafting Essentials: Materials You’ll Need
One of the beauties of this project is its simplicity and the minimal materials required. Most items can be found at your local craft store, discount retailer, or even around your house. Here’s what you’ll need to get started on your adorable foam Peeps bunnies:
- Foam Board: You’ll need two large pieces. Standard craft foam board (often 20×30 inches or larger) is perfect. It’s lightweight, easy to cut, and provides a smooth surface for painting.
- Sharp Utility Knife or Craft Knife: Essential for clean cuts through the foam board. A fresh blade makes all the difference!
- Cutting Mat or Protective Surface: To protect your work surface when cutting.
- Pencil or Marker: For tracing your bunny outlines.
- Sandpaper or Sanding Block (fine-grit): For smoothing out any rough edges after cutting. About 180-220 grit works well.
- Acrylic Craft Paints: Choose traditional Peeps colors like pink, yellow, blue, lavender, or green. You’ll also need a small amount of dark brown paint (like burnt umber or dark chocolate brown) for the eyes and noses.
- Paintbrushes: A larger brush for applying the main colors and a smaller, fine-tipped brush for details like the eyes and nose.
- Newspaper or Drop Cloth: To protect your work area from paint.
- Optional:
- Clear Craft Sealant Spray: To protect your painted bunnies and give them a finished look.
- Fine Glitter or Glitter Glue: To replicate the iconic sugary texture of real Peeps.
- Paper Towels or Wet Wipes: For quick cleanups.
Step-by-Step Guide to Creating Your Foam Peeps
This project is incredibly straightforward, making it perfect for crafters of all skill levels. Follow these simple steps to bring your foam Peeps bunnies to life!
Step 1: Designing and Cutting Your Bunny Shapes
The key to these bunnies is their charmingly simple silhouette. You don’t need an intricate pattern; the beauty lies in their iconic, slightly imperfect shape.
- Initial Outline: Start by finding a reference image of a classic Peeps bunny online. Observe its distinct, almost marshmallow-like form. On one of your foam boards, begin to freehand sketch a large bunny outline with a pencil or marker. Don’t overthink it – a basic oval body with two elongated, rounded ears is the essence. My bunnies ended up being rather large, which truly makes a statement, but feel free to adjust the size to fit your decorating needs.
- Creating a Template: Once you’re happy with your first outline, carefully cut it out using your utility knife. Remember to always cut away from your body and use a cutting mat or several layers of cardboard underneath to protect your surface. This first cutout will serve as your perfect template for the second bunny, ensuring consistency between your pair.
- Cutting the Second Bunny: Place your newly cut foam bunny on the second piece of foam board. Trace carefully around its perimeter with your pencil or marker. Then, cut out this second bunny shape.
- Working Outdoors (If Possible): I highly recommend doing the cutting outdoors if the weather permits. Cutting foam board can create a bit of a mess with tiny foam particles, and it’s much easier to sweep up outside. If working indoors, lay down a large drop cloth or newspaper to contain the debris.
- Smoothing Edges: After cutting, you might find some rough or uneven edges. Gently smooth these out using fine-grit sandpaper or a sanding block. Use light, even strokes to avoid creating new divots. The goal is a soft, rounded edge, reminiscent of a real marshmallow.
Step 2: Bringing Your Bunnies to Life with Color
Now for the fun part – adding that vibrant Peeps color! My bunnies needed a quick coat of color to transform from plain foam into giant, cheerful marshmallows.
- Color Selection: I chose a classic pink for one bunny and a sunny yellow for the other, echoing traditional Peeps colors. Feel free to experiment with other pastel shades like light blue, lavender, or mint green to match your specific spring decor theme.
- Painting Technique: When painting foam board, it’s crucial to apply light, even coats of acrylic paint. Foam can absorb moisture, and applying too much wet paint at once can cause it to warp or become bumpy. I recommend doing 2-3 thin coats, allowing each layer to dry completely before applying the next. This ensures vibrant, opaque coverage without saturating the foam.
- Drying Time: Patience is key! Depending on your paint and humidity, each coat might take 20-30 minutes to dry to the touch. Ensure they are fully dry before moving on to adding facial features.
Step 3: Adding the Iconic Peeps Faces
The simple, sweet faces are what truly make a Peep recognizable. Don’t aim for perfection; their charm lies in their slightly imperfect, hand-drawn look.
- Facial Features: Once the main paint colors were thoroughly dry, I used some burnt umber craft paint (a rich, dark brown) to add the eyes and noses. This color really resembles melted chocolate, perfectly mimicking the classic Peeps look.
- Tools for Details: A small, fine-tipped paintbrush is ideal for these details. Alternatively, you can use the blunt end of a pencil, a Q-tip, or even a toothpick for precise dots and shapes.
- Embracing Imperfection: Remember, real Peeps don’t have perfectly round eyes or symmetrical noses, and that’s part of their endearing appeal. Embrace any slight wobbles or variations in your painted features. Two simple dots for eyes and a small, inverted triangle or oval for the nose are all you need to capture their characteristic expression.
Step 4: Optional Finishing Touches (Glitter & Sealant)
To truly capture the essence of a Peep, consider adding a subtle sugary texture or a protective layer.
- Sugary Sparkle: For that iconic sugary coating, you can apply a thin layer of glitter glue over your dried paint, or mix fine iridescent glitter with Mod Podge and brush it on. This adds a beautiful shimmer that catches the light and makes your bunnies look even more authentic.
- Protect and Preserve: To protect your beautiful paint job and make your Peeps more durable, consider spraying them with a clear craft sealant (matte or glossy, depending on your preference). This will help prevent chipping and fading, ensuring your bunnies can be enjoyed for many springs to come.
Creative Display Ideas for Your Foam Peeps Bunnies
Once your foam Peeps bunnies are complete, it’s time to find them the perfect spot to spread their spring cheer! These versatile decorations can brighten up almost any area of your home.
- Fireplace Mantel: This is where my little bunnies currently reside! They add a playful pop of color and whimsy to the mantelpiece, especially when paired with other spring elements like fresh flowers, greenery, or small decorative birdhouses. I’m still tweaking my full mantel display, but they are certainly a focal point.
- Entryway Console Table: Welcome guests with a cheerful display. Place your bunnies alongside a vase of tulips or daffodils for an inviting spring vignette.
- Bookshelves or Open Shelving: Tuck your Peeps bunnies amongst your books or other decorative items to add an unexpected touch of spring joy. They break up the monotony and bring a sense of fun.
- Dining Table Centerpiece: Group them together with a colorful Easter egg display, a bowl of plastic grass, or a charming spring-themed runner for a delightful centerpiece.
- Kids’ Rooms: These non-edible Peeps are perfect for decorating a child’s bedroom or play area, adding a touch of their favorite spring candy in a safe and lasting form.
- Outdoor Accents (Sheltered Areas): While not fully weatherproof, your sealed foam bunnies can temporarily adorn a covered porch, patio, or even be placed carefully in the garden for a quick photo shoot, as I did! The vibrant green grass provided a beautiful backdrop for my Peeps.
- Pair with Other Decor: Don’t be afraid to mix and match! These bunnies look fantastic alongside ceramic eggs, floral arrangements, string lights, or even homemade garlands. As my kids suggested, adding two Easter eggs (which I did with a little help from PicMonkey for the photo!) truly completes the scene.
Beyond Bunnies: Adapting Your Peeps Craft
While bunnies are quintessential for Easter, the beauty of this foam craft project is its adaptability. You can easily extend this idea to create other charming shapes and seasonal decorations:
- Peeps Chicks: The other iconic Peeps shape! Simply adapt your tracing to a chick silhouette for a diverse Peeps display.
- Seasonal Variations: Think beyond spring! This foam crafting technique can be used for various holidays. Imagine ghost-shaped Peeps for Halloween, Christmas tree Peeps, or even heart-shaped Peeps for Valentine’s Day. The possibilities are endless with a little imagination and different paint colors.
- Different Sizes: Create a family of Peeps by cutting them in various sizes – from small accents to large statement pieces like mine.
A funny anecdote: My kids, who were very involved in the “realism” of these Peeps, even suggested adding a bite mark to one of the ears! Of course, I couldn’t let that happen to my perfectly crafted, non-edible bunnies, but it certainly shows how convincing they look!
Ready to Create Your Own Adorable Peeps?
Aren’t these foam Peeps bunnies just the cutest addition to spring decor? They are a testament to how a simple DIY project can bring so much joy and personality into your home. This craft is a delightful way to embrace the festive spirit of Easter and spring without the fuss, offering a charming, lasting decoration that’s sure to bring smiles.
I hope this detailed guide inspires you to unleash your creativity and craft your own adorable foam Peeps. Whether you make a pair or a whole flock, they’re guaranteed to add a whimsical touch to your seasonal displays. It’s truly rewarding to create something beautiful with your own hands, especially when it results in such charming, guilt-free decor.
Thank you so much for stopping by and sharing in this crafting adventure! I always love having visitors and sharing my latest projects. Do you have any favorite spring crafts? I’d love to hear your thoughts and see your creations in the comments below. Please come back soon for more DIY inspiration!
Have a wonderful and creative day!
Dee 🙂