
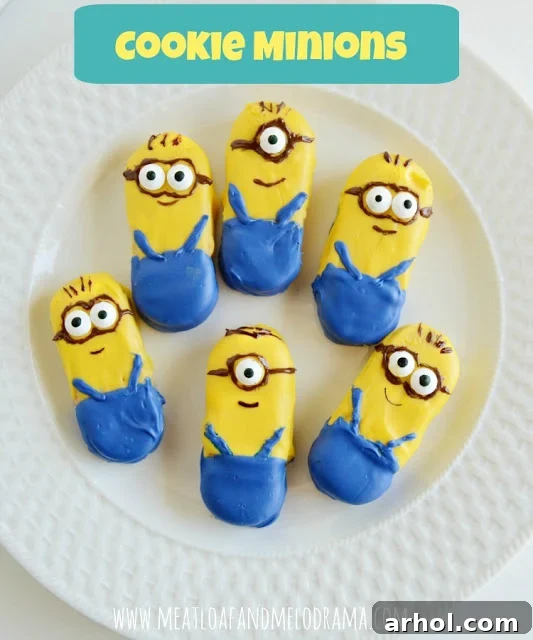
Hey there, fellow creators and snack enthusiasts! Get ready to infuse some irresistible charm into your kitchen with a project that’s guaranteed to bring smiles. If your household is anything like mine, the adorable, mischievous Minions have captured hearts, and their latest cinematic adventures have everyone buzzing with excitement. My kids are absolutely thrilled for the new Minions movie release, and truthfully, even I find those little yellow creatures utterly delightful. It seems they’re everywhere we look right now, from toys to clothing, and naturally, they’ve inspired our latest culinary endeavor.
So, when the call came from the kids – “Can we make our own edible Minions?” – I was not just on board; I was enthusiastically leading the charge! There’s something incredibly special about creating themed treats together, especially when they’re as iconic and beloved as the Minions. What started as a simple idea quickly blossomed into a fantastic family activity, resulting in a whole army of these incredibly cute and utterly delicious Cookie Minions. They’re so charming, you almost won’t want to eat them… almost!
One of our family’s most cherished traditions, and something my kids and I genuinely look forward to, is decorating cookies and crafting special, homemade treats. It’s an activity that transcends age; even my teens, often glued to their phones, will happily emerge from their digital worlds long enough to participate in the artistic, edible fun! We’ve always had a blast with this during the Christmas holidays, turning our kitchen into a festive cookie-decorating workshop. But why limit such joy to just one time of year? We quickly realized the fun shouldn’t stop there, so we expanded our tradition to other holidays, special occasions, and often, just for the sheer joy of it.
Why No-Bake Minion Cookies Are a Brilliant Idea
For this particular Minion adventure, we made a strategic decision that simplified the process immensely: we opted for store-bought cookies. This choice was a game-changer for several reasons. First and foremost, it meant we didn’t have to fire up the oven, which is always a massive plus during the warmer months. Keeping the kitchen cool while still enjoying a creative, hands-on baking (or rather, no-baking) project is a win-win in my book. The simplicity of starting with pre-made cookies allows you to dive straight into the most enjoyable part: the decorating! It cuts down on prep time, reduces cleanup, and makes this project accessible to even the busiest families or those new to kitchen crafting. These adorable Minion cookies are perfect for parties, movie nights, or just a delightful afternoon snack that kids will adore helping to create.
Gathering Your Essential Supplies for Minion Magic
Creating these delightful Minion cookies is surprisingly simple and requires just a few key ingredients. The beauty of this recipe lies in its minimalist approach, focusing on vibrant colors and playful details that truly bring our favorite yellow characters to life. Here’s what you’ll need to gather to get started on your edible Minion army:
- Vienna Finger cookies: These rectangular cookies provide the perfect base, mimicking the Minions’ cylindrical shape. Their flat surface is ideal for dipping and decorating.
- 1 (10-ounce) bag yellow candy melts: This will be the iconic Minion yellow skin. Candy melts are easy to work with and provide a smooth, vibrant finish.
- 1 (10-ounce) bag blue candy melts: Essential for their signature denim overalls. This adds a crucial splash of color and character.
- Edible candy eyes: These are a must for giving your Minions their expressive, goofy, and sometimes bewildered looks. You can find them in various sizes to create one-eyed or two-eyed Minions.
- 1/2 cup semi-sweet chocolate chips: This will serve multiple purposes for drawing details like their goggles, straps, hair, and wide smiles.
- Wax paper or parchment paper: Crucial for drying your dipped cookies without sticking.
- Microwave-safe bowls or a double boiler: For melting your candy melts and chocolate.
- Small spoons, toothpicks, or a piping bag with a fine tip: For applying the chocolate details.
A Detailed Guide to Crafting Your Cute Cookie Minions
Let’s get down to the fun part – transforming simple cookies into delightful Minion characters! Follow these easy steps for a smooth and enjoyable decorating experience:
Tips for Achieving Minion Cookie Perfection
Even though these are simple no-bake treats, a few tips can elevate your Minion cookie game:
- Optimal Candy Melt Consistency: If your candy melts seem too thick for dipping, you can thin them slightly with a teaspoon of paramount crystals or a very small amount of coconut oil or vegetable shortening. Add gradually, stirring well, until you reach a smooth, flowing consistency.
- Even Dipping: For a clean line, gently tap the cookie against the edge of the bowl after dipping to remove excess coating. This prevents drips and ensures a smooth finish.
- Quick Setting: If you’re short on time, you can place the wax-paper-lined baking sheet with your dipped cookies into the refrigerator for 5-10 minutes to help the candy coatings set faster.
- Chocolate Detailing Mastery: For precise lines with chocolate, a disposable piping bag with a small round tip (like Wilton #2) works wonders. If you don’t have one, a Ziploc bag with a tiny corner snipped off can serve as a makeshift piping bag. For fine details, a toothpick dipped in chocolate is also a handy tool.
- Alternative Cookie Bases: While Vienna Finger cookies are ideal, you can experiment with other rectangular or even oval-shaped cookies if you prefer. Just ensure they have a relatively flat surface for easy dipping and decorating.
Overcoming Challenges: The Edible Marker Saga and Creative Solutions
No creative project is without its little challenges, and our Minion cookie adventure was no exception! I had originally purchased edible markers, envisioning perfect, precise lines for the Minions’ goggles and smiles. However, to my dismay, they simply would not work on the candy-coated cookies. I’m still not entirely sure why – perhaps it was the specific texture of the candy coating, or maybe the markers themselves just weren’t compatible. Whatever the reason, it taught us a valuable lesson in adaptability and embracing “Plan B.”
That’s when we pivoted to using melted chocolate instead. Yes, it was a little messier, and admittedly, the lines weren’t quite as pin-straight as I might have achieved with a fine-tipped marker. But you know what? It didn’t matter one bit! The little cookie Minions still turned out absolutely charming. We’re not professional bakers or decorators here; we’re just a family having fun in the kitchen. And besides, these cookies were destined to be devoured anyway! The slight imperfections only added to their homemade character and charm. These delightful cookies would undoubtedly be an absolute hit at any Minion-themed party, bringing a personalized touch that store-bought treats simply can’t match.
And as for those edible markers that wouldn’t cooperate with our cookies? My resourceful daughters found an alternative use for them, turning their wrists into canvases for some impromptu DIY body art. It just goes to show, sometimes the greatest fun comes from unexpected detours!
Minion Cookies: The Ultimate Party Pleasers
Imagine a vibrant Minion-themed birthday party, a fun movie night with the family watching the latest Minions adventure, or even a school potluck that needs a touch of whimsy. These no-bake Minion cookies are the perfect addition to any event! They are incredibly eye-catching, appealing to both children and adults, and their familiar faces instantly bring a sense of joy and playfulness. Serving a platter of these homemade treats not only provides a delicious snack but also acts as a fantastic decorative element that ties into your theme beautifully. Guests will be delighted by the effort and creativity, and the kids will love showing off their favorite characters in edible form. Plus, since they’re easy to make in large batches, you can effortlessly cater to a crowd without breaking a sweat in the kitchen.
Embracing the Joy of Simple, Creative Treats
So, whether you’ve got a passionate Minion lover in your home, are planning an epic Minion party, or simply want a fun and easy kitchen craft for a rainy afternoon, these adorable cookie Minions are an absolute must-try. This project proves that you don’t need elaborate baking skills or fancy equipment to create memorable and delicious treats. It’s all about having fun, getting creative, and enjoying the process with your loved ones. Whip up a batch (or ten!) and watch the smiles erupt. We hope you and your family have as much fun making and devouring these delightful edible Minions as we did!
Thanks for stopping by and happy decorating!