
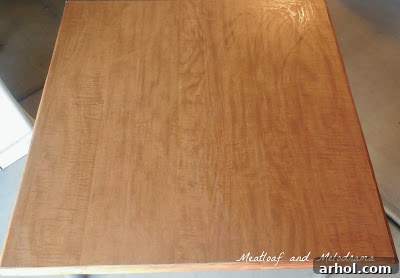
Hello fellow DIY enthusiasts and home decor adventurers! Today, I’m thrilled to share a recent project that transformed a rather unloved, budget-friendly find into a vibrant centerpiece for family fun. My husband and I recently embarked on a semi-reluctant but ultimately rewarding expedition with our typically energetic (but sometimes easily bored) children to our local thrift store. It was one of those glorious days where all donated merchandise was half off, a siren call for any avid thrifter. After a quick scan, we stumbled upon an unassuming coffee table. It was, to put it mildly, unremarkable. Yet, for a mere four dollars, it held the promise of a creative canvas. We scooped it up, envisioning its potential, despite the kids’ initial protests about its plainness. This simple, inexpensive purchase was about to embark on a journey of transformation, proving that sometimes the best treasures are found in the most unexpected places, waiting for a little imagination and a splash of paint to bring them to life.
My immediate thought for this humble coffee table was to give it a simple coat of paint and designate it for our loft area. It seemed like the perfect spot for the kids to use it for various activities – building intricate LEGO structures, engaging in lively board games, or coloring masterpieces. This seemed like a straightforward, low-effort project, but as often happens with creative endeavors, a more ambitious idea began to sprout. “Why not make it a checkerboard table?” I mused, suddenly captivated by the vision of a functional, interactive piece of furniture. This ingenious concept meant it wouldn’t just be a surface for play; it would be the game itself, constantly inviting engagement. The table’s top featured some sort of veneer, which meant proper preparation was crucial for a durable finish. My ever-supportive husband took on the task of sanding the veneer, meticulously preparing the surface for what would come next. Sanding is a vital step often overlooked, as it creates the necessary texture for the primer and paint to adhere effectively, ensuring the longevity and quality of the finished piece.
Sanding the veneer was a critical first step, establishing a foundation for all subsequent layers. Veneer, a thin layer of wood, can be tricky to paint if not properly prepped, as paint may not adhere well or could peel over time. My husband carefully worked to scuff the surface, removing any existing sheen and creating a slightly rough texture that would “grip” the primer. This process isn’t just about making the surface look uniform; it’s about engineering a bond that will withstand years of enthusiastic playtime. Once the sanding was complete and the dust meticulously wiped away, we moved on to the priming stage. We opted for a spray-on primer, a choice that significantly streamlined the process. Spray primer offers an incredibly smooth, even coat without brush strokes, which is ideal for achieving a professional finish, especially on flat surfaces like a tabletop. It adheres beautifully to the sanded veneer, creating an opaque, uniform base that locks out stains and ensures that the final paint colors will appear true and vibrant. This meticulous preparation ensured our checkerboard table would not only look fantastic but would also be durable enough to withstand countless rounds of chess and checkers.
With the primer thoroughly dry, we were ready to apply the base coat. We chose a classic black spray paint, knowing it would provide a strong, elegant contrast for the checkerboard squares. Spraying the entire table required a steady hand and an even application to avoid drips and ensure consistent coverage. We applied several thin coats, allowing each to dry completely in between, which is crucial for a smooth, professional-looking finish. This layering approach prevents cracking and promotes better adhesion. Once the black base was perfectly dry, the real artistry began: marking off the squares for our checkerboard. This step demands precision and patience. We carefully measured the tabletop, dividing it into an 8×8 grid, which is standard for chess and checkers. Using high-quality painter’s tape, we meticulously outlined each square, pressing down firmly along the edges to prevent any paint bleed. The key here is accuracy; even a slight misalignment can throw off the entire aesthetic of the board. This detailed taping process is arguably the most time-consuming part, but it’s absolutely essential for achieving those crisp, clean lines that define a checkerboard pattern. The anticipation grew as each square was meticulously taped, foreshadowing the vibrant pattern soon to emerge.
For the contrasting color of our checkerboard squares, I found serendipity in an unexpected place: a sample pot of off-white latex paint. This particular shade had originally been purchased as a test color for our bedroom walls, but it turned out to be not quite right for that purpose. However, its soft, creamy hue was absolutely perfect for this coffee table project! It provided a beautiful, subtle contrast against the stark black base, creating a timeless and inviting aesthetic. Using a small brush, we carefully painted inside the taped-off squares. This is where the firm application of painter’s tape truly paid off, as it created a sharp barrier, ensuring the off-white paint stayed exactly where it belonged, preventing any frustrating bleed-through. I was incredibly fortunate to have the enthusiastic assistance of two of our kiddos during this phase. Their eager hands, guided by my supervision, made the painting process fly by much faster and added an extra layer of family bonding to the project. Their involvement made it more than just a table; it became a shared creation, imbued with their effort and excitement. It’s amazing how a paint color that was a “miss” for one project can be an absolute “hit” for another, proving that sometimes, the best solutions are found in our existing supplies.
Once the off-white paint was dry to the touch, we very carefully peeled away the painter’s tape. This moment is always a mix of excitement and trepidation, hoping for crisp lines and no paint bleed. To my absolute delight, the lines were incredibly sharp and clean, creating a perfectly defined checkerboard pattern. The transformation was already stunning! To add an extra touch of polish and ensure immaculate edges, I used a white paint pen and a ruler to meticulously go over all the lines. This final detailing step tidied up any minuscule imperfections and truly made the checkerboard pop, giving it a professional, finished look. While I’m still relatively new to the world of furniture painting and DIY projects of this scale, I was genuinely impressed with how wonderfully it turned out. The satisfaction of taking an old, discarded item and turning it into something so functional and beautiful is immense. This project has certainly ignited a new passion within me, and I’m already eagerly anticipating my next thrifting adventure, searching for another overlooked piece with hidden potential just waiting to be uncovered and reinvented. The possibilities are truly endless when you approach old furniture with a creative eye.
Since its grand unveiling, this little coffee table has become a beloved and highly utilized fixture in our home, far exceeding our initial expectations. It’s no longer just a place to set drinks; it’s a hub of activity and friendly competition. We wasted no time ordering a set of classic chess pieces online, and having a ready-made chess table means we can spontaneously dive into a game whenever the mood strikes. There’s something incredibly inviting about a permanent game board, always ready for play, that encourages more family interaction and less screen time. While I confess I’m not exactly a chess prodigy – even my youngest, a spirited six-year-old, manages to outmaneuver me more often than not – the joy is in the playing, not just the winning. The laughter and concentration around the table are priceless. Perhaps I’ll need to put a request in with Santa for a set of checkers this year, or maybe even dominoes, to expand our game night repertoire. This project wasn’t just about painting a table; it was about creating a dedicated space for connection, learning, and making cherished family memories. It’s a testament to how a small DIY effort can bring significant warmth and entertainment into a home.
This thrift store coffee table makeover perfectly encapsulates the joy and immense satisfaction that comes from upcycling. Beyond the obvious financial savings, giving new life to an old piece of furniture is a wonderfully sustainable practice, reducing waste and contributing to a more eco-conscious lifestyle. It’s also an incredible way to inject personalized style into your home, creating unique pieces that reflect your taste and tell a story, unlike anything you could buy new from a big-box store. Every scratch and ding on this table, whether from its past life or its new one, adds to its character and the memories made around it. If you’ve been contemplating a DIY furniture project, I wholeheartedly encourage you to take the leap! Start with something small, visit your local thrift store, and let your imagination guide you. You might be surprised at the hidden potential waiting to be uncovered, and the profound sense of accomplishment you’ll feel when you transform something ordinary into something extraordinary. This checkerboard coffee table is a constant reminder that with a little effort, creativity, and a few dollars, you can create functional art that brings endless joy to your family. It’s more than just a table; it’s a testament to the power of transformation and the beauty of handmade love.
Thank you for joining me on this creative journey! I hope this project inspires you to look at everyday items with a fresh, imaginative perspective. Until next time, happy crafting!
Dee